Attracting birds to the site is both useful and enjoyable. It is useful because they destroy pests, it is pleasant to listen to their singing and observe the behavior of birds. Therefore, many come up with the idea - to build a birdhouse with their own hands. People over 40 years old, while they can remember their school years: at the lessons of labor, the boys made houses for birds. But not only site owners make birdhouses. Often residents of apartment buildings hang them on trees near the house, on balconies and loggias.
What to do
The answer is unequivocal - from wood, and hardwood: conifers are too resinous. Resin can stain the plumage, leading to the death of the bird. Do not use plywood, or. Rarely does anyone settle in such birdhouses: glue and binders scare away birds. For the same reason, we assemble and fasten blanks only on nails or screws, we do not use glue.
Most often, birdhouses are made from boards. The thickness of the boards is at least 20 mm. This thickness is sufficient to maintain a stable temperature inside, which is important when hatching chicks. Moreover, the boards are needed unplaned, in any case, the inner surface should be rough. The front part under the notch is also specially scratched: along these notches, chicks and birds rise to the notch.

To prevent cracking of the boards during assembly, we pre-drill holes for the screws. The diameter is slightly smaller than the diameter of the screw.
Sizes of birdhouses for different types of birds
To attract different types of birds, the size of the house should change. The proportions of the “body” itself and the letok change mainly. The task is to create more familiar nesting conditions for this species.
| bird species | Bottom dimensions | Birdhouse height | Notch dimensions | Note |
|---|---|---|---|---|
| Starlings | 10*10cm | 30-40 cm | about 5 cm | letok is preferable to a round shape |
| Sinichnik - tits, flycatchers, redstarts, sparrows, pygmy owls | 10-12 cm | 25-30 cm | 30-35mm | notch round |
| Small titmouse or flycatcher (flycatcher, redstart) | 10*8cm | 25-30 cm | 30 mm | |
| Poluduplyanka | 10*8cm | 20 cm | height 33-50 mm across the entire width of the wall | letok - a longitudinal slot in the entire width of the front wall |
As you can see from the table, basically only the height changes. The width remains more or less stable. It's not worth making birdhouses anymore. They will stimulate to lay more eggs, and the birds will not be able to fully feed a large number of chicks, as a result, the offspring will be weak and, most likely, will die.

If you want to attract wagtails, make a birdhouse laid on its side: it will be 10-12 cm high and 35-40 cm wide, with the same small entrance located approximately in the middle. Wagtails have weak legs, and they cannot climb the high wall to the entrance. Therefore, such a choice of nesting. in the wagtail, it is also desirable to make a trapik about 10 cm wide in front of the entrance - so that they can enter on foot.

Some explanation is required for the half-hollow. Some birds are used to nesting not in hollows, but in depressions between branches. In a completely closed artificial nesting place, they rarely settle. If you want to attract, for example, a gray flycatcher, make a small box for it, in which the notch goes the entire width of the front wall.

Just keep in mind that some types of squirrels also like to settle in such houses.
There is another nesting place that birds often like more - the nest box. This is a birdhouse, hollowed out from a piece of log. Often a dried tree is sawn into logs of a suitable size, turning it into apartments for birds. The height and diameter are selected based on the dimensions that were indicated for an ordinary birdhouse. The bottom and roof in the hollow are made from a piece of board.

Duplyanka - a birdhouse made of logs
Safety
It's a shame and a pity when the nests of birds are ruined. Cats are mainly engaged in this, and even woodpeckers. Therefore, when you make a birdhouse with your own hands, increase the overhang of the roof. In almost all drawings, it is drawn 5 cm long. In order to protect the birdhouse from the cat, it is necessary to make sure that he cannot reach the notch. To do this, the roof should protrude by at least 7 cm, and it is better to add a couple more - for large specimens. This ledge will also protect from slanting rain: the chances that the chicks will get wet becomes even less.
Another option is to put nails on the lid. The cat is unlikely to get hurt, but it won’t work to sit comfortably - they won’t give nails.

There are several ways to protect chicks from woodpeckers:
- beat the notch with tin:
- drive a few nails around the notch;
- nail an overlay made of wood on the notch area, the fibers of which run horizontally.
All this will prevent the woodpecker from expanding the notch and getting to the eggs or chicks. The last trick - the overlay - will also complicate the task for the cat: it is more difficult to reach the chick through a long entrance.

Measures against enemies: 1 - from woodpeckers, 2.3 - from cats
They are still saved from cats and possible invaders with the help of protective belts. They are made either from tin strips or from “brooms”. You will understand everything by looking at the picture. Please note that the distances must be maintained within an accuracy of 3-4 cm. Then the animals will not be able to jump over the protective belts. There should not be knots, feeders and other possible supports between them and the birdhouse.
Where to hang
Where to hang a birdhouse is also a science. If they gathered to hoist on a tree, then at a height of at least 2.5-3 meters. There should not be paths or busy metas near the selected tree - a well, a bench, etc.

When choosing a place on a tree, keep in mind that there should not be large branches in front of the entrance: the approach should be free. At the same time, you need to deploy it so that the “window” looks south. All this increases the chances that tenants will settle in your birdhouse.
Another point: you need to tie or nail so that the “house” is tilted slightly forward. So it will be easier for the chicks to get out, and less rain will clog.
How to make a birdhouse with your own hands: photo report
We will do the easiest option - with a flat roof. As already mentioned, we take non-planed hardwood boards with a thickness of 20 mm or more. To avoid splinters, it is better to work with gloves. We cut the blanks according to the drawing. Try to keep the saw cuts even and at a right angle: there should be no gaps. Immediately after hatching, the chicks are without plumage, and the slightest draft can kill them. Therefore, all edges must be even.

We take long thin nails - diameter 1.5-2 mm, length 4-5 cm and a hammer. We start assembly. We nail the sidewalls to the front part at a right angle. For each - three or four nails.

Turning the workpiece upside down, take the bottom, insert it, align it. We nail to the sides. From above we cover with a back wall, we also nail. Do not forget about the connection of the back wall with the sidewalls.

Turning the notch up, we nail the bottom also from this side. It remains to assemble the roof. We take the remaining square - a double of the bottom, nail it so that the visor sticking out in front is at least 5 cm (preferably 7-10 cm, as they said before). If the nails stick out, bend them.

The roof just needs to fit snugly. If something interferes, we earn money with a chisel. That's all, the birdhouse is ready with your own hands.

Often a perch is installed under the entrance. Is she needed or not? If there are enough branches around, it is better not to do it. If there are no branches, you need to either make a perch or a small shelf, although you can do without them. Why? Because cats also rely on them and it is easier for them to reach the chicks with support.
How to make a titmouse, see the video
We make a nest box - a birdhouse from a log
If the feathered people have a choice - to settle in a nest box or a birdhouse made of boards - they will choose a nest box. It is more like the usual "housing" - a hollow, it has no slots on the sides and, therefore, it is warmer. They are less noticeable on the tree, which means more chances to grow offspring. This is a plus from the bird's point of view. Now about the pluses from the point of view of "manufacturers": a fallen tree goes into work, and it is free. If you find a suitable one, it will be enough for a large number of birdhouses. About the minuses - making hollows is longer and more difficult: you have to manually pick out the core, leaving the walls intact.

Now about how to find a suitable tree. Aspen is best suited: it usually rots from the inside, and remains hard along the outer edge. Therefore, we go in search of an aspen forest, and there, among the fallen trees, we look for a suitable one: we cut several trunks. It is important to find with a whole edge and a rotten middle - the work will go faster.

It is desirable to find such an aspen - with a rotten core, but strong edges
Often such trees have rotten bark, which makes them look unsightly. We clean off the bark, pull the log to the dacha or to the house. There we cut into logs of a suitable size. Dimensions are determined by the diameter. For a birdhouse, the inner diameter of the nest box should be 22-30 cm, respectively, the outer diameter should be 27-36 cm.
The height of the block of wood also depends on the type of house - a titmouse 20-40 cm high (but they are more likely to settle in low ones), a birdhouse - from 30 to 45 cm. precipitation dripped from the roof. For the manufacture of roofs and bottoms, you will need trimming boards, you can use unedged and slabs.
We take a cut off block of wood and begin to pick the core with a chisel. The task is to dig a through hole. After that, even hard wood is easier to chip. To make the process go faster, you can drill holes with a drill, then break out the jumpers with a chisel.

The task is to dig a through hole
As a rule, the rotten core ends quickly, then you have to chip off pieces of wood with a chisel and a hammer or mallet. But with a hole in the center, it is much easier - longitudinal pieces are chipped off, work goes on at a normal speed.

The walls should remain about 1.5-3 cm. We try to work out the middle more or less smoothly, without large chips. When the walls are selected, we make a notch. If there is a knot, you can hollow it out. Or take a bark and a drill, drill in a suitable place. If there is no crown, we take an ordinary drill, drill holes in a circle, then, using the same chisel, we cut through the remaining jumpers.

A piece of board 2-2.5 cm thick goes to the bottom. It is nailed or screwed onto self-tapping screws. The protruding parts are cut as close to the walls as possible.

It remains to nail the roof. The same board or slab will do. Before screwing in the self-tapping screw, drill holes, otherwise the board may split.

Actually, you have already made a birdhouse with your own hands, it remains to protect it from woodpecker attacks. If there are knots on the walls, it is advisable to coat them with plasticine (regular, for children). They can also close up the gaps that remain between the bottom and the roof and the walls: it is rarely possible to fit everything clearly. If you do not want to cover with plasticine, you can caulk with a hemp rope. It is applied to the slot, and driven into it, with a flat screwdriver (actually, there are special blades for caulking, but they are large - this is the time, and for “one-time use” they should be bought ...). If it "goes" badly, you can knock on the handle with a hammer.

Caulking "seams" with hemp rope
How to decorate a birdhouse
While the birdhouse is new, it looks relatively good, but after a couple of months it will darken. For birds, this is good - it will become less noticeable and they will only benefit from this. But not all homeowners like to look at such an unsightly “decoration”. To improve the appearance, the birdhouse can be painted, but you need to choose “natural” colors - brown, gray, shades of green. Do you want your birds to survive? This means that their nest must be masked, and not painted in all the colors of the rainbow, attracting all possible predators.


And this one is just ideal - no gaps in the floor))

Sinichnik is inhabited

Beautiful decoration and disguise
We hope that now you can not only make a birdhouse with your own hands, but also competently (from the point of view of birds) decorate it.
Dimensional drawings
Some drawings of birdhouses are in the text, we post a few more in this section. Correcting the dimensions for the planned "residents" is probably not a problem. Also note that the layout is given for a board with a thickness of 2 cm. If the thickness is increased or decreased, adjustments are necessary.

Birdhouse with a triangular roof: drawing, dimensions


Sloped roof birdhouse (front wall higher)
Half of humanity already lives in cities and large population centers, and by 2050, about 9.7 billion people will live on earth. And what about here birds and birdhouses? But, precisely for this reason, the movement and distribution of wild flora and fauna are becoming more and more limited. The larger the city, the more difficult it is for animals and birds to adapt to changing environmental conditions. Nevertheless, nature takes its toll and there are many species of birds that live in the city or just next to a person.
Humans and wildlife must share a limited habitat. Of course, not all wild animals have the ability to adapt to new conditions. Although it can be repeated that the city is a habitat for many species of birds. And if you want to make life easier, cozier and more comfortable for birds, you can build a birdhouse for your feathered friends.
So, you want to build a bird house, make a birdhouse with your own hands? And at the same time, not just an ordinary birdhouse, but something interesting, not standard and impressive? A very good idea, for several reasons. Of course, you can just buy a birdhouse, but it will be much more interesting to make it yourself. When you make a birdhouse yourself, you have the opportunity to determine the size, appearance and shape of this birdhouse. Also, in this exciting and creative process, your children will be happy to help you, and the process of work and the result will bring a lot of positive and sincere feelings. You can even explain to the children that local birds will move into the house a little later.

Whether it is a starling, a thrush, a warbler or a common sparrow - all these birds have a special place in the ecosystem. True, in recent years the number of birds has slightly decreased - birds are considered a natural sensor, the purity of the environment. For example, in the US, some realtors estimate the total cost of houses, taking into account the presence or absence of birds near the property. Therefore, even a little help to birds is important and useful for protecting nature, and this does not require a lot of money, you only need your desire and imagination.
In order to better watch birds, you can make a birdhouse with your own hands and install it within visual reach from the windows of your house or apartment. Thus, the children will be able to rejoice, and you will be interested in it. If you don't have tall trees, you can install your "work of art" on a special platform.
2. What are birdhouses. Choose the right birdhouse
If you are used to work then this article is for you. You can make a standard birdhouse, according to standard sizes and drawings, but put aside this option and come up with something original and unique.
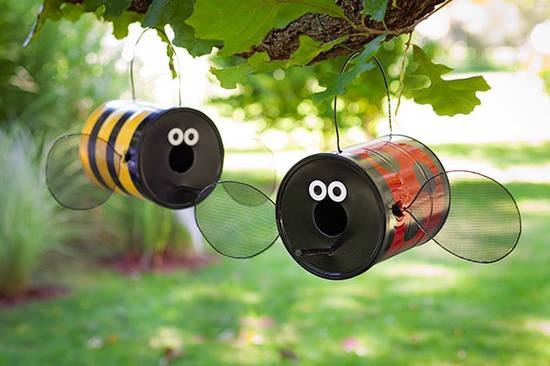
Most often, wood is used to build a birdhouse. However, with a creative approach, you can choose the basis for your future house from a number of interesting materials: it can be a plastic water bottle, a coffee can, a tea can, old shoes, an old lantern, a wicker basket, ceramics and much more. .
By the way, if you are a supporter of the traditional wood material and you have time, and your hands work correctly, make not just a small wooden birdhouse according to standard sizes and drawings, but a castle or even a city for birds. And you will realize very quickly that the whole process is actually not as complicated as it seems. The question is not HOW make a birdhouse, the main question is WHAT birdhouse to choose.
If you haven't already, take a look at these photos. Presented below photo of birdhouses will satisfy any taste and you can take one of these ideas as the basis for building your personal "masterpiece" and make a birdhouse with your own hands.

It looks like a fairytale gingerbread house, but it's actually clay and acrylics.

And it is difficult to call it a birdhouse, a whole installation where the birdhouse becomes the culmination. Difficult to perform, but worth it.

Almost standard, but the sloping roof, spring coloring and little details make this birdhouse cute and unique.

From the series: I blinded you from what was. But it is definitely fast and not at all expensive.

Reminds me of a house of horrors from a famous American movie, however, if the overall setting is suitable - why not?

A two-story blue antique painted wooden birdhouse with a dragonfly and a flower. Simple and tasteful.

This is not just a birdhouse, this is a solid townhouse for as many as 6 families. If there were no bird doors, it could be mistaken for a real house.

A rural option for budget housing for birds.

It is possible that some birds are interested in witchcraft, and perhaps there are witches among them ...

Giant forest high-rise building. I wonder who lives in such a bird house?

It was not easy to make such a birdhouse, but now UNCLE TOM'S HUT is just a real decoration for any summer cottage and country house.

A budget option for a birdhouse made of wine corks. But light, warm and not expensive, but at the same time original.

A classic of the genre, but the original coloring changes things radically.

A whole network of birdhouses in the style of the old Slavic cordon.

Cheerful bright coloring, a little creativity and each birdhouse is individual and cannot be repeated.

Choose an Arab tower to your liking. In this case, a living tree for fastening is not required.

Just a tea tin box, but it looks solid and reliable.

Do you want to make a bird house in 5 minutes? Then this is your choice 🙂 Two empty nescafe jars, colored duct tape and two birdhouses are ready.

From the same budget series. But it is bright, simple and the eye rejoices.

Housing for serious birds. Dedicated to lovers of the East. What could be better for them than a birdhouse in the form of a Chinese pagoda?

A very small bird house, but made with a certain idea and some grace and accuracy.

Old boots are a great solution for a fun birdhouse and backyard in the old Russian style.

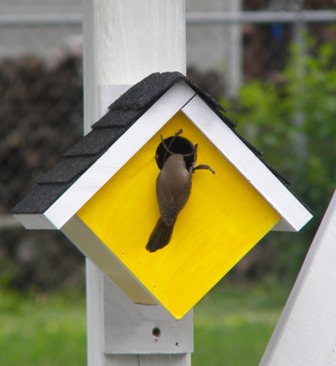
Birdhouse - a house in bright sunny colors pleases the eye and enlivens the landscape of the site.

Grandfather is a lumberjack. Of course, not everyone can make such a bird house, but it is for a long time and solid.

A small, simple house made of wood with a car sign roof. Yes, of course, everything is simple, but the design is thoughtful and functional.

Birdhouse with a green roof. Unusual and close to nature.

Small house - trailer. The original wooden house.

Modern version almost in high-tech style. But how interesting will the residents feel in it?

Painted classics - a birdhouse - a house with windows. No frills, but nice and elegant.

Wooden models in solid colors with green roof decoration. Perhaps this is your option.

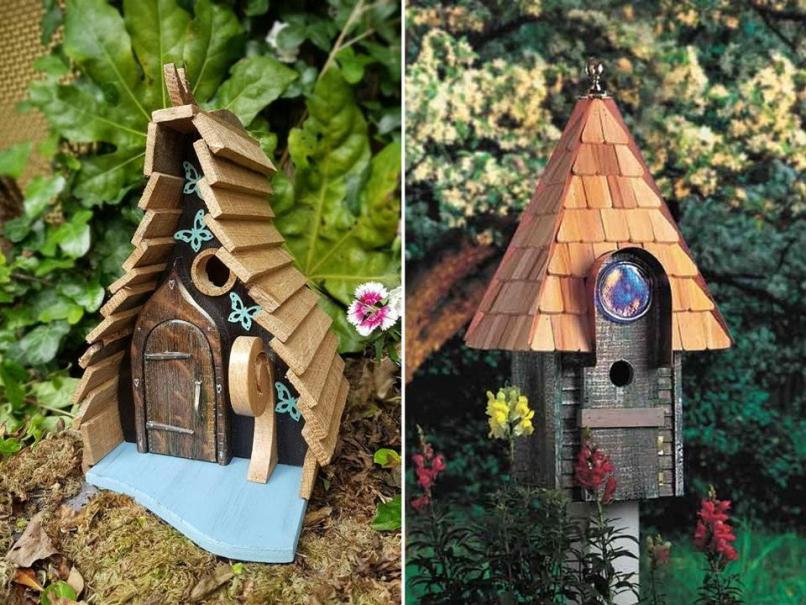
A whole house with many details and realistic elements. Such bird houses are valued the most. Indeed, such a work can be of interest to anyone.

A light, elegant version of a neat birdhouse, the houses are decorated in bright colors and decorated with decorative elements.


A solid antique wooden house, with regard to both the processing of the material and the method of painting the model.

Another version of the design house. Antique painting, reliable roof.
3. Unusual birdhouses from Jay - 15 copies
Jay R., a professional little bird house maker, has been doing this for over 7 years. Moreover, over the past few years, its products have been successfully sold on Internet sites and specialized stores. Today, anyone can buy the results of his work from anywhere in the world.
The cost of unusual birdhouses from Jay starts from 70 USD, and he lives in the UK. Jay is especially passionate about his work and elevated it to the rank of some kind of art. However, judge for yourself.


4. Where to buy a birdhouse? How much does a birdhouse cost?
For the laziest 🙂 If after looking at everything photo of birdhouses If you didn’t dare to do something of your own and thought about purchasing a birdhouse, then further information is just for you. O the price of a birdhouse. In the spring, on any construction market, you can purchase a standard birdhouse starting from 300 rubles apiece.
You can also choose a standard birdhouse, but covered with a bright pattern, on the Yandex market at a price of 500 rubles.
And finally, it is possible to order not just a standard birdhouse, but a mini bird house at one of your favorite foreign online stores, which will cost you about $30.
P.S. Before buying a birdhouse, try to make the simplest birdhouse with your own hands ...

Gardeners attract birds to their plots for a reason. It is pleasant to listen to the birds singing, to observe their behavior and the maturation of the chicks. And most importantly, the singing family is able to rid the garden of bugs and pests. If you make do-it-yourself birdhouse and hang it among fruit trees, there will be no need to use insecticides to protect garden plants. Biologists have calculated that chicks can eat almost as many larvae and bugs every day as they weigh themselves.
Who will live in the house?
Closer to warm spring days, birds return home from warm lands. For swifts and wagtails, starlings and flycatchers, swallows and titmouse in early spring, there is not enough food, and there is nowhere to hide. It is impossible to predict which feathered family will settle in the prepared house. One thing is known: in order to feed their brood, starling parents bring their children about a thousand larvae and beetles per week.
If a birdhouse (do it yourself made or bought in a store) will remain in the garden for the winter, sparrows or titmouse will settle in it. However, with the onset of spring, the "legitimate" owners (starlings) will evict the tenants and occupy the dwelling.
For flycatchers, which also live in garden plots, smaller huts are built than birdhouses, but according to the same scheme. But for pikas, you need a teremok with two additional through holes in the side walls.

The dimensions of the notch in the house for titmouse should be no more than 3-3.5 cm. And housing for settling with wagtails should not have a perch under the entrance, but a small stand - a trap. The paws of this bird do not have sufficient tenacity.
Important! Before you start making a shelter for birds, first decide for whom exactly it is intended, since the dimensions of the dwelling must correspond to the size of the bird.
What is the difference between a birdhouse and a feeder
In the frosty and snowy winter months, people help the birds survive. Small devices and devices for feeding birds are called "feeders". Birdies are treated not only to bread crumbs. Titmouse love to peck on pieces of fat. Other birds will not refuse grain and rowan berries. Feeding troughs look like hanging mini verandas. This is a kind of bird dining in the open air.
DIY birdhouse make it more closed. In such towers, a feathered family builds a nest in the spring and hatches chicks. This dwelling should be inaccessible not only to predatory crows, but also to cats. If the feeder can be made even from an ordinary plastic bottle, then the house for permanent residence should be not only strong, but warm and reliable.
"Duplyanka" is a birdhouse made from a single piece of log with a hollowed out core. The round entrance resembles a natural hollow, which gave the house its name.

What materials do craftsmen use to make a home for birds? Natural ones are best, such as:
- wood;
- plywood;
- rough boards;
- waterproof cardboard;
- gourd lagenaria.
To improve moisture-resistant properties, ready-made birdhouses are treated on the outside with a protective agent.
Important! Birds do not like sharp smells of paint and drying oil. Therefore, acrylic enamels or wax impregnations are used for coating.
About birdhouses and design ideas
Even an old sneaker can find a "second life" as a birdhouse if you fix it on the board and then on the tree with the heel part up! Pichugi will live it with pleasure.

Gets very warm do-it-yourself birdhouse, made from pieces of thick felt or knitted from coarse woolen threads. Above such little houses, an additional roof made of plastic or tin is necessarily fixed to protect against rain.
Important! Housing should be comfortable and safe for the feathered family and their chicks.
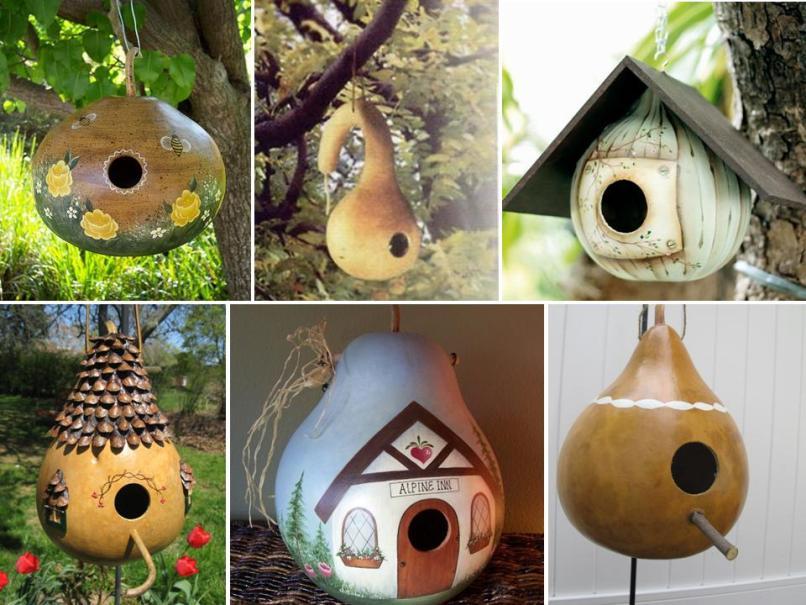
One of the interesting and easy-to-make options is a bird's hut made from gourds - gourds (lagenaria).

The sequence of work is as follows:
- take the dried fruit without cracks and damage;
- wash its surface with a rough sponge and hot water from possible contamination;
- dry well;
- mark with a simple pencil a place for a notch (entrance to the house);
- cut a hole with a sharp knife and clean its edges with a piece of sandpaper;
- shake out the seeds from the pumpkin;
- pierce a hole under the notch with an awl and insert a stick into it, previously lubricated with PVA glue;
- pierce the top of the pumpkin across the “tail” and thread a strong twine into the hole;
- lovers of drawing will be able to color an unusual do-it-yourself birdhouse;
- cover the finished house with a protective layer of acrylic varnish;
- hang a designer birdhouse on a tree or pole.
Such an unusual and beautiful nesting will serve as a decoration of the garden, will bring double benefits. After the departure of the grown chicks or in the fall, the product is removed, freed from feathers, straw and other residues, disinfected, dried and cleaned until next spring.
Simple and cost-free
The most budget option for making a birdhouse is a house from a juice bag. 15-20 wooden ice cream sticks are prepared in advance. The package is washed from the remnants of the juice, dried, a hole is cut with a knife for an entrance with a diameter of 5-6 cm. The entire surface of the package is glued on the outside with chopsticks (to look like a hut). From the inside, a small rough board is attached to the front wall so that the chicks can get out. A rope is threaded through the top of the package, for which the house is hung on a tree branch. Teremok is ready to receive guests.

Classic wooden birdhouse
DIY under the power to make not only a simple hut, but also a fairly solid housing for feathered friends. You will need the following tools and materials:
- wooden boards up to 2 cm thick;
- a pole and wire for attaching a birdhouse;
- ruler or square;
- simple pencil;
- a hammer;
- screwdriver;
- jigsaw or saw;
- drill;
- PVA glue;
- nails or screws.
Blanks are marked on the boards and cut out in accordance with the dimensions.

On the front wall, a notch with a diameter of 5-6 cm is sawn through at a height of about 10-15 cm from the bottom. Traditionally, the entrance hole is made round, and its dimensions should correspond to the size of future residents. This must be taken into account so that neither a crow nor a cat can climb into the nest and drag off the chicks.
A hole is drilled just below the notch and a stick is inserted into it, 8-9 cm long. On this perch, the birds will rest and announce the surroundings with their trills. Sometimes the enemies of starlings and flycatchers also use this wand.
The lid is fixed at an angle to prevent water from entering the house. To do this, 2-3 cm are cut off on both side walls towards the front part. The inclined plane of the roof, in addition, prevents the predators that have climbed onto the birdhouse from keeping their balance.
Important! The inside of the front wall must be rough, otherwise the chicks will not be able to get out. If the boards are smooth, small notches are made on their surface.
Assembly of finished parts of the house
First, a pole is nailed to the back wall of the birdhouse. Then, sleeve strips are attached to the inside of the lid. Moreover, there should be a distance for the visor ahead. The next step is to connect the back wall to the side parts and nail the bottom, attach the front front wall. All parts must be connected tightly, without gaps and cracks. When using nails, small holes are pre-drilled at the joints. This is done so that the wood does not burst.

The lid is not nailed, but tightly inserted from above. This is done in order to subsequently easily care for the birdhouse after it is released by the birds. The roof should protrude forward a few cm, creating a small visor above the notch.
Important! During work and assembly, it is necessary to ensure that the tips of the nails do not stick out on the inner surface of the walls. Otherwise, the birds that will live in the hut may get hurt.
How to fix a birdhouse
After the assembly is completed, it is important to choose the right place where it will hang birdhouse. DIY you need to prepare a strong wire. Do not nail a pole with a house with nails to a tree. It is tightly attached at a height above 3 meters, attached with wire to the trunk.
It is recommended to hang the bird house with a slight forward slope. To do this, use a small board, which, when installing the birdhouse, is placed under the upper part of the rear wall. This step will keep the rain out of the nest and make it easier for the chicks to get outside.
Important! The birdhouse is fixed in such a way that the entrance faces south or southeast. Then the cold winds will not blow in and the chicks will be warm and comfortable.
Both feeders and nests for feathered singers are not located in open space. Birds are very cautious and shy. They will only use the houses if they feel safe.

Do I need to care for birdhouses
Then the dwelling is dried, aired and cleaned until the next bird season.

Many gardeners pre-repair paints and outdoor surfaces so that any smells will wear off by spring. And in mid-March and early April, install cozy bird houses on your site.
When the house for the owners of the site is built, it's time to think about the rest of the inhabitants of the surroundings. Our helpers, the birds, also need housing. What it will be depends on the type of birds that need to be attracted to the garden.
"Building standards" for a birdhouse
When choosing housing, birds are guided not by the beauty and elegance of the building, but by its safety and functionality. Birds are guaranteed to settle in the garden under a number of conditions:
- the birdhouse is made of hardwood;
- the thickness of the walls of the house - at least 2 cm;
- when assembling, glue or materials based on it were not used: plywood, fiberboard, OSB.
Fresh wood of coniferous trees is unsuitable, because it releases resin that sticks feathers together. In addition, birds do not tolerate strong odors, so instead of glue, nails or screws are used to fasten parts.
From an old pine board without resin pockets, you can make a birdhouse
It depends on the parameters of the house which type of birds will choose it. Most birds recognize their future home by the size of the inlet. Notch diameter:
- for starlings - 4.5–5 cm;
- for redstarts - 3.5 cm;
- for tits - 2.8–3.5 cm.
If you cut the entrance too wide, the nest will be easily accessible to predators. And there is also a great chance that squirrels or large birds will settle there.
Squirrels are funny neighbors, if the owners of the site do not mind treating them with their berries and nuts
Try not to exceed the standard dimensions of the birdhouse:
- height - 30–35 cm;
- bottom inside - 12–17 cm.
Otherwise, the birds will hatch too many chicks, some of which will die due to underfeeding. It is better for parents to raise 2-3 healthy cubs.
Not only starlings settle in birdhouses, but also sparrows, flycatchers, swifts, all kinds of tits and redstarts.
Every bird has a favorite house design
It is not necessary to make a perch on a birdhouse. Magpies can sit on it and destroy the nest. Thresholds on the house also do not attract birds. Due to the structure of the legs, it is inconvenient for them to stand on a plane.
Birds don't need sills on birdhouses
Gallery: drawings and diagrams of birdhouses
Restless sparrows are the most common inhabitants of gardens A birdhouse with a flat roof is made in a few hours A birdhouse with a raised roof is not the safest option for birds For tits, a house with a bottom of 12x12 cm is suitable  A birdhouse with a notch diameter of 3 to 4 cm is suitable for the smallest birds. After sawing out the details of the birdhouse, grind the cut points. The simplest birdhouse for redstart is with a square notch.
birdhouse decoration
The less attention the dwelling attracts, the better for the birds. It is advisable not to paint it and not add bright details. A house made of untreated wood is the best option. In extreme cases, odorless paint is used to match the color of the bark of trees - gray, brown or maroon.
Too brightly colored thin plywood birdhouses are used only for decorative purposes - to decorate the garden, birds are unlikely to settle in them
Another thing is decor with natural materials. Pieces of bark, twigs, moss will decorate and camouflage nesting.
Bark and branches hide the dwelling from the watchful eye of predators.
Gallery: birdhouse decor
A birdhouse decorated with pebbles can scare away birds due to glare  Small tree cuts decorate the house and do not irritate the birds
  A birdhouse in the form of Baba Yaga's house will decorate any tree Wine corks will additionally insulate the walls of the house Gift birdhouse is covered with carvings Birds are unlikely to settle in a birdhouse made of branches due to numerous cracks By gluing planks onto a birdhouse painted with white paint, we get a half-timbered house
  By gluing the birdhouse with saw cuts, the gaps are closed with moss. You can stylize the birdhouse as a village house. Making a birdhouse with children, draw cartoon characters on the walls. A birdhouse is often stylized as a fairy-tale house. An interesting solution is to use a water tap instead of a perch.
  The decor in the form of a tree trunk on the facade really adorns the birdhouse. Garden designers have figured out how to combine flowerpots and birdhouse. If you can’t draw, draw the birdhouse with lines under the ruler and color it.
Birdhouse made of wooden boards with a flat roof
Spring is coming soon again and my husband and I decided to make the right birdhouse for our winged friends. Our last house was chosen by squirrels and adapted for a nut warehouse, it turned out to be too big for birds.
Now the choice fell on the simplest design of a birdhouse with a pitched roof.
Tools:
- a hammer;
- screwdriver;
- drill and drills;
- jigsaw or saw.
Materials:
- meter board 10 cm wide - 1 pc.;
- meter board 15 cm wide - 1 pc.;
- nails and screws.
Step-by-step instruction:
1. We mark the boards according to the drawing.
The drawing is needed so that all the details of the birdhouse come together
2. We cut out all the details, except for the bottom and the roof spike. With a chisel we make notches on the inside of the facade so that the chicks can climb to the exit.
While cutting the board, press it firmly against the surface so that it vibrates less.
3. We get 2 sidewalls of a birdhouse measuring 10x30 cm, a facade and a backdrop - 15x30 cm, a roof - 15x25 cm. We intentionally increase the overhang of the roof to protect against predators.
Board surfaces do not need to be sanded.
4. On the front wall, with a pencil and a ruler, we mark a notch with a diameter of 3 to 5 cm, depending on the type of birds that are expected in the garden.
Measure the middle of the bottom and sides of the facade, draw lines and mark the notch at their intersection
5. We drill a hole inside the notch circle.
First, a hole is drilled in the facade for a jigsaw knife
6. We insert a jigsaw knife into it and cut out the notch.
Move the jigsaw slowly so that the knife does not fly off
7. We stuff nails on the outer walls at the attachment points so that the points stick out a little.
If you hammer nails in advance, there is less chance that they will bend.
8. We assemble the body of 4 walls of the birdhouse in the following order: facade, side walls, backdrop.
Nails are hammered into the walls slowly so as not to bend
9. We take a board 10 cm wide, apply it to the place where the bottom of the birdhouse will be and mark the cut line. We do the same with the roof spike.
Do not cut the bottom in advance, first assemble the case and measure the actual dimensions
10. We saw off the listed details. We insert the bottom into the body and fix it with nails.
11. We nail the spike to the roof from the back.
The roof spike protects the birdhouse from rain getting inside
12. We attach the roof so that a canopy forms over the notch. We drill holes for the screws and screw the roof.
After a year, the roof can be unscrewed to clean the birdhouse
13. The birdhouse is ready.
A birdhouse made of raw boards will merge with the bark of a tree and will not attract the attention of predators
Master class on making a birdhouse - video
duplyanka
Birdhouses made of logs belong to the category of elite housing. To make a hollow, in a block of wood 30–50 cm long and 30–35 cm in diameter, the middle is hollowed out with a chisel. After drilling the notch from the bottom and top of the body, boards or saw cuts are nailed.
Starlings and tits are happy to settle in nest boxes
We make a hollow - video
Plywood birdhouse with gable roof
If there are scraps of a moisture-resistant laminated board, you can make a birdhouse out of it. However, due to toxic fumes from plywood, most likely, the house will only be a decoration in the garden.
Tools:
- screwdriver;
- drill;
- the drill is slightly smaller than the diameter of the screws;
- drill bit with a diameter of 50 mm;
- saw or jigsaw.
Materials:
- plywood;
- self-tapping screws.
Step-by-step instruction:
1. Draw a drawing.
A birdhouse with a gable roof is still better to make from boards
2. Mark the plywood and cut it.
3. Drill a notch hole on the facade with a crown. Drill a hole for the perch 4 cm below it. Make holes for self-tapping screws on all parts.
The house is assembled in the following sequence: facade, side walls, bottom, back wall, roof, perch, plank
4. Assemble the housing without the back wall.
5. Lay the structure down with the entrance, install the bottom and back wall, fasten.
6. Assemble the roof.
Holes for self-tapping screws are drilled in advance so as not to split the plywood when they are screwed in.
7. Insert the perch on the front.
8. If desired, glue the decor and paint.
Birdhouses are painted with odorless products
How to make a birdhouse with a gable roof - video
Gallery: interesting birdhouse ideas
Any birdhouse will be transformed if you cover the roof with tiles A birdhouse in the form of a barn with a sloping roof will decorate the lawn if you install it on a pole Making an apartment building for birds is a great temptation, but they will not be able to live together Old car numbers often cover roofs abroad Bird house looks stylish with an irregular roof Eco-friendly shingles for a birdhouse can be made from wood The shape of the birdhouse does not have to be strictly rectangular Birds love round houses, as they follow the shape of the nest To make an unusual birdhouse, change the shape of the roof Modern birdhouses have strict geometric shapes It cannot be guaranteed that in two families will live in a double birdhouse Birdhouses with a gable roof leak, so it’s better to cover the ridge with tin A birdhouse with a sharp roof will decorate a plot with a modern house You can try to scare away cats by placing a plywood copy on the birdhouse An unusual solution is a roof of two bedrooms fishing A rectangular notch is also suitable for birds. Sometimes decorative birdhouses are made in the form of “dancing” houses  A modern birdhouse can be very comfortable for birds Wicker birdhouse - very beautiful, but cold because of the cracks
Where and how to hang a birdhouse
The bird house is placed on a tree with a slight tilt forward, so that it is convenient for the chicks to get out of the nest. The letok is oriented to the south side so that cold winds do not blow inward. Hanging height - not less than 4 m above the ground. To prevent cats from getting to the chicks, increase the roof overhang by 5 cm from that indicated in the drawings.
Birds need to be protected from their natural enemies - cats.
To protect against feathered predators:
- beat the notch with tin;
- do not mount a perch on the birdhouse;
- make an entrance under the roof itself.
Long overhang and lack of a perch are necessary protection measures against predators
To properly fix the birdhouse on the support, the slats are screwed to the back wall. For them, the house is tied to the trunk with a wire or synthetic cord.
To prevent the strapping from growing into the bark, a wooden or rubber pad is placed under it.
Do not nail a birdhouse to a living tree with nails. This causes him severe harm, especially during sap flow.
Pipe sections are driven into the ground, into which a pole with a birdhouse is placed.
If you decide to place a birdhouse on the roof of the house, do it with an eye on the cats. Attach the bird's "cottage" to a two-meter pin upholstered in tin. But the best place is under the roof overhang, you can under the ridge. Screw in a screw there, and screw a metal eye to the house. There should be no objects around that the cat can catch on.
For the strength of the fastener, the metal eyelet for the birdhouse should have a pear-shaped cutout
There should be an open space in front of the birdhouse for birds to fly up. Only tits love houses hidden deep in the crown of a tree. Usually they hang 1 birdhouse per 10 m 2 of the garden. If you place them more often, they will be empty.
Do not hang more than one birdhouse on a tree, birds will conflict
Decorative birdhouse from a plastic bottle
Birds very rarely nest in houses made of artificial materials. The so-called birdhouses made of plastic bottles are used only to decorate the garden and feed the birds.
Materials:
- five-liter plastic bottle - 3 pcs.;
- a strip of burlap;
- perch;
- glue;
- paints;
- leg-split;
- branches.
Tools:
- knife and scissors;
- marker;
- brush.
Step-by-step instruction:
1. Cut out a notch at the top of the bottle.
The notch is easily cut with sharp scissors
2. Cover the area under the notch on the inside of the bottle with burlap.
Burlap is needed to make it convenient for the birds to get out of the bottle.
3. Under the 4 cm notch, make a cross-shaped incision for the perch.
4. Cut out the trapezoid tile template. Attach it to a two-liter bottle, circle with a marker and cut.
For cutting tiles, it is better to use bottles with a smooth surface, they are easier to glue.
5. Glue the shingles on top of the house in rows from bottom to top. You will need 3 rows.
In order not to wait a long time for each row of tiles to dry, you can use a heat gun
6. Paint the house: the roof is brown, the walls are white.
7. Paste the bottom of the birdhouse and the space around the notch with twigs. Insert a perch.
 Share with friends!
Our interest in birdhouses wakes up in the spring along with a drop, bright rays of the sun and sonorous voices of birds. I really want nimble and cheerful birds to settle in our yard. It is pleasant to watch the family chores of birds and listen to their trills. It is no less pleasant to realize that the birds will help protect the garden from pests.
Birdhouses for birds: what are they?
We all observed a considerable number of different birdhouses. You might get the impression that these are just small houses with a hole of different shapes and colors. In fact, birdhouses can be made from a variety of materials and must have specific parameters for different types of birds. There are certain requirements for their design and placement.
Especially for you, we have grouped the existing options into a convenient form for review. Of course, before you start assembling a bird house, you need to see what they are.
Birdhouses made of wood - a classic of the genre
There is no doubt that wood is best suited for making a classic birdhouse. The reason is in the whole complex of its characteristics:
- good thermal insulation;
- acceptable soundproofing;
- sufficient strength;
- environmentally friendly;
- well processed;
- available at cost.
We have prepared for you a photo of 40 types of wooden birdhouses, arranging them in order of increasing complexity and quality of design.
 Before you are images of the simplest designs. As you can see, they suit the starlings themselves. Unless they do not suspect that the service life of an untreated house is limited. If appearance does not matter, choose one of these options.
 If you spend a little more time, you can make a noticeably prettier bird house. Perhaps you are using another type of lumber for this purpose. Definitely, it will take a little more skill and effort.
 Fantasy played the main role in these constructions. Moisture-proof impregnation and a tin roof will definitely increase the life of crafts. Products are somewhat more complicated than ordinary bird houses.
 As you can see in the photo, the birdhouse can be decorated by cutting a hole in the shape of a bird silhouette. At least the roof can be painted. To assemble a bird house, you can use a lining processed with a blowtorch.
 The photos above show the application of paints. In principle, one color is enough to decorate the craft. Several bird houses painted in different colors look great.
 If you try, the paints will help turn the bird's housing into a fabulous house. The actual design is not complicated. Fantasy and diligence are the main tools of the presented success.
 A few more options for successful and simple solutions. Small-section sticks allow you to complement the craft with a fence, trellis, and so on. In the bottom two photos, using a jigsaw helped a lot. The use of wood of different colors and the unusual shape of the bird house ensured the exclusivity of the work.
 The photos above say: do not limit your imagination! Of course, to assemble an airplane and a helicopter, you will need parts made on a lathe. However, the locomotive and the tiger are made from ordinary planks using a simple tool. You can repeat!
 The two dainty birdhouses in the image above are made with taste and care. It's not easy to repeat this. Creating something similar and your own is even more difficult.
 We present four more examples that will serve as a decoration for a site of any level. Of course, wood carving is not for everyone. Note that the two lower options are quite realistic for copying. It will take a lot of time and effort.
Birdhouse made of logs - a separate issue
 A great idea is to use an ordinary log for a birdhouse in the country. This is also wood, but untreated. Note that an old tree trunk with a rotten core is the best option. Such housing for birds resembles a hollow and is called a hollow. As you can see, there can be a variety of products in terms of design.
 For many, an old log is more accessible than a cut board. Birds don't care what their home looks like. A simple deck or a birch palace will do. You make the choice.
 The nest box can be decorated with branches, boards, and mushrooms. Again, this is about the manifestation of fantasy.
In any case, those who decide to make the house more complicated and interesting should definitely link its design with the place and environment where the birdhouse will be located.
Plywood houses for birds are also made
 It is believed that plywood is not the best suited for a bird house, as it has an unpleasant and harmful smell of glue. However, the starling in the picture likes the plywood dwelling. Products with a noticeable smell of glue should probably not be used. It can be assumed that over time, the slight smell will pass. Plywood is more expensive than edged board, but is stronger and will last longer.
 Here is a factory kit for assembling a bird house. Its main advantages are interesting design and high assembly speed. Thin plywood has reduced heat and sound insulation. Such a bird house is best used in warm regions, and it will not last long.
 A few more options for the execution of plywood birdhouses demonstrate the wide decorative possibilities of the material. The use of paints will provide an impeccable external design. Probably, such crafts are best used for decorative purposes.
 Here is the simplest plywood bird houses. They are best used in relatively warm regions. They won't last long in this condition.
 The use of 20mm plywood and paints greatly improves the position of plywood houses. Experiments with the form of crafts are welcome.
Cardboard birdhouses - this is possible
 Cardboard birdhouses are hard to take seriously. As follows from the pictures, such products exist. At the same time, they are made at enterprises for the production of corrugated packaging.
 Of course, such a house for birds is inexpensive, it is assembled quickly and even looks decent. Obviously, they will last one season, and in those parts where it will not be soaked by rain. However, we decided to overcome the indicated shortcomings of the material and offer further in the text a scheme for assembling a fairly reliable house for birds made of corrugated cardboard.
Birdhouses from plastic bottles - a fallback option
 At first glance, plastic containers are very well suited for a bird's nest: they cost nothing, are durable, and are not afraid of rain. Note that birds do not like to sit in a transparent room with poor heat and sound insulation. In addition, the slippery surfaces of the bottle make it difficult for the bird to move around in the house.
However, these disadvantages can be overcome. Note that the assembly of such a product does not require a hacksaw and a drill and can be performed by a woman or a child. A plastic bottle can be painted, covered with an opaque material and trimmed from the inside with a cloth. It is better to use five-liter eggplants.
To prevent the wind from rocking the light structure, it must be securely attached to the tree, for example with adhesive tape. Obviously, in this situation, a wide scope for decor and decorations opens up. Further down the text, we offer a practical way to use plastic bottles for a birdhouse.
Bird houses from improvised materials
 A very interesting house for birds is obtained from a pumpkin. The internal contents of the plant are cleaned with a spoon through the future notch. The craft is dried, decorated and hung on a tree.
 Options for "finishing the room" on the outside can be very different. Note that even in the simplest version, the product has a certain decorative value. Often, it is for this purpose that such crafts are made.
 A wooden barrel or pebbles and cedar cones, as well as beer cans, are suitable for building a bird house. Almost any material will do, from beer cans to shoes.
At the same time, it is important to observe the conditions for the comfortable living of birds, which we will discuss later in the text.
 An old boot is a great home for birds. By the way, the leather version will last a long time. The convenience of living in an old snag with a feathered hollow definitely does not need to be explained. Nothing stops us from adding our human ornaments.
 An old bucket is perfect for birds. It is especially convenient to use a piece of plastic pipe for arranging a bird's hut. Very simple and durable. The possibilities for decoration are, as always, endless.
Tenement houses or townhouses for birds
 Probably, the apartment buildings were mastered first by birds, and then by people. Options - a great variety. Like people, an apartment building can be beautiful.
 These examples are more like townhouses. Probably, next to the "high-rise building" for a large number of birds, you can always observe at least one of them.
At the same time, one should not forget that a cheerful company of birds can harvest your entire garden in one sitting.
Decorative birdhouses
 Decorative birdhouses also have a place to be. They are designed to decorate rooms. Often, decorative crafts are placed in the garden.
 Birdhouses can be made by kids out of paper, cardboard boxes, plastic bottles and beer cans. Of course, no dimensions in this case should be observed. We have selected for you images of the most characteristic products that will suit the child.
Sizes of birdhouses for birds and other requirements
There are general requirements for bird housing, regardless of what specific birds they are intended for:
- The bird house must have sufficient thermal insulation, protected from noise, moisture and drafts. For this, a wooden birdhouse is made of boards with a thickness of at least 20mm. The seams and cracks of the house are sealed with clay, plasticine or tow.
- The design should not have sharp protrusions that could injure feathered inhabitants. The protruding parts are treated with emery cloth.
- The configuration of the birdhouse should allow the birds to easily get in and out. In a birdhouse made of planed boards, the front wall is roughened from the inside with a hacksaw and a drill. A birdhouse made of a plastic bottle is trimmed from the inside with a coarse cloth.
- The bird housing material should not emit unpleasant odors. Laminated chipboard and OSB board contain formaldehyde and are not suitable for birds. For the same reasons, the use of plywood is also discouraged. Do not use inorganic adhesives to assemble the birdhouse. It is better to paint the product with acrylic paints.
- Do not use too bright colors to decorate the house. Birds distinguish colors much better than people, and in nature they are not used to showing their nest to everyone. It is better not to create a tip for birds of prey and cats. Good paint will significantly extend the life of your product.
- The design and placement of the birdhouse should provide adequate protection from cats and woodpeckers.
- The birdhouse should not be too large so as not to provoke the female to lay too many eggs. Large numbers of chicks are difficult to feed and will not survive.
 Let us add in more detail a few more essential remarks on the "architecture" of bird houses. To protect against feline organized crime groups (organized criminal groups), the birdhouse should be positioned so that it is impossible to climb into it from nearby branches.
It is better not to make a support under the notch, as the entrance to the bird house is called: the bird has enough branches if the birdhouse is on a tree, and the cats will definitely take advantage of the additional opportunity for criminal purposes. To protect the chicks from attack from above, the overhang of the birdhouse visor is increased to 70-80mm. The greater the angle of the roof, the more difficult it is for cats to do dirty work.
 To prevent cat OPG from reaching the birdhouse along the support from below or above, it is wrapped in tin in accordance with the image. The cat slides on the metal and will not reach the chicks. To protect against the claims of the woodpecker, the birdhouse is reinforced with a metal or thick wooden lining, as in the photo. Then he will not be able to expand the notch and get to the eggs.
Quite often, birdhouses are made from coniferous wood. The resin released from the wood can ruin the plumage of birds. It is better to use birch or alder for a bird's nest. As a last resort, you should pick up pine boards without knots.
Different birds have their own characteristics and choose "apartments" for themselves in accordance with their needs. When planning to make a house for certain birds, use its standard GOST dimensions from the table below.
 The bird house mentioned in the table under the name "half-hollow" is intended for birds that are accustomed to nesting not in hollows of trees, but in a depression between branches. These birds prefer a certain amount of light, and a slit entrance is suitable for them.
Please note that it is difficult for the wagtail to move along vertical surfaces, and it is better for it to equip a comfortable platform in front of the entrance with a width of 8-12 cm. For small birds, like pikas, they organize two entrances located opposite each other. It is believed that starlings do not settle in green houses.
The choice of location and methods of attaching bird apartments
 Ornithologists recommend placing one birdhouse on an area of 20m2. In practice, one birdhouse is enough in the garden, since a larger number endangers your cherries and even seedlings of tomatoes. If you install several birdhouses, ensure a distance of more than 15 meters between them.
Usually a birdhouse is installed at a height of 2.5-3.5 m from the ground. If there are objects nearby where people often appear that will disturb the birds, increase the height to 4.5-5.5m.
It is necessary to think about the optimal orientation of the bird house relative to the cardinal points. If the entrance to the open space faces south, the house may overheat. It is better to place it in the shade. It is also wrong to turn the notch in the direction of the most frequently blowing winds, since rain will fall through the entrance to the birdhouse. Also, to protect against rain, you should use the wall or roof of the building, the foliage of trees, etc.
Often a birdhouse has a special bar for attaching to a support. It can be fixed to inanimate objects with nails and screws. For fastening to trees, flexible clamps are used. Suitable reliable and durable cords and ropes. In this case, the fasteners should not pinch the tree as the trunk thickens. If the birdhouse you installed is not inhabited by tenants, try rearranging it to another place. Probably, this circumstance will affect the decision of the birds.
Workshops for making birdhouses
Drawings, dimensions and photos of the assembly of a wooden birdhouse with decorations
We suggest that you familiarize yourself with the drawings of the three options for the most common birdhouses made of wood. Again, it is better to make them from hardwood or use pine boards without knots with resin. If you check the size table, you can find that for starlings and other birds, the house may have different dimensions than in the drawings. Next, we describe the scheme for assembling a birdhouse with a single-sided lid, guided by which you can carry out any of the three projects yourself.
 Here is a drawing of a birdhouse from boards, which is the simplest. A feature of this design is a removable cover. In order for it to be securely fixed, an insert 120x120mm is provided, attached to the lid from the inside. If the cover is not going to be removed, the liner is not needed.
 The gable cover looks more interesting, but the design is a little more complicated. Pay attention to the accuracy of the connection of the roof parts with the side walls. It is possible that in these places additional sealing with plasticine, clay or hemp will be required. Removable cover design is not provided.
 This drawing shows a design with an inclined removable cover. Attention should be paid to the accurate execution of the inclined sections of the side walls. We give a master class for assembling a birdhouse in two stages: first we make a birdhouse according to the description, and then decorate it at our discretion.
 This is how the finished birdhouse will look like
 Consider the sequence of actions in stages:
- For the manufacture of a birdhouse, I used a pine board with a section of 160x20mm. The knots are very small, so the resin will not interfere with the birds.
- For parts with a width of 120mm, I cut the board along this width. A 40mm wide cut was used as a pole for attaching a birdhouse.

- To mark the details, I used a square. Otherwise, gaps in the craft cannot be avoided.
- I marked the length of the liner under the cover “in place”, it’s more convenient.
- With special care, he marked out and made an oblique cut on the front and back walls of the product.
- First, the notch was drilled with a feather drill.

- However, I did not have a feather drill of the required diameter, so I completed the work with a jigsaw.
- I scratched the front wall from the inside with a hacksaw to make it easier for the birds to get out of the house.

- The result is a set of parts shown in the picture.
- The notch was cleaned with sandpaper for the convenience of the birds.
- To assemble the house, I drilled holes with a diameter of 2 mm for screws. On long walls, three screws are enough, on short walls, two.
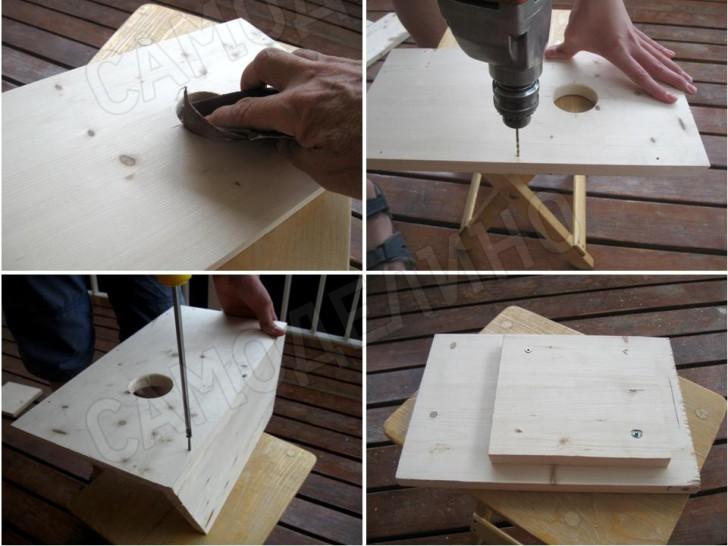
- I fastened the side walls with 3.5x40mm screws, 3.5x35mm screws came up to assemble the cover.

- The result is a bird house without cracks and gaps. For those who wish to extend the life of crafts with the help of paints and at the same time make a birdhouse a joke, we follow further.
- First, let's turn the canopy over the entrance into the visor of an impromptu cap. Marking is done with a compass.

- The cut along the arc was made with a jigsaw and processed the sharp edges with an emery cloth.

- I also smoothed out all the sharp edges of the craft with sandpaper. With this work, it is convenient to wrap the emery skin around a wooden bar.
- Next, I cut out templates for the eyebrows, eyes, lips, and ear of the “Cyclops” from paper. I tried them on crafts and redid those that did not fit in proportions.

- For false ears I used 16mm thick plywood, for the mouth - 10mm. I pressed the corresponding templates to plywood and outlined the contours with a marker.
- All details of complex shape were cut out with a jigsaw.

- The nose has a geometric shape, so I marked it with a ruler. The cut parts were cleaned with sandpaper.
- Ears, nose and birdhouse lid painted with brown paint in two layers. I used red for the lips.
- The body of the “Cyclops head” was painted with yellow acrylic paint. To mark the white of the eye and eyebrow, I attached the appropriate templates to the front wall and circled with a marker. Eyebrow and eyelashes done with a black marker. The white of the eye was painted over with white paint.
- Ears, nose and mouth secured with screws. Especially for the photo he invited a cheerful bird - a fashion model.
New technologies for assembling a birdhouse from cardboard and bottles for women's and children's hands
Not everyone who wants to build a birdhouse with their own hands has the opportunity to saw boards, drill with a drill and wrap screws. On the other hand, plastic bottles and cardboard boxes are available to everyone. Both materials are poorly suited for creating a bird house.
 We came up with the idea that we would get a wonderful result if these improvised materials are used together: plastic protects against moisture, and corrugated cardboard provides thermal insulation. We bring to your attention the original project of a bird house from improvised means, which can be implemented by anyone at home. See how we did it in the picture.
 Here is a presentation of a master class for making an apartment for birds from plastic bottles and corrugated cardboard. The drawing in this case is not required, since the dimensions are printed on the parts:
- First you need two identical five-liter bottles. We cut one of them from the bottom along the line marked with a marker. The cut point extends below the protruding part so that the second container can be inserted into the first.

- Corrugated cardboard is best suited two-layer 6mm thick. The markup should be a rectangle. We cut the cardboard with a clerical knife using a metal ruler.
- First, we cut out one part 118x118mm and check how it goes inside the cut container. Ideally, if it clings a little to the walls of the jar. If it passes with a large gap or passes into the container with difficulty, you will have to choose other sizes of the square. In the event that the size of the bottom and roof is changed or cardboard is used with a thickness not equal to 6mm, the detail drawings will be different. The height of 300mm will not change, the width of the front and back walls is equal to the size of the bottom and roof, the width of the side wall is equal to the width of the front, minus twice the thickness of the cardboard.
- We mark the entrance with a marker in accordance with the image. To get a circle, it is convenient to circle the lid of the container with a marker. The hole is cut with a narrow knife.

- We cut out all the details from corrugated cardboard in accordance with the image.

- With a glue gun, apply glue to the bottom of the back wall.
- We install the bottom liner on the glue. To ensure proper assembly, temporarily install and hold the side wall with your hand. It is necessary to hold the parts before they are fixed with glue.
- You will get an assembly in the form of the letter "G".
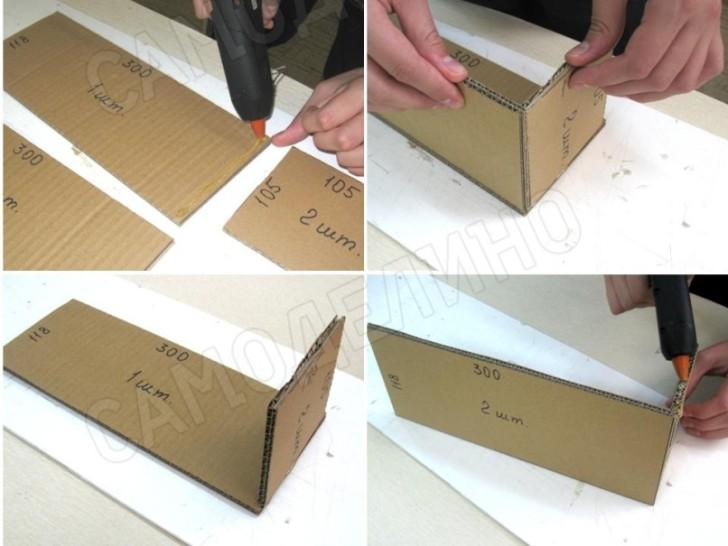
- Apply glue to the end of the bottom.
- Apply glue to the edge of the side wall.
- After installing the side wall and solidifying the glue, you will get an assembly of three parts.
- Apply glue to the top of the side and back walls.
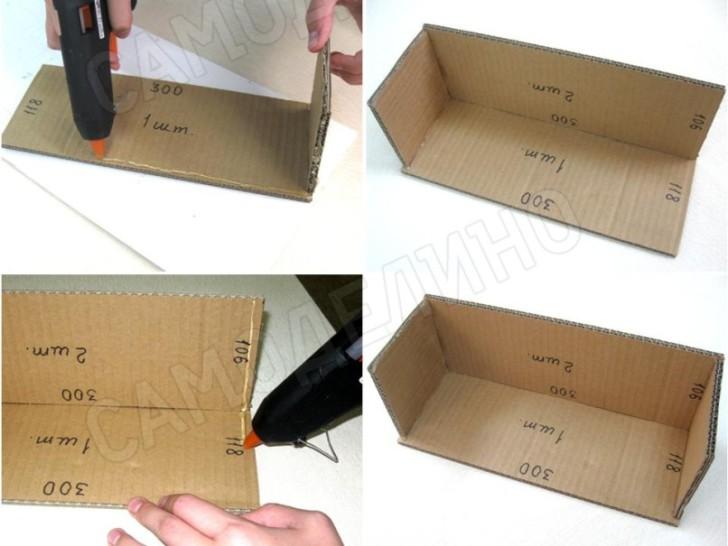
- Once the roof liner is installed and the adhesive has cured, you will have a four-piece assembly.
- We apply glue for the second side wall.
- We install the second side wall and get a box without a lid.
- We apply glue to the ends of the four parts and install the front wall.
- The base of the craft is ready.
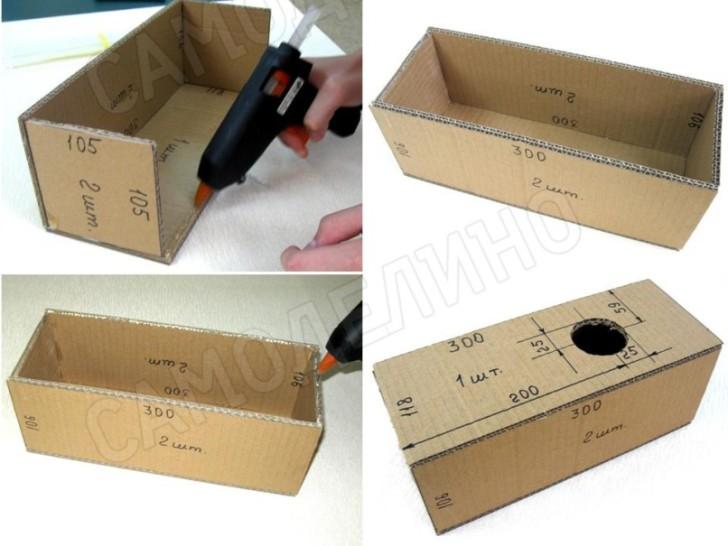
- At the ends of the craft, we remove the protruding glue to glue the bottom and roof.
- We apply glue to the four ends of the walls and the bottom liner.
- We install the bottom of the birdhouse.

- Now we have a bird house with an insulated and reinforced bottom.
- This is how the finished cardboard capsule looks after the roof sticker.

- Carefully insert the cardboard insert into the eggplant and mark the notches on the bottle with a marker.
- Cut out the notch according to the markup.
- We are preparing corrugated cardboard parts for warming the bird house in accordance with the image.
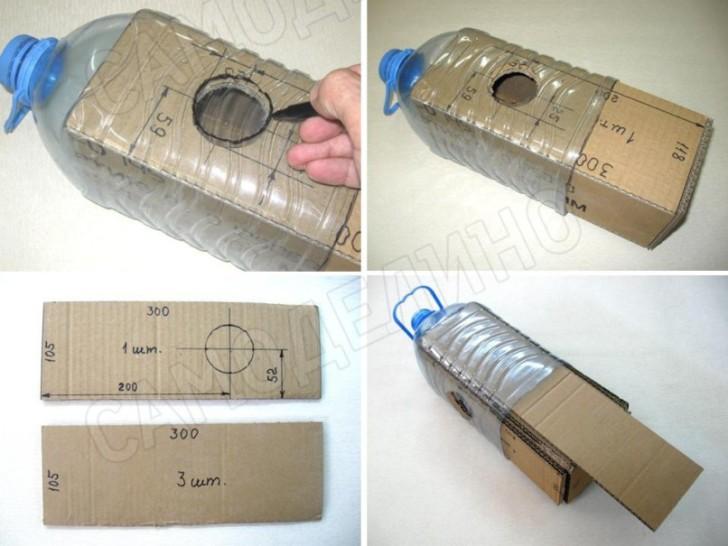
- Everything worked out for us, and the “insulation” is in place.
- We move the details into place. If they do not fit well, the parts can be cut or the cardboard can be dented at the edges of the long sides.
- After adjusting the size of the second bottle and assembling, mark the holes for wire staples on the sides of the birdhouse with a marker. We punch holes at a distance of 20 mm so as not to make a hole through the walls of the product through.

- We make two brackets from copper wire with a diameter of 0.5-1mm in accordance with the holes.
- Slide the bottom eggplant down and insert staples into it from both sides. We bend the ends of the staples so that they easily go into the upper bottle.
- We shift the lower eggplant into place and insert the staples into the holes on the upper bottle.
- Slide the bottom of the plastic container back into place.

- We twist the wire and bend the twist.

- It looks like an almost finished birdhouse. We received impeccable thermal insulation and moisture protection of the bird house.

- We painted the top of the house brown and the bottom yellow. The sharp edge of the plastic may injure the bird. We took a piece of corrugation, cut it along and put it on the edge of the notch. You can color the product at your own discretion. The craft resembles a castle tower, so you can draw a battlement from below.
How easy it is to make a birdhouse from a log
We have already given examples of arranging an original birdhouse made of logs. Birds will definitely like such a project, as it resembles a hollow that is familiar to birds: it has no gaps and merges with the environment. Now consider a master class for assembling such a birdhouse on your own.


How to disable ads on Android: remove pop-up ads
The Russian received a term and a million fine for "piracy Negative consequences of the law
Identification of key factors
The criteria for classifying organizations and individual entrepreneurs as small and medium-sized businesses have changed
See what "Royalty" is in other dictionaries Pitfalls of legislation