Every business owner wants to stand out from their competitors. At present, the technologies for the production of illuminated advertising have stepped far ahead and offer the widest choice of materials and technologies for the manufacture of signs for every taste and budget.
Let's consider duralight and LED-neon, as an affordable material for the manufacture of not only signs, but also decorative and lighting design of the entrance group, the facade of your building, or even the interior (both reception and interior design elements). Why duralight, or LED-neon? The fact is that these materials do not require any special knowledge of the sign manufacturing technology, which requires taking into account many nuances. In addition, modern duralight is made on the basis of the same LEDs, due to which its light output will be maximum, applicable to its manufacturing technology.
WHAT IS USED IN LIGHT BOXES AND SIGNS?
Let's figure out why LED duralight, light modules, strips and LED neon are better than good old neon tubes, morally and technologically obsolete incandescent lamps and fluorescent lamps. I think that incandescent lamps are immediately swept aside. AT outdoor advertising such lamps were used about 40 years ago, and even then because of the lack of other alternatives. The only case is duralight (more recently it was assembled on the basis of miniature incandescent bulbs).
OBSOLETE MATERIALS FOR BOXES AND SIGNS.
- Incandescent lamps- high heat transfer is not applicable for our conditions. In winter, such a lamp, during operation, melts the snow and ice around it, the plastic elements of the sign, fills it with water, when it turns off and cools down, it overgrows with ice, which eventually melts again and safely burns out along with the electrical wiring elements. Extremely low efficiency - high power consumption, low light output. Let's forget about them.
- Luminescent electrics- it is impossible to create complex elements from fluorescent lamps. Such an electrician turns on for a long time and poorly at low temperatures. Small selection of lamp color options. Recently, it has been used only in light boxes, or for illuminating shop windows. It is successfully superseded by LED technologies, which have a higher light output efficiency, many times longer time between failures and less demanding on temperature. environment. In isolated cases, energy-saving lamps are found in small signs made by a handicraft method. I consider such use unacceptable, if not from an aesthetic point of view, then at least because of the low IP class, which can be very fraught for those who like to "save".
- Neon (gas light) tubes- being one of the oldest technologies at the moment, it has not so many disadvantages compared to LED neon and even LED duralight. But there are also significant drawbacks - for gas-light tubes, a relatively narrow range from -25 to +50 C is considered to be the operating temperature. At a lower temperature, increased currents are required for the operation of the tube, which drastically reduces the life of the tube itself. Under real operating conditions, it has been noticed that a temperature of -15 and below leads to a significant drop in the brightness of the neon tube, as a result of which the key inscription of the name of your store, made in neon, is inferior in luminosity to the lower box on fluorescent lamps. Also, neon advertising requires a very high supply voltage, which is dangerous for interior use, and you have to think about where to place bulky and heavy power transformers. Another significant disadvantage - the glass is fragile! Well, besides, we are considering the possibility of making advertising with our own hands, and neon tubes cannot be dispensed with without the help of competent specialists and expensive equipment.

MODERN LIGHTING MATERIALS FOR Illuminated Signs and Boxes.
As a result, it turns out that for the manufacture of illuminated advertising, or its elements with our own hands, neither luminescent nor gas-light technologies are suitable for us. This is where we return to using for our purposes LED duralight, LED neon, LED strip and light modules as to the most accessible and profitable materials for us .

- Round duralight.
- LED modules.
- Flexible LED neon.

PLUSES AND MINUSES OF USING NEON AND DYURALIGHT.
Pluses (+).
- Durability- LEDs mean up to 100,000 hours of continuous operation. I have not seen the MTBF declared below 30,000 hours even from Chinese manufacturers.
- Extremely low power consumption- LED-neon flex consumes 4-8 watts per linear meter (neon tube is about 20 W-meter). In general, as practice shows, with the same luminous intensity, LEDs consume 4 times less energy than fluorescent ones, and about 10 times less than incandescent lamps.
- Operating temperatures- The range recommended by LED manufacturers ranges from -70 at the lower end of the range to +85 (cautious manufacturers limit this threshold to +50) - at the top. At the same time, the brightness of the glow is preserved, as well as the instant start.
- Flexibility- both duralight and LED neon are essentially flexible plastic tubes with LEDs and electrical circuit elements laid out inside. I would like to note that duralight bends easier, with a smaller bending radius and along any axis, unlike LED neon. As a result of this factor, it is more convenient to lay out flat and rather large elements of a sign (for example, the contours of letters) with LED neon, while you can easily repeat any contour of a design element with duralight.
- High IP65 ratio- most of the tubes produced at the moment can work absolutely without problems when completely immersed in water.
Minuses (-).
We have analyzed a lot of advantages of LED neon and duralight, but surely there are also disadvantages? Yes, both LED neon and duralight have their drawbacks.
- A common disadvantage is the multiplicity of cut. Due to the fact that the elements of the electrical circuit of the device are located inside the tube, both duralight and LED neon have a certain cutting step (multiplicity) that varies from 0.15 to 3.0 meters for duralight and from 0.91 or 1, 52 meters for LED neon. In this regard, some restrictions are imposed on the design performance, since you have to hide the excess length of the light cord somewhere.
- It is believed that the disadvantage of duralight compared to LED neon is discreteness of the glow of duralight. Those. it is possible to save money and make contour lighting of the sign from cheaper, compared to LED-neon, duralight, but in the end we will get either uneven light with pronounced points of illumination (when the illuminated surface is close to the sign), or too weak and inexpressive glow (when increasing the distance from the sign to the illuminated surface). Naturally, this point can be considered a disadvantage only when performing certain tasks, but when choosing a design solution, you should still always take into account that the step between the LEDs in duralight is very noticeable and amounts to 0.5 - 2.5 cm, while LED- neon has a smooth, indistinguishable from neon, glow along its entire length.

- And finally, I want to note once again that LED neon bends well only in one plane, and in other planes the bending radius is much inferior to duralight, which cannot be ignored if you want to highlight a complex shape of a small size.
USEFUL LINKS ABOUT DURALIGHT.
Glow and glitter effects help create beautiful and glossy objects. In this tutorial, I'll show you how to create a background from a brick texture and then using layer styles and the tool Feather(Pen Tool), we will create a bright neon effect, which we will apply to the text, in addition, we will add electric wires to text. So let's get started!
Final result:
1. Create the background
Step 1
Create new document 1500 x 950 px, install Permission(Resolution) 300.
So go ahead File - Place inline(File > Place Embedded) and in the window that appears, select the original image with a brick wall texture. Apply scaling to your liking. Press the (Enter) key to apply the changes.

Step 2
At the bottom of the layers panel, click the icon (Create new fill or adjustment layer) and in the menu that appears, select the option Levels Levels(Levels).

Step 3
Convert this adjustment layer Levels(Levels) to a clipping mask for the brick wall texture layer by clicking the corresponding icon at the bottom of the Properties panel ( properties). Next, in the settings of the adjustment layer Levels(Levels), set the value for Shadows(Shadows) 85.

Step 4
Next, click the icon again Create a New Adjustment or Fill Layer(Create new fill or adjustment layer) and add an adjustment layer Hue / Saturation(Hue/Saturation) as clipping mask. Next, in the settings of this adjustment layer, set the value Saturation(Saturation) 11, and the value Brightness(Lightness) -83.

2. Create the text
Step 1
Create text, all capital letters. Font ‘Beon Medium’. Text color #a33e88, font size 103 pt.

Step 2
Duplicate the text layer. Turn off the visibility of the original text layer by clicking on the eye next to the layer thumbnail. Next, right-click on the duplicate layer and in the window that appears, select the option Rasterizetext(Rasterization).

Step 3
Choose a tool Rectangular area(Rectangular Marquee Tool) (or select any selection tool you like), in the settings of this tool, select the mode Add to selection(Add to selection), and using this tool, select horizontal text fragments.

Step 4
Next, let's go Editing - Cut(Edit > Cut) and then go Editing - Paste Special - Paste in Place(Edit > Paste Special > Paste in Place). Thus, horizontal fragments will be highlighted on separate layer. Name the layer with vertical slices vertical(Vertical), and a layer with horizontal fragments Horizontal(horizontal).

Step 5
Decrease the value fills(Fill) to 0 for both layers vertical(Vertical) and Horizontal(horizontal).

Step 6
Duplicate each layer twice vertical(Vertical) and Horizontal(Horizontal), next, group the layers into appropriate groups. Name new bands vertical/ Horizontal(Vertical/Horizontal).
Translator's note: Each group should have 3 layers.

Step 7
Position the layer with the group Horizontal(Horizontal) below the layer with the group vertical(Vertical).

3. Add Styling to the original layer with horizontal text fragments
Horizontal
Step 1
Add a layer style Embossing
- The size(Size): 10
- Uncheck the box global illumination(Use Global Light)
- Corner(Angle): 0
- Height(Altitude): 70
- Check the box Smoothing(anti-aliased)
- Backlight mode(highlight mode): Linear light(linear light)
- Shadow Mode(Shadow Mode)- Opacity(Opacity): 0%

Step 2
Add a layer style Circuit
- Check the box Smoothing(anti-aliased)

Step 3
Add a layer style inner shadow(Inner Shadow) with the following settings:
- Blend mode(Blend Mode): Lightening(screen)
- Color: #e658d4
- Corner(Angle): 30
- Bias(Distance): 0

Step 4
Add a layer style inner glow
- Opacity(Opacity): 85%
- Color: #fe66f1
- Source(Source): From the center(Center)
- The size(Size): 18

Step 5
Add a layer style Shadow
- Bias(Distance): 13
- The size(Size): 7


4. Add Styling to the First Duplicate Horizontal Text Layer
Double click on the first duplicate layer Horizontal(Horizontal) to apply the following layer styles:
Step 1
Add a layer style Embossing(Bevel and Emboss). Set the following settings:
- The size(Size): 16
- Uncheck the box global illumination(Use Global Light)
- Corner(Angle): -36
- Height(Altitude): 42
- Circuitgloss(Contour): Cove - Deep
- Check the box Smoothing(anti-aliased)
- Backlight mode(highlight mode): Bright light(Vivid light)
- Shadow Mode(Shadow Mode)- Opacity(Opacity): 0%

Step 2
Add a layer style Circuit(Contour) with the following settings:
- Circuitgloss(Contour): Cone - Inverted
- Check the box Smoothing(anti-aliased)


5. Add Styling to the Second Duplicate Horizontal Text Layer
Horizontal(Horizontal) to apply the following layer styles:
Step 1
Add a layer style Embossing(Bevel and Emboss). Set the following settings:
- The size(Size): 16
- Uncheck the box global illumination(Use Global Light)
- Corner(Angle): 18
- Height(Altitude): 58
- gloss outline(Contour): Half Round
- Check the box Smoothing(anti-aliased)
- Backlight mode(highlight mode): Bright light(Vivid light)
- Shadow Mode(Shadow Mode)- Opacity(Opacity): 0%

Step 2
Add a layer style Circuit(Contour) with the following settings:
- gloss outline(Contour): Sawtooth 2
- Check the box Smoothing(anti-aliased)

Step 3
Add a layer style inner glow(Inner Glow) with the following settings:
- Blend mode(Blend Mode): Linear light(linear light)
- Noise(Noise): 5%
- Color: #ffdcfa
- Source(Source): From the center(Center)
- The size(Size): 38

Step 4
Add a layer style External glow(Outer Glow) with the following settings:
- Color: #7f2d65
- The size(Size): 15

This is the styling of the final layer. Horizontal(horizontal). We additionally added gloss and glow.

6. Add Styling to the Original Vertical Text Layer
Step 1
Right click on the original layer Horizontal(Horizontal) and in the window that appears, select the option Copy layer style(Copy Layer Style) and then right-click on the original layer vertical(Vertical) and in the window that appears, select the option Paste Layer Style(Paste Layer Style).
Double click on the original layer vertical Corner(Angle) by setting the value to 90 in the layer style Embossing Heights(Altitude) to 74.

Step 2
For layer style inner glow(Inner Glow), just change The size(Size) by 15.

We have corrected the effect according to the vertical and diagonal text fragments.

7. Add Styling to the First Duplicate Vertical Text Layer
Copy the layer styles of the first duplicate layer Horizontal(Horizontal) and then paste the copied layer styles to the first duplicate layer vertical(Vertical).
Double click on the duplicate layer vertical(Vertical) to correct Corner(Angle) by setting the value to -76 in the layer style Embossing(Bevel and Emboss) and also change the values Heights(Altitude) by 53.

The result for the first duplicate layer.

8. Add Styling to the Second Duplicate Vertical Text Layer
Copy the layer styles of the second duplicate layer Horizontal(Horizontal) and then paste the copied layer styles to the second duplicate layer vertical(Vertical).
Double click on the second duplicate layer vertical(Vertical) to correct Corner(Angle) by setting the value to -82 in the layer style Embossing(Bevel and Emboss) and also change the values Heights(Altitude) by 53.

So, we have finished styling both parts of the text.

9. Additionally add a glow and create electrical wires
Step 1
Create a new layer below the text layer whose visibility we turned off earlier. Name this layer ‘Glow in the background’. Change the blending mode for this layer to Linear light(Linear Light).
Set the foreground color to #98338b, select the tool Brush(Brush Tool), set a large soft brush. Just click a few times to add a glow behind the text (don't brush, just put a spot of color).

Step 2
Create another new layer below the ‘Glow in the background’ layer. Name this layer ‘Wires’. Choose a tool Feather(Pen Tool), in the settings of this tool, select the mode contours(Path).
What you need to do next is create outlines where you would like to add electrical wires. You can add anchor points and also create curves by dragging the guide anchor points. When creating outlines, remember that the outlines don't have to be perfect. At any time, you can use the tool Arrow(Direct Selection Tool) to correct anchor points or guide lines.

Step 3
To create separate paths, hold down the (Ctrl) key. First draw a path, then press + hold (Ctrl), then click outside the path, thus creating a separate path that will not be attached to the next path that you will create next.

Step 4
Take your time in this step to get an interesting result.

Step 5
Choose a tool Brush(Brush Tool), next, go to the brush settings panel Window - Brushes(Window > Brush), set the Hard Round brush to 7 px, value Interval(Spacing) 1.

Step 6
Set the foreground color to #252525, select the tool Arrow(Direct Selection Tool), right-click on the path and in the window that appears, select the option Stroke the path(StrokePath).

Step 7
In the window that appears, select the tool Brush(Brush), and also uncheck the box Simulate pressure(Simulate pressure).

Step 8
So, we completed the stroke of the contour. Press the (Enter) key to delete the work path.

10. Add Styling to the Wires
Double click on the layer with the drawn wire to apply the following layer styles:
Step 1
Add a layer style Embossing(Bevel and Emboss). Set the following settings:
- Check the box Smoothing(anti-aliased)
- Backlight mode(highlight mode): Bright light(Vivid light)
- Color:#ec6ab7
- Opacity(Opacity): 24%

Step 2
Add a layer style Circuit(Contour) with the following settings:
- Check the box Smoothing(anti-aliased)

Step 3
Add a layer style Pattern overlay(Pattern Overlay) with the following settings:
- Blend mode(Blend Mode): Multiplication(Multiply)
- Pattern(Pattern): 8

Step 4
Add a layer style Shadow(Drop Shadow) with the following settings:
- Opacity(Opacity): 60%
- Bias(Distance): 13
- The size(Size): 10


11. Create mounts
Step 1
Choose a tool Rectangle(Rectangle Tool) to create an 11 x 15 px rectangle.
Translator's note: next, I will describe the entire process of creating a fixture: 1. in the settings of this tool, set the mode shape layer(Layer-shape) 2. Add anchor points, move them (using Arrow tool) 3. Rasterize the shape 4. Create a duplicate. 5. Apply layer styles.

Step 2
Choose a tool Add Anchor Point(Add Anchor Point Tool). Add two anchor points in the center of the rectangle's vertical lines.

Step 3
Now, select a tool Arrow(Direct Selection Tool), using this tool, select the center points you added, and then press the Left arrow key once to move the points 1 px to the left.
Translator's note: 1. When selecting points with the Arrow key, hold down the (Shift) 2. You won't see the outline selection, don't worry, you've already selected them, because the dots will become active, you will see it now, just press the left arrow key to move the dots 3. Try pressing the left key a few times to notice the shift effect.

Step 4
Duplicate the rectangle layer. Rotate the duplicate rectangle, for this we go Editing - Transform - Rotate 90° clockwise(Edit > Transform > Rotate 90° Clockwise). Name the first rectangle layer ‘H’ (for horizontal(horizontal)) text fragments, and name the second layer ‘V’ (for vertical(vertical)).

12. Apply Styling to the Fixtures
Double click on the 'H' layer to apply the following layer styles:
Step 1
Add a layer style Gradient overlay(Gradient Overlay) with the following settings:
- Opacity(Opacity): 42%
- Type ofgradient(Style): Linear(linear)
- Click on the gradient bar to set the gradient colors to #151515 on the left, #6d6d6d in the center, and #161616 on the right.

Step 2
Add a layer style Shadow(Drop Shadow) with the following settings:
- Opacity(Opacity): 60%
- Bias(Distance): 13
- The size(Size): 10


Step 3
Copy the layer styles by right-clicking on the 'H' layer and in the window that appears, selecting the option Copy layer style(Copy layer style). In the same way, paste the layer style on the 'V' layer. Next, double click on the 'V' layer to change the angle of the layer style. Gradient overlay(Gradient Overlay) to 0.

Step 4
Translator's note: the author added mounts to the brick wall to create the feeling that the wire is attached to the wall, and also added mounts at the entrance and exit of the neon lamps themselves.

13. Add a Color Fill Layer
Create a New Adjustment Layer Color(Solid Color). The fill color is #a34799. Place this adjustment layer below the electrical wires layer, change the blending mode for this adjustment layer to Bright light(Vivid Light). In this way, we will add a pink tint to the brick wall behind the text and increase the glow and lighting of the final result.


Congratulations! We have completed the lesson!
In this tutorial, we created a background from a brick wall texture, darkening it a bit. Next, we added text, rasterized the text layer, separated the horizontal, vertical and diagonal text fragments.
Once we have created the text and applied styling to it, we additionally added a glow to the background and using the tool Feather(Pen Tool) created an outline for electrical wires. We've stroked the path and applied layer styles to create a 3D look.
Finally, we applied the tool Rectangle(Rectangle Tool) to create attachments for electrical wires, and then applied layer styles to them. And finally, we added a final adjustment layer to enhance the colors of the final result.
Thank you for being with me until the end of the lesson. Hope you enjoyed this tutorial.
A cool effect for those who are good at Photoshop! Surprise your subscribers or just learn how to make a glowing inscription is quite simple. Let's see how to make a neon inscription in Photoshop?
Background preparation
First you need to open the background image in Photoshop. In most cases, they take a picture of a brick, stone or metal wall. It is enough to enter “brick wall” in the search engine.
Option 1
How to prepare a background for a neon inscription:
- Open a picture of a brick wall (or any of yours).
- On the right in Photoshop there is a panel with "Layers". Right there to the right of small image our picture, you need to click on the lock and unpin the layer by double-clicking on it.
- In the window that appears, you can set absolutely any name for your layer (or you can not set it) and click OK.
- Next open Images-Image Size. And set the width and height parameters to 1280*720.
- Then open Filter-Distortion Correction.
- On the right, click on the "Custom" tab and set "Remove Distortion" to -1.00. Press OK.
- In the right menu, where all layers are shown, hover over the small circle at the very bottom. Click on it and select "Hue/Saturation".
- Set the Brightness to -60 (minus 60) and the Saturation to -90.
- Fasten the layers together. On the same tab, where the parameters were previously set, there is a box with a down arrow at the bottom. It must be pressed.
Option 2
How to make a neon inscription in Photoshop and a background:
- Open image.
- In the Layers section, click on the small circle and select the "Levels" tab.
- Reduce the white color to a value of 65-75 (any range).
The Control command and "+" on Windows, the Command and "+" command on Mac enlarge the picture. A similar effect can be configured in the settings so that the photo is enlarged by scrolling the mouse wheel.

Making magic
Then the matter will remain small. You need to choose and download the font that you like. Don't forget to install it on your computer! You can eat French rolls and drink tea during installation.?
How to make a neon inscription with your own hands:
- Write text and scale the inscription to the desired size.
- In the Layers panel, double-click on the layer and bring up the menu with the Layer Style settings.
- Set the Fill Opacity to 0%.
- In step "Stroke" put The size by 4 pixels, and Position select "From center", select Stroke color optional.
- In step "External glow" ask Blend mode- "Normal". Choose any color from the palette as desired. The size set to 12 pixels.
- In step "Inner Glow" ask Blend mode- "Normal". Choose any color from the palette as desired. The size set to 12 pixels.
- In step "Shadow" and "Inner Shadow" put The size by 7 pixels, Bias by 7 pixels.
- Create a duplicate layer with Ctrl + J.
- Turn off all settings in the layers panel except "Strokes".
- Customize in "Stroke" the following options: The size by 2 pixels, Color- white.
- Neon inscription is ready! And you are great!
Backlight
The final, but optional step, which creates an unusual highlight around the letters. It's like a neon tube reflects a little on the wall.
How to make a neon sign glow:
- On the Layers panel, where the layers of your labels are located, there is a small arrow in the very corner that allows you to collapse all settings. You need to do this procedure with 2 layers of text.
- Hold Ctrl and create a new layer. It should be below the label layers.
- Hold Ctrl and click on the pentagram of the text layer (letter T). The entire text layer should be selected.
- Select a tab from the top menu Selection - Refine Edge.
- In the window that appears in the tab "View" select mode "Overlay".
- feathering put on 50, and Move Edge at 70.
- Press Ctrl + Delete and fill the label with white.
- In panel Layers choose Blend Mode - Overlay.
- Next, double-click on the same layer, in "Color overlay" choose any shade for the inscription, and Blend mode put "Color".
Life hack for phones
The developers have not yet created a similar application for phones. But there are two programs where you can make a neon inscription online. Applications are called Draw pictures and take notes and Kids Doodle. The only negative: in both editors you need to draw by hand.

FROM applause
Be the most stylish! Use super effects.
In recent years, more and more people are trying their hand at starting their own business. Someone can invest heavily in the beginning and take risks, but not everyone has such an opportunity and a large scale is not always needed.
Let's say you want to set up a small repair shop. For a successful implementation, you need knowledge of the matter and a sign that informs people around you about your services. It doesn't have to be expensive, but your customers should notice it.

Now we will share a way how to make a sign with your own hands.
Types of signs
Now there are a huge number of ways to attract the consumer. The oldest of them is the sign. Looking at photos of signs, one can notice their diversity not only in the names and design, but also in the types of signs themselves.

So there are signs consisting of one name, and advertising signs, in which, in addition to the name, a brief essence of the services provided is given.

You can also distinguish signs by the method of manufacture:
- not light (ordinary);
- light (neon signs and LED);
- three-dimensional signs (boxes and letters).
Naturally, shop signs are most often used, but businesses never stop using this method of advertising themselves.

What you need to create a sign
To make a sign at home, you must first select the type of billboard. In our case, an ordinary non-illuminated sign was taken.

It is the easiest and fastest to make, and the workmanship will not be much worse than that of professionals.

What is required for this:
- steel sheet two meters (minimum thickness);
- self-adhesive in various colors;
- rag, wipe glued places;
- Double-sided tape
- scissors (ordinary and for metal);
- simple pencil;
- computer, preferably with a printer;
- tape measure or ruler (you can do both);
- plastic card (bank or discount card is suitable).
Making a sign
Let's prepare the base first. It will be a steel sheet measuring 1 by 2 meters. However, our sign will be 2 meters by 50 cm, and since the width of the self-adhesive film is 45 cm, we will reduce the width of the future sheet to this value and make 2 cuts.

As a result, we get 2 bases for future signs 200 cm by 45 cm. In order not to suffer with precise and even cutting of metal, we recommend ordering its cutting at the store where it was purchased.

For accuracy, after cutting, you need to sand the edges with sandpaper or a file so that everything is even and smooth.

When the base is ready, we move on to creating templates for the name. They are usually made on a computer, and Photoshop or other graphics editors are used as programs. In them, select the desired font and enter the name of the future sign.

After that, print the letters on the printer and cut them out. You will receive layouts that need to be glued to the film, and then cut out along the contour.
The next step is to stick a background on the sheet. This is more difficult to do than it might seem at first glance.

In order for the self-adhesive film to stick to the metal correctly and without wrinkles, the paper is carefully torn off from it from the middle. After that, with someone's help, they begin to glue the film to the sheet, from the center to the edges.

Note!

Use plastic for leveling. You should not rush when doing it, it will have a bad effect on quality. The length of the film can be made slightly longer than the length of the sheet. This will allow you to bend its edges and, thus, fix the self-adhesive on the metal even more reliably.

The final step will be the even placement of the name of the sign on the base. To begin with, the letters are laid out on a sheet and roughly placed in the middle of the base.
After that, it is necessary to apply an alignment line so that the letters do not “jump” (only if this is not specifically intended). Then, the paper is torn off the film from the letters and strictly along the resulting line they are pasted onto the background of the sign.

To avoid swelling when sticking, as well as with the background, a plastic card is used. The final touch is the edging of the signboard.

As a rule, film cuts from previous stages of work are used on it. The optimal width is 2 cm. The edging is glued from the edge to the center, and it is located both in plain sight and with reverse side bases, to hide the irregularities of the edges of the sheet. Accordingly, the width of the strip on the edge should be at least 4 cm.

After completing all the steps, you will get a beautiful and inexpensive sign made by you!
Note!


DIY signage photo


Note!


A homemade neon sign can be used not only for its intended purpose, but also as a bright and extraordinary lighting element in an interior of a suitable style. Details of making a neon sign in the form of an inscription with your own hands, below.
materials
For work you will need:
- flexible neon for 12 or 24 V and a power supply to it;
- 2-pin connector for flexible neon;
- end caps;
- aluminum profile;
- flat aluminum tube in width corresponding to flexible neon;
- epoxy adhesive for steel products;
- sandpaper;
- wire;
- electrical tape or heat shrink tubing;
- primer;
- paint;
- hacksaw;
- vise;
- transparent silicone adhesive.

Step 1. You need to make a layout of the inscription, which will become a sign. In fact, it needs to be transferred to big leaf paper, for example, drawing paper, etc. Since neon tubes can end up bending differently than you imagined, it's worth making a rough layout out of round wire. Fix it with pieces of adhesive tape and evaluate whether this is what you want to see. After transferring the layout to paper.

Step 2. Based on the prepared template, bend the flat aluminum tube to form a frame. At bends and intersections, it will need to be welded.
Step 3. On the back of the frame, weld two metal fasteners that will be needed to hang the inscription on the wall.
Step 4. Cut the prepared aluminum profile into small pieces, 1 - 2 cm long. They need to be fixed along the entire length of the prepared frame. Be careful when attaching them, as the profile pieces should be installed strictly on the side where the flexible neon will pass. The twists and turns will make them appear to be on either side of the tube, but they are not.
Step 5. Before fastening the profile, sand the metal frame along the entire length, paying particular attention to the places where welding was used.
Step 6. Attach the profile pieces to the frame at the predetermined points using epoxy glue. Leave everything until the adhesive is completely dry.
Step 7. Apply a primer to the surface of the resulting frame. Leave everything again until the material is completely dry.

Step 8. Attach flexible neon to the frame. If it does not fit tightly enough into the fasteners, use epoxy glue.

Step 9. Cut off the excess flexible neon.
Step 10. Install the power supply connector, observing polarity.

Step 11. Check if the assembled structure works.


Quality requirements
Peat resources Milling peat extraction
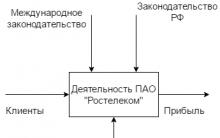
Closed Joint Stock Company Transtelecom
Setting up Wi-Fi equipment
Pasteurization drawer for the selection of "heads" during rectification