Very soon we will celebrate International Bird Day. Help your child find out what birds exist, teach them how to make crafts, costumes of winged creatures.
Day of the Birds - script

After reviewing it, it will be easier for parents to come up with a costume for their child, and teachers will find out what game and educational tasks can be included in the event program.
The hall is decorated accordingly. You can put, decorate walls and windows with twigs to create a forest atmosphere. There are many songs about birds. The teacher turns on one of them, the guys enter the hall to the music.

They are dressed in matching costumes. Someone represents a woodpecker, a cuckoo, a dove, a sparrow, a swan.
The host says riddles, the answer will be the character of some child. Children must find out and answer which bird is meant.
The next contest sounds like "Bird Names". The host asks questions, the guys must guess a specific feathered one. Here is a sample list of questions:
- Why the cuckoo was named that way (because it makes the sound “cuckoo”).
- What act influenced the fact that a detachment of birds was called sparrows (these birds eat grain and seeds and tried to eat them where people processed the crop. Therefore, the workers shouted “Thief-bey!”).
- Why is a magpie called white-sided (because it has white sides).
- For which the bird was nicknamed the pika (it sounds like it is squeaking).
- buckets;
- baskets;
Containers are placed at a certain distance. Children take turns with a small ball to hit them. Each participant has three attempts. For one hit, 1 point is assigned, at the end of the competition the results are summed up, the winner is selected.
The next task is intellectual. It is necessary to prepare cards with photographs of birds and food drawings for them. In addition to it, you need to prepare the wrong cards, which will show what birds cannot eat. For example, salt, black bread.
Two cards will show millet and simply. Children should put photographs of waxwing, sparrow, siskin, oatmeal, and carduelis on this loose food. Since these birds are very fond of this cereal.
Children will put photos with waxwings and bullfinches on cards with images of elderberry, mountain ash, bird cherry. These birds love these berries.
On the seeds of melon and watermelon, you need to place a nuthatch, a tit, a woodpecker. And next to the dry branches of nettle, quinoa and burdock, place a bullfinch, goldfinch, tit, siskin.
And sunflower seeds are very fond of nuthatches, tits, bullfinches, sparrows.
The next game is mobile, called "Rally of Birds". Children in feathered costumes are called. One guardian of the birds is chosen. Others at this time at their meeting should decide important issues. As soon as a stranger appears near the group, the guard must give a voice, imitating the singing or cry of the very bird in whose costume he is dressed.

For bird day in kindergarten, the scenario may include proposed calm and active games, as well as others.
How to quickly sew a woodpecker costume for Birds Day?

For this, it is not necessary to be an experienced dressmaker, you can make it in a couple of hours, adopting an easy idea.

To make such a costume, take the existing clothes as a basis. These are black trousers and a turtleneck or a T-shirt of the same color. You will also need:
- light red fabric;
- white thick fabric;
- bow-butterfly of red color;
- seven red buttons;
- threads;
- scissors;
- needle.

Fold the white canvas in half, draw a semicircle below. Cut it out in a zigzag motion.

Draw a pattern in the form of a cone or a sharp triangle. Apply it on the front side of the wings, circle. Fill in the space between these shapes with a black marker, leaving the triangles white.
To make the woodpecker costume further, these wings need to be sewn to the sleeves of the T-shirt and the back of its neckline. The child will put on black shoes on his feet, and a hat needs to be sewn on his head. For this product, dense knitwear is suitable. You can use leggings or an old sweater. As you can see in the pattern, the cap consists of four wedges. In this case, three need to be cut out of red fabric, and the fourth front one - from black.
Cut out eyes from a white canvas, paint over the pupils with a black marker or sew on buttons.

Make a beak from a folded sheet of cardboard, which is painted over or pasted over with a brown, gray cloth.
Do-it-yourself sparrow costume for Birds Day
It will also come in handy on International Bird Day. There are easy options for making such an outfit.
For him, take:
- T-shirt
- brown fabric;
- beige and dark gray tulle;
- gum.
- Cut the T-shirt to give it the shape of a vest. From tulle, cut ribbons 5 cm wide, stitch each in the middle, while shirring.
- You can sew these ribbons onto a rectangle of fabric, make wings by tying the sewn ribbons around the neck. Or sew them together, and only then sew them to the vest from the T-shirt.
- For a skirt, a rectangular canvas is taken. From above it needs to be tucked two times, stitched. Pass an elastic band here, measured around the girl's waist. At the bottom, the skirt is hemmed and decorated with a lighter stripe of tulle.

The cap is made in the form of a cap with a visor, you can take a ready-made headdress of a suitable color. Fluffy shorts should be collected at the bottom with an elastic band.

If you need to quickly make a sparrow costume, then put on a brown skirt on the girl, and trousers of the same color on the boy, which are tied at the bottom or elastic bands are inserted here. On a white turtleneck, you can sew a lace light collar or tie a frill, quickly sew wavy wings from a brown linen.

It remains only to make a sparrow mask. For it you will need the following materials:
- colored white paper;
- glue;
- cardboard;
- ruler;
- scissors;
- pencil;
- elastic.

Unfold the mask, try it on the child. At this stage, you can correct something. Now this template needs to be put on brown cardboard, cut out the base of the sparrow mask from it.
Draw an equilateral triangle on the cardboard, leave an edge for gluing this part to the mask. Cut out the beak and bend it in the places marked with dotted lines in the diagram.

On top of this blank, you need to glue light brown paper. Attach the beak to the mask using glue.

On the 1st and 2nd sides of this part, you need to make small holes, stretch the elastic band here and tie its edges.
If you want to make a bright bird costume, then take the next master class into service.
Prepare:
- pleasant to the touch fabric;
- bright patches;
- for ties - soft ribbons;
- threads in tone.

Overcast the edges of these blanks. Make feathers from bright patches, the height of these parts is 5 cm. But it is most convenient to cut out strips of fabric, making their edges wavy.

Put on the base of one wing, on the bottom row, the prepared strip, sew it. Do the same with the second wing. Gradually moving up, attach other decorated colored ribbons.

To connect these two parts, sew a strip of fabric on top, it should be long enough for the child to tie these wings around his neck. On the remaining free upper part of the wings, wash the remaining feathers.

According to this pattern, you can sew an outfit for almost any feathered bird for the Bird Day holiday. You just need to take the patches of the corresponding color. If you are making a sparrow costume, then use cuts of brown and gray fabric.
The same goes for the mask, matching colors will help make it for different birds. Here are the materials from which you will assemble this piece of costume, from:
- felt;
- rubber bands;
- thread.
Transfer the pattern to the fabric, cut it out.

You will need two such blanks in order to lay a triangular nose cut out of felt between them.

Mark the elastic band according to the size of the child's face. If it is thin, tie knots at both ends. Insert these places into the side parts of the mask. Sew along the edges.

If you want to decorate it, then you can cut out the same leaves from green and blue felt as in the sample in the photo. On bird day in kindergarten or at school, it is quite possible to put on similar masks for elementary school children.
Of course, how can you do without themed crafts on such a day? They can decorate the venue of the event, give each other or take it to the competition.
Making crafts for Bird Day!
To make a bird in a nest, take:
- colored paper;
- balloon;
- thick brown threads;
- paper napkins;
- PVA glue;
- scissors.

From colored cardboard, you need to cut out paws, a beak and eyes for birds. While the glue dries, start making a nest for this character. To do this, wrap the inflated balloon with threads. Pre-lubricated with glue.
When the yarn dries, the ball is pierced with a needle, the blank of threads frozen in this position is cut into two halves.

Put straw or yarn similar to this material in the resulting nest. You can use loose satin ribbons. Tie the nests to ropes and hang them on the trees, which are also handmade.

Thus, you can decorate the hall in which Bird Day will be held in kindergarten.
You can also invite the guys to make these birds, in order to then play a small performance with the participation of birds.

First take:
- cotton pads;
- wooden skewers;
- glue;
- plastic eyes;
- scissors;
- colored paper.
Cut out a beak from colored paper, glue it and eyes on the face. Attach halves of cotton pads as bird wings. Let the children decorate their creations with colored ribbon.
To hang the bird later, insert a piece of ribbon of the appropriate size between the two blanks. Sew these parts together on the wrong side, leaving a small space free at the bottom of the tail. Turn the bird through it, straightening the corners with a skewer or pencil.

Stuff the feathered padding polyester through this edge, sew these places with a hidden seam. Use a thread and a needle to embroider the eyes of the bird, and attach the wings using a decorative seam.

Sew a button on the tip of the tail of the craft, after which the do-it-yourself bird is ready.

You can also use such creations to decorate the venue of the holiday. Prepare for it in advance, include interesting quizzes and games for children in the Bird Day celebration script. Help the children fall in love with these animals, teach them how to protect and feed them during the cold season.
So that the child fully understands how to make crafts for Bird Day, look at this process with him.
Your beloved child will also certainly want to make a fabulous Firebird from napkins and plasticine, especially since the process of twisting colored paper balls is very exciting.
The following photo selection will help you make cards for the International Bird Day quiz.
The following video will help you quickly make a black crow mask. The idea will come in handy not only on International Bird Day, but also for a theme party, a matinee in kindergarten or for staging a performance.
Children are very fond of costume holidays. They love to dress up in various images, portray their favorite characters, animals, birds. The more complex and interesting the outfit, the more joy it brings to the kids.

The image of a cheerful, nimble sparrow is liked by girls and boys, it is positive and cheerful. Making a do-it-yourself sparrow costume for a child is not difficult, you need imagination and some free time.
We will tell you how to sew a character's outfit: make wings, a tail and a hat, complete the look with makeup and accessories.
Making a sparrow costume
Characteristic features of the image: gray-brown colors, black elements and, of course, the main bird attributes - tail, wings, beak.
Carnival outfit can be made from fabric, paper or even plastic bags. The basis of the outfit can be sewn or use elements of casual clothing that match the color.
Sparrow costume from everyday clothes
Consider an outfit based on items of clothing from the wardrobe. For a girl, a gray-brown dress is suitable, for a boy - a suit of calm gray-brown tones. Complete the clothes with details: a hat, wings and a tail, you get a recognizable bird.

We sew a sparrow costume ourselves
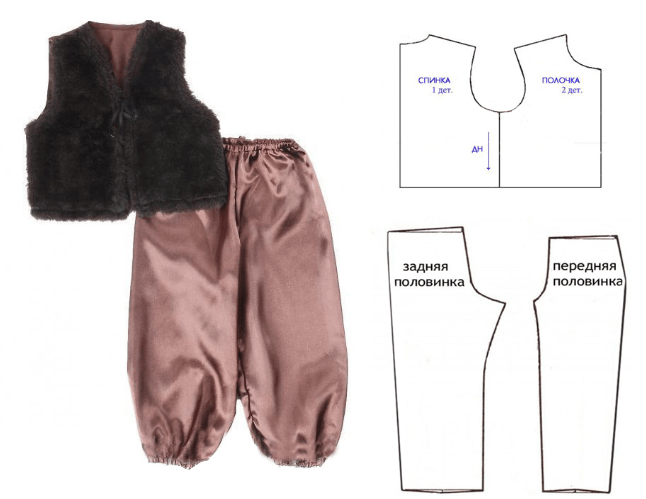
For a boyish version, you can sew a vest and loose satin pants with your own hands. You will need:
50 cm dark brown fabric, faux fur can be used
70 cm light brown fabric
Cut the trousers like pajamas and collect the free edges for an elastic band. You will need to measure the length from the waist to the bottom of the product and the circumference of the hips. In such a model, the boy will be comfortable during outdoor games, dance performances. To make a vest, you need to know the length of the back and the girth of the chest.
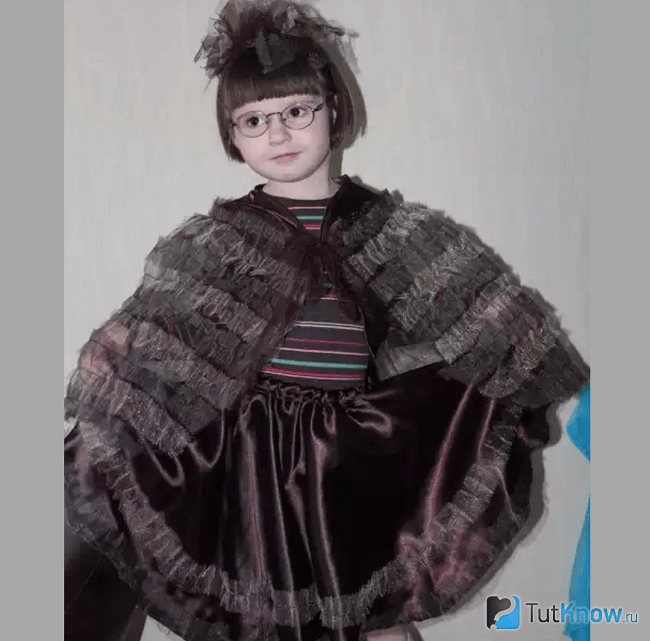
For a girlish version of the costume, sew a vest and a satin skirt. You can make a simple model gathered at the waistline or a tiered skirt. On the hem, decorate it with an organza or tulle ruffle. The third way: make a puffy petticoat of dark tulle that will peek out from under the top skirt.

The model of the basic kit for our hero of the holiday is not so important. Let it be shorts or leggings, a dress or a skirt, even a jumpsuit. The most important thing is the details: wings, beak, tail.
Create the wings and tail of a sparrow
The easiest style for creating wings is a cape. It is cut on the basis of a circle. Sew elastic or ties along the edge of the neckline. Make the bottom of the cape curly with triangular protrusions. Add decor that imitates fluff. Sew imitation feathers in a contrasting color onto the cloak. To do this, you can use artificial feathers from needlework stores or boas.

The plumage can also be cut out of plastic bags and sheathed the entire cape with such pieces. It will take a long time, but very beautiful.

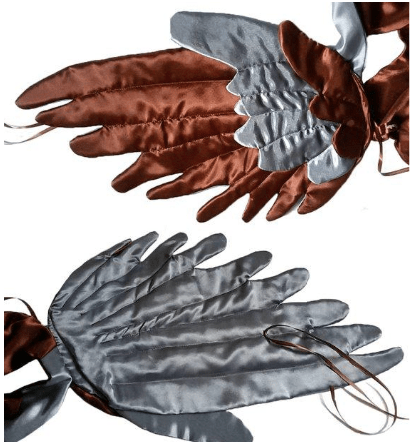
The second and more difficult way to make wings is to sew two separate wings together.
You will need:
fabric approximately 1m x 0.5m (satin, velvet, silk, old curtains can be used)
synthetic winterizer
scissors
ribbons or rubber bands for attaching wings
Cut out the base for the wings from them and sheathe them with an imitation of plumage. The top of the product is done in brown, the bottom - in gray. For rigidity, lay layers of fabric with padding polyester. Such wings are sewn with their upper part to the shoulders, and the lower part is attached to the wrists with ties or rubber bands.
The tail can be sewn to the main dress, or it can be made removable. The wings and tail should be combined, so sew it in the same technique as the wings. Cut out two parts of brown and gray colors, lay them with a padding polyester and connect along the contour.

Making a sparrow hat
Let's consider three different ways of making a hat for our bird:
bezel
scarf
To recognize the hero, a paper headband with a picture or a mask is enough. To make a mask, cut out a piece of paper that is suitable in size, make cuts for the eyes and glue the nose, cheeks and bangs. It remains only to paint the template colorfully so that it turns into a real sparrow mask.

The next most difficult option is a scarf with a beak and eyes. It is better to choose non-slip materials for its manufacture so that the scarf does not slip and does not interfere with the child. Choose cotton fabrics. The diagonal of the scarf should be 10-15 cm larger than the size of the head.
For a bird nose, a small square of felt in four additions is suitable. The sparrow's nose is short, so a part with a side of 10 cm will be enough. When you add up the square, you get a beak 5 cm long. Connect the edges of the part with light stitches and sew the resulting element to the fabric of the scarf. Sparrow eyes can be made using the applique technique. First, sew white circles of a larger diameter onto the scarf, then black ones of a smaller diameter.

For the hat model, a beret or bell is suitable. Choose knitted materials, fleece, velor, velvet.

Make the spout out of fabric and fill it with synthetic winterizer so that it keeps its shape. If you have felt, use it.
For the peephole, you can buy special parts for soft toys in the store and fix them on the fabric. But such elements are usually small in size. The app looks better. First, a white circle is sewn on, and a smaller black circle is sewn on top of it. Complete the hat with imitation of fluff, faux fur.

On the child's cheeks, add a water-based fantasy pattern that imitates bird plumage.

Complete the outfit with textile boots or draw bird's paws on the child's slippers. A picture with paws can be cut out of black paper or printed on a printer and pasted on shoes.

That's all. Do-it-yourself sparrow costume for a child - ready. You can fly to the holiday!

Do-it-yourself titmouse costume for a girl is a great alternative to more common carnival children's looks. The titmouse bird is elegant and bright - in a yellow-blue dress, with wings and in a bird mask. In this outfit, your baby will definitely not go unnoticed.
Choosing materials
The materials you use for your titmouse costume will determine the final look and feel of the costume. Outfits made of poor synthetic fabric are cheap, but they stick to the legs, become electrified and can irritate the child's skin. Then, instead of joy, he will receive continuous grief from the holiday.
For the breast of a titmouse, you can use plush or fleece that imitates short plumage; elegant organza or tulle is suitable for a skirt. Wings and a mask are perfectly obtained from dense, bright and well-shaped felt. You may also need thick cardboard from which to make your bird's beak.
As for the shades, let's pay attention to the titmouse in nature - this bird has a yellow belly and a “tie”, a head and wings of black, shimmering blue. Therefore, the titmouse costume will resemble a real bird, if you take the main outfit in yellow, a dress or a skirt with a T-shirt will be preferable for a girl. Complement it with blue or blue wings, and you get a real titmouse.
Dress
If you don't know how to sew well or don't have time to spare, the easiest way to make a titmouse costume is to take a ready-made bright yellow dress. However, there are other less time-consuming options. For example, you can take a yellow T-shirt and sew a skirt from bright tulle. You can choose a hard one that stands up and keeps its shape well - the skirt will turn out to be fun and perky, like a tutu. And from soft eurotulle you can make a lighter fluffy skirt that will create a romantic look, and then this skirt can be used in other outfits.
To make a skirt, measure the child's waist and measure the length of the future skirt. According to these measurements, cut 4 pieces of tulle so that the skirt does not shine through. Set the sewing machine to the longest stitch length and sew along the edge of each piece separately. If you sew by hand - just type the edge of the cut on the thread, as they say, "bait" it. Then pull the thread at one end to get the assembly. Straighten all the folds so that they are uniform. Now sew over the folds with the already short basic stitch to secure the gathering. Do this with every cut.

Measure a piece of wide satin ribbon for the belt - waist circumference plus 30 centimeters on each side for tying a bow. Fold all the pieces of tulle on top of each other, sew so that they become one. Put a satin ribbon on top of the cut and pin it to the tulle with pins. Fold the free end of the ribbon over to the other side and pin again. Stitch the belt to the skirt and it's ready. Due to the long ends of the belt, you can easily tie it around the child's waist.
Wings
The next step in creating a do-it-yourself titmouse costume is wings. There are many options here, but we will highlight a few of the simplest and most beautiful.
For the first one, you will need a blue bolero with short or long sleeves. On the sleeves, you can sew long shreds of shiny organza in blue shades - the wings are ready.

The second option is to sew the wings out of fabric and felt. To do this, you need a cut of any blue fabric for the base and felt of different shades of blue. Let the child extend his arms to the sides, and you measure the distance between the wrists. This will be the width of the wings. From the fabric, cut a semicircle, the base of which is equal in length to your measurement. The diameter of your semicircle can be made to measure the child from shoulder to waist. Sew rubber bands or ribbons to the corners to tie the wings at the wrists.
Next, cut out a lot of oval long blanks from felt - they will imitate feathers. Sew these feathers onto the base with an overlap. Sew the finished wings to the collar of the dress, tie on your hands, and your titmouse can take off.
Another option is to sew a blue feather boa on a similar fabric base around the edge - it will turn out very similar to a bird.

Titmouse costume mask
Measure the circumference of the child's head, add 3-4 centimeters for overlapping. Cut out a strip of this length from the cardboard. From the same cardboard, cut out two triangles, glue them along a long edge to make the beak voluminous, and glue the base to the middle of the cardboard strip. Connect the strip into a circle. Cut out two eyes from cardboard and stick on tape. Color the blank, and you can put it on your head.
The second option is to make a mask out of felt. Cut out two pieces of glasses and a teardrop nose from felt. Glue the nose to the middle of the glasses, glue the second piece of glasses on top. Insert an elastic band around the edges. The edges of the mask can be stitched for security and decorated with feathers or bright pieces of felt in other colors.

Details
To complete the titmouse costume for the girl, you can wear yellow knee socks or leggings, suitable shoes under the dress. You can also add makeup to the face - for example, draw blue wings on the cheeks.
You don't have to spend a lot of money to get the perfect carnival costume. In particular, a bird costume, given the time and patience, is quite easy to make on your own. However, the process of making some costumes is a little more complicated than others, so be sure to fully read the step-by-step instructions in this article beforehand so that you immediately familiarize yourself with what you have to do.
Steps
Azure bird costume
- Plain or bottom plain skirt (white or blue), or a tutu that fits you
- Blue feathers or feather boas
- glue gun
- Leggings and tank top
- Ready-made or homemade mask
-
Start with a skirt. You need to use a plain skirt in a color that will accentuate the blueness of the feathers. Try to use the colors natural for the azure bird - blue or white. Avoid greys, greens, oranges and reds.
Attach feather boas to the bottom of the skirt. The boa must be glued onto the skirt with a hot glue gun, starting from the bottom edge of the skirt and spiraling up to the waistline.
Make a simple mask covering the eye area. Take the material chosen for the mask (blue felt or cardboard) and circle the contours of your forehead, eyes and bridge of the nose on it. Cut out the mask.
- The eye holes should be large enough so that you can see everything normally.
- Attach a band or elastic band to the sides of the mask. To do this, you will need to make mounting holes in the mask with scissors or a hole punch.
- Alternatively, you can simply buy a simple ready-made mask and then decorate it.
-
Cover the mask with feathers. Use a glue gun for this. In no case do not stick feathers on the mask when worn, it must be removed.
- Start at the outer corner of one of the eyes. You should glue the feathers with hot glue so that they fan out from this point.
- Move on to the inner corner of the same eye. Glue the feathers with the same slope so that they overlap each other a little, but do not block the hole for the eye.
- Repeat the procedure with the second half of the mask.
- Trim some feathers to a length of 2.5 cm. Glue them to the mask at the bridge of the nose to cover the transition area from one feathered half of the mask to the other.
- Let the glue dry.
-
Gather all the pieces of the costume together. Now that you have your two feathered pieces, all you have to do is dress appropriately. Try to use colors in clothes that will not stand out, but will serve as a good background for feathered elements.
- For example, you can try wearing a low-key leotard to draw more attention to the needlework you have created. Or you can wear leggings and a T-shirt.
- To dress up, you can put on simple black shoes or act more boldly and dress up in orange leggings and shoes to imitate bird feet.
-
Ensure that all elements of the costume are combined. In order for the costume to match the look of the azure bird as closely as possible, all the items of clothing you use must be combined!
- The blue feathered skirt imitates a bird's tail, and the blue mask imitates the bird's head.
- The chest of the bluebird is usually represented by a combination of white and tan, so instead of using a blue top, you can take a white tank top and a brown boa.
- A blue jacket or cardigan worn will represent the blue wings of an azure bird.
Owl costume
-
Gather the required materials. Before you start working on a costume, you need to prepare everything that is required for its successful manufacture. Gather the following:
- Pieces of brown, gray and black fabric of sufficient length and width to cover the span of your arms and make a cape to which feathers will be attached
- Extra fabric for making wing feathers
- Circle template (you can use a standard dinner plate) to make the neck of the cape
- glue gun
- Tape or rubber band
- Sewing machine or needle and thread
- A simple gray jumper that is not a pity to cut and glue parts to it (you can take an old unnecessary thing)
- Gray tights
- Ready-made or homemade mask made of cardboard, foamiran or fabric
-
Cut out the gray wings. Take a piece of fabric as long as the span of your arms and a width equal to the distance from the neck to the knees. From it, cut out a semicircular cape with a zigzag edge. She will imitate wings.
- Place the upside-down plate in the center of the top edge of the fabric for the cape and use it to trace a semicircle on the fabric with chalk. Cut out this piece. So you get the neck of the cape, so that it is comfortable to wear around the neck.
- Attach a ruler to one of the corners of the neck so that it deviates from the top straight edge of the fabric by about 20 °, and draw a line to the side edge of the fabric. Repeat the process with the other half of the cape. Cut the fabric along the two drawn lines. Now you have the top edge of the cape ready.
- Make a zigzag bottom edge of the cape. Draw a semicircle from the end of one wing to the other, and then draw a zigzag line along it. Cut the fabric along a zigzag line.
- This will complete the process of making the top gray layer of the cape.
-
Cut out the black wings. Lay the first gray cape over a slightly larger piece of fabric. Take the chalk and accurately outline the contours of the upper edge of the cape and its neck, and draw a semicircular line of the lower edge below approximately the height of the zigzags made on the first cape. Cut out the outline of the black cape and then zigzag the bottom edge as well.
Sew the capes together. Align both capes with the neck line and sew them in this place.
- You can sew parts both on a sewing machine and manually.
-
Attach two ties to the corners of the neck of the cape. Measure out two pieces of black tape. Sew ribbons to the corners of the neck of the cape from the black side.
- Each piece of ribbon should be long enough to wrap around your neck.
- Instead of sewing on ribbons, you can simply glue them on with hot glue.
- This completes the manufacture of a cape that imitates wings.
-
Measure the gray jumper. Measure from the sleeves to the bottom of the sweater. Also measure the front width. You will need to cut enough feathers from the fabric of your choice to completely cover the entire measured area of the jumper.
- For each feather, you will need to cut a slightly elongated oval out of the fabric. The pen should be about 7.5 cm long and 5 cm wide.
- Divide the width of the jumper into sections of 5 cm. This will tell you the number of feathers in each row.
- Multiply the number of feathers in the row by 3 to find the total number of black feathers.
- Multiply the number of feathers in the row by 2 to find the total number of gray feathers.
-
Attach the feathers to the jumper. Glue each feather onto the jumper with a separate dab of hot glue. In this case, you will need to alternate rows of black and gray feathers, and the first and last rows should be black.
- Start working from the bottom row. The lower tip of each feather of the first row should protrude quite a bit beyond the edge of the bottom of the jumper.
- Gradually, row by row, rise higher. The feathers of each next row should overlap slightly with the feathers of the previous row.
- Lay out the feathers in a row so that they are in contact.
-
Make an owl mask. Take foamiran and draw the contours of the mask on it yourself, or use a ready-made template. Cut out the mask along the contour and make holes in it for the eyes. Glue the mask to a pair of cheap sunglasses.
Dress up in a suit. Wear a feathered jumper and gray bodysuit. Tie a wing cape around your neck and complete the look with an owl mask. This completes your work on the costume.
Raven costume
-
Gather materials. To make a costume, you will need the following:
- Sewing supplies
- Black felt
- yellow felt
- White felt
- Black hooded jumper
- glue gun
- Dark trousers and boots
-
Draw and cut out the details of the beak. Draw on black felt the contours of two slightly curved halves of the beak. Cut them out with sharp scissors.
- If desired, the contours of the details can be drawn by hand. Please note that the beak should be visible as if from the side, and not from above. The base of the beak should be represented by a straight line, while the beak itself should look like a slightly curved triangle.
- The size of the beak should be sufficient so that when it is attached to the hood of the jumper, the external resemblance of the hood to the head of a bird becomes noticeable. Please note that the size of the beak for children and adults will be different.
-
Sew on the beak. Align the two parts of the beak and sew together along the top edge. Then attach the beak with the base to the top of the opening of the hood and sew.
- Since the felt does not crumble, there is no need to turn the parts inside out after sewing. Just try to make sure that the lines are even and the work looks neat.
- The center of the beak should be located in the center of the hood, while it should hang over the face when the hood is put on the head.
Before you start working on the costume, you need to prepare everything. Gather the following materials:


How to disable ads on Android: remove pop-up ads
The Russian received a term and a million fine for "piracy Negative consequences of the law
Identification of key factors
The criteria for classifying organizations and individual entrepreneurs as small and medium-sized businesses have changed
See what "Royalty" is in other dictionaries Pitfalls of legislation