Application on the theme "Winter" for elementary school
Master class "Making a figurine of a bird using the origami technique"
Target: implementation of the mini-project "Bird's canteen" as part of the school action "Help the wintering birds."
Tasks: promote
the formation of such qualities as care, mercy, mutual assistance;
clarification of knowledge about the structure of the body of a bird;
development of fine motor skills of fingers;
the formation of communicative and regulatory UUD.
The production of this work is available for students in grades 3-4. Preliminary work in the previous lesson: making a “feeder” appliqué according to a template.
The image of a do-it-yourself bird will be an excellent reminder of the need for constant care for the wintering birds of your area. This is especially important in winter.
Required materials and tools:
2 sheets of paper matching in color;
Scissors;
Glue (if necessary - if the paper is thick and does not bend well, you can connect the “runaway” parts with glue droplets).
Description of work.
1. We prepare 2 sheets of colored paper that matches in color.
2. Cut out 2 identical squares from them.
.jpg)
3. We fold the squares with the wrong side to each other, combining the corners.
.jpg)
.jpg)
4. We fold the two-layer square diagonally.
.jpg)
5. Bend down two layers of paper so that the corner goes down by about 1/3.
.jpg)
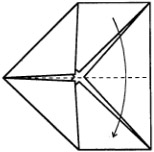
6. Fold the resulting workpiece in half vertically.
.jpg)
.jpg)
7. Turn the workpiece clockwise so that the lower sharp corner is in the left hand. We form a bird's beak from it.
.jpg)
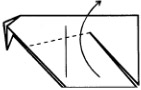
8. We bend up one of the corners that look down. This will be the wing.
.jpg)
9. We do exactly the same work with the other lower corner, thereby forming the second wing.
.jpg)
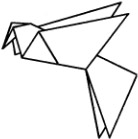
10. From the side of the opposite head, outline the contours of the body of the bird and cut out the unnecessary part.
.jpg)
11. We begin to form the tail feathers by cutting out narrow long triangles.
.jpg)
There are a large number of hobby options, and everyone is sure to find something of their own. Crafts made of paper or cardboard today are of interest to quite a lot of people of all ages: from adults to the smallest child, who will benefit from this activity. With free time and a suitable scheme, you can do this simple and at the same time aesthetic activity. Paper design has an attractive force that draws all family members into the process.
How to make a flying bird The product was originally created as a symbol of religious beliefs and rituals of the Pomeranian people. In those days, the toy was made of wood and hung from the ceiling in the front corner of the house, where there was usually a table and benches. Another name for this bird is "The Bird of Happiness".
Scheme and manufacturing templates is not particularly complex. Even a small child, with diligence, can successfully make this dove. A special motivation for constructing such an origami is belief that the creation of a thousand such handicrafts will bring the fulfillment of a cherished desire to a purposeful person. For a simpler perception, an exact diagram or video is needed:

Gallery: paper bird (25 photos)


How to make a crane (origami) with wings with your own hands
 This work is not easy and will take a little more time for beginners, but will amaze others with grace and originality. Using everything one plain piece of paper, you can create a work of art. Any color will do for the job: a flapping bird will create an iridescent iridescence when using many shades. A master class on creating a crane will give you and your child unforgettable moments of joy.
It should be remembered that for best performance it is necessary to carefully approach the joining of corners and smooth the folds with your fingers repeatedly.

How to make an origami sparrow bird
The master class for creating this instance is not at all complicated, it is required from an adult or a child strict adherence to step-by-step instructions and thorough patience- especially if you want to do it for the first time.

A do-it-yourself sparrow made of paper will blend in harmoniously with the home environment and delight a small child.
Paper crafts are a wonderful way to have fun with friends and children, make original gift and just improve fine motor skills. Origami birds are created most often, since their schemes for beginners are the most understandable, and the resulting product is quite original and presentable.
How to make an origami bird?
The most active in the origami technique are cranes, swans or pigeons. Owls, gulls, and other representatives of the fauna are less popular, and more often precisely because of the difficulty of working with them. There are, of course, a lot of schemes for each of the birds: they differ both in the required level of training and in general view figurines.
All of them imply the presence of colored or plain paper, which will not tear from too frequent manipulations at a particular point, but will also be easily deformed. In addition, you often have to resort to using a simple pencil, ruler, protractor and scissors. However, in some algorithms, these devices may not be needed.
Paper swan is the easiest to make. You can often see such a bird as an element of table setting, when large napkins are folded in this way, placing them on an empty dish.
Required for manufacturing big leaf paper in the form of a square, on which a central line is outlined, and the side corners are tucked to it. The figure resembles an elongated rhombus. At the triangles that made up its long part, the inner corners are bent, and the figure is again folded in half along the middle vertical.
The sharpest corner (lies at the base) is bent diagonally so that this part forms a perpendicular to the base, and its tip is directed by a new fold outward to the side. The head and neck of the swan are ready. It is enough to bend the tail along parallel diagonals twice with an accordion, and work with this origami bird is completed.
Origami bird: dove patterns

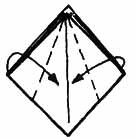
The dove is a symbol of peace and the easiest origami bird to make. There are certainly a lot of schemes for him, and beginners are encouraged to use the one that includes only 7 steps. You will need to stock up on colored paper, cutting out a 20 by 20 square or slightly larger from it, so that there are no particular difficulties when adding. At the initial stage, you will need to place it in front of you like a diamond, and then bend all the edges inward, aligning the tops in the center. You should get a square envelope.
Now the lower corners of the figure are tucked up to the center line and bent, turning the square into a pentagon. After that, along the same median vertical, it is folded, and the paper is rotated. Its widest side looks up, the acute angle is to the left, the diagonal goes down. At this step, an acute angle is bent, which will become the beak of a dove: it is advisable to stick to a diagonal of 45 degrees. However, it should be understood that it does not go back or forward, but folds inward, between the halves of the paper. And the top line will now bend the other way around.
Next, you will need scissors: at an angle of 45 degrees, a diagonal incision is made at the lower right angle. If it is difficult to determine its length by eye, you can find the middle on the right side of the figure, draw a line along it along the base, and the point of intersection of this line with the diagonal from the right angle will become the place where the incision ends. The left part of it is bent outward, forming the wing of a dove: this must be done on both sides.
The right one remains lowered: this is the bird's tail, with which 1 more manipulation must be performed. Start a diagonal from an acute angle to the upper base, measuring an angle of 20 degrees, and then bend the edges of the figure along this line inward. This completes the creation of an origami paper dove.

You can use another scheme of the same bird, which already includes 11 steps, but for someone in execution it may seem simpler than the previous one. A sheet of paper is selected with the same parameters, and is also located in the projection of the rhombus, after which it is folded in half along a vertical line and straightened back. Then the side parts must be tucked to the same middle, combining them with edges, and bend the top back.
The next step is to outline the lines: the side corners of the resulting triangle are folded towards the middle and straightened, then each of them bends outward, but only along the front side, so that the top remains intact. She will become the head of a dove at the final stage.
The lower ends of the side bends need to be removed inward, the angle at which this is done is taken as minimal - 7-10 degrees. After that, along the middle vertical, the figure is folded by moving away from itself: i.e. those sides that were in your field of vision should remain in sight, being external. Then the product is rotated so that the median line along which it was bent looked diagonally upwards: this is the back of the bird.
It remains only to bend the head inward - the upper corner, and fold the tail. The latter is reproduced as follows: first, the part is folded and straightened along a line close to the base, then along the one that is 0.5-1 cm (depending on the original paper size) to the right of it. Now, thanks to the outlined lines, it is easy to bend the latter with a movement of your finger so that it hides inside the bird. A simple origami dove is ready.
Origami: do-it-yourself bird of happiness
There were legends and songs about the bird of happiness, and for sure many at least once were interested in how it looks. However, its appearance in the minds of each nation is different: in particular, in Japan, the crane is called the bird of happiness. In this East Asian country, there is a belief that 1000 of these origami birds are able to fulfill even the most unrealizable, but innermost desire. Of course, this is just a beautiful fairy tale, but perhaps by the time when the 1000th crane flutters out from under your hands, your old dream will really come true?
To create such a bird, you need paper, preferably colored on both sides. Sheet sizes of 18 by 18 or 24 by 24 are preferred, because smaller settings make it harder to work out every detail if there is no significant experience in origami. And the last nuance that is important to consider when choosing paper is the degree of its softness and strength. Often you have to bend and unbend 1 line several times, after which some materials start along this place tear, which reduces the result to "no".

- According to the classic origami bird of happiness scheme, the square is placed so that it resembles a diamond, after which it is folded in half twice and unfolded back, each time forming a rectangle. Such a move made it possible to outline auxiliary lines. Now you need to turn the paper over and start bending again, but already along the diagonals of the rhombus, each time getting triangles. This created the last auxiliary lines.
- The sheet is turned over again, and then it is necessary to press on its center with a finger, lifting all the corners up and combining them: i.e. the paper will “hug” the finger, which is immediately removed. The paper standing on the surface with its base in the plane is still the same square, but in the projection of a rhombus. It should be turned over so that the "blind" corner, which is the base on which they pressed, is at the top, and the divergent ones look down.
- A new stage - the sides of the rhombus need to be folded inward, aligning the edges along the center line. After which they unbend back. The same must be done for the upper "deaf" corner: lower it down and straighten it again. Basting lines are ready. most interesting and important point: pull the lower edge of the upper layer, lifting it, as a result of which folds should be created along the previously drawn lines, and a hollow not completely closed rhombus should form. The same actions are performed for the opposite (back) side.

- Now, outwardly, the figure resembles 2 elongated rhombuses, combined with a single base. Continuing to hold it in this position, you should again fold the sides inward, towards the midline: for each rhombus this is done separately, they are by no means combined at this stage. Then it is important to bend each of the lower parts upwards and spread them apart no more than 45 degrees, and then straighten them again.
- Along the lines obtained, the ends of the rhombus will again need to be bent, but already inward, and on either side the very tip is also bent by 45 degrees - this will be the head of the bird. The final step is the lowering of the "wings", i.e. the upper ends of the rhombus, as well as the flattening of the central "hump". The Japanese bird of happiness is ready to fly for a dream!
Do-it-yourself crane of happiness: video
When you fully master these schemes, you can move on to more complex versions of the firebird, the original owl, etc. The number of algorithms for creating origami birds has exceeded 100, so you will definitely find an idea to your liking.
Birds fly high in the sky, they are a symbol of freedom. Due to the fact that they can rise up, they also symbolize victory, divinity and power. All over the world they are considered messengers of the gods. Having a figurine of a bird in the house is considered a good sign, it protects and saves from any adversity. Such a figurine can be made from paper, it will not be expensive and very fast. Which in turn will save your budget and time. Today we will learn how to make an origami paper bird with our own hands. Moreover, this technique is becoming more and more popular every day and is gaining momentum. We will make several birds, and then you choose which one to make. Also, this craft can serve as an excellent gift, it can be placed in a bouquet of flowers or put in a package for the main gift. You will learn how to make a bird out of paper very soon.
Starting easy
First, we will do a simple paper craft with you, for this we will use the following scheme.
1) For crafts, take a square sheet of paper, fold it diagonally and unfold it back.
3) Bend the top corner down. We should get an inverted triangle.
4) Then we bend the upper corners of the workpiece to the sides as shown in the diagram.
5) After that, on those corners that we folded down, you need to bend the small edges up.
6) Fold the workpiece in half, as in the diagram.
7) Flip it 90 degrees. And we see that this blank is already beginning to look like a small bird.
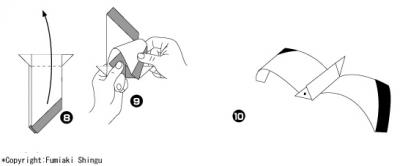
8) We bend the upper corner a little down, this will be the bird's beak.
9) And fold the tail with a small fold.
10) Here the bird is ready.
They can be made from different colors of paper or they can then be painted and used as decor or decoration for a child's or adult's room, it will depend on the color.

Now let's try to make a slightly different bird using this technique.

1) For this craft, we need a square sheet of paper, which we bend and then unfold diagonally.

2) Fold all corners to the center point.

4) Fold the workpiece in half.

5) We bend the upper left corner inward. We make an incision with scissors where indicated in the diagram.

6) We bend the wing.
7) And then we bend the second wing on the other side.

8) This is what our future bird will look like:
9) We also bend part of the tail inward.

10) And now she is ready!

We have presented you two schemes of birds that can be made by someone who is just starting to get involved in this art. If you like it and want to continue learning this technique, you can start collecting the following birds, the diagrams of which we provide below. It will be a seagull and a flying crane.
Seagull in flight
We will fold the seagull using this scheme:

1) For crafts, we need a square sheet of paper, fold it twice diagonally and unfold it back.
3) And now we bend it in the opposite direction along the dotted line, as indicated in the diagram.
4) Turn the smaller middle corner back.
5) And from the other corner, the one that is larger, we make a stepped fold.
6) Turn over our workpiece.
7) Fold it in half.
8) Turn off the corners on both sides, making the wings.
9) Now we bend our wings.
10) It remains only to finish the wings and our seagull is ready.

Making a crane
1) For this craft, you will need a square sheet of paper, which we fold diagonally.

2) Bend the resulting triangle in half.

3) Bend the bottom corner to the top.

4) Now our workpiece needs to be turned over.

5) Fold the bottom corner to the right.

6) Open another corner.

7) Fold the sides to the center line.
8) And turn them back.

9) Fold down the top pocket.

10) Then we turn over our workpiece again.

11) Now you need to outline two side folds.

12) And open our pocket.

13) Here is the blank we should get.
The bird, like all creatures of wildlife, has a very wide symbolism. In many cultures, it symbolizes the Creator, resurrection, the immortality of the soul, the good news. Birds can also be considered a symbol of the feminine, abundance and wisdom. different birds can carry different symbols. Birds can be made using the origami technique: a crane, a penguin, a sparrow, a falcon, and even an owl and a phoenix. Depending on the chosen bird, the complexity of the work will be different, as well as the scheme.
Origami bird: the easiest master class for beginners
This bird is the easiest origami that even a small child can handle. The scheme consists of 10 steps, shown in detail in the picture. To work, you need paper, it’s good if it is colored. You can also use patterned napkins.

- We fold a square sheet of paper diagonally and straighten it back.
- We bend the corners of the sheet to the intended line.
- We bend the remaining free triangle.
- We bend the upper corners of the resulting triangle to the center and straighten it.
- We fold the sides along the marked line as in Figure 5.
- We repeat for the second side.
- We bend the corners of small triangles in the opposite direction.
- Fold the shape in half.
- We turn over.
- We fold the tail and beak of the bird in this or any other way.
So the do-it-yourself origami paper bird is ready, it can be used to create an original decoration, as in the photo below.

Paper crane
The crane in the culture of China and Japan is a sacred bird, messenger, mediator of the gods. The white color of the plumage is a symbol of purity, and the red head is the receptacle of vitality. Cranes in the Taoist melt on themselves the souls of the dead to heaven, Taoist priests turn into them after death. The long, curved neck symbolizes wisdom: vain words linger in it, giving time to think about the answer. According to popular belief, the black crane lives for a thousand years. The crane in art, together with pine and stone, is a symbol of longevity. A crane flying towards the sun symbolizes success, high position in society, social uplift.
No wonder the paper crane theme is so popular. In this lesson, as you understand, we will fold a crane, which, among other things, can also flap its wings, as in flight.

1. For origami, take a square sheet of paper.

2. Fold it diagonally.

3. Fold the workpiece in half again.

4. We lay out the pocket, unbend it, as in the figure.

5. It turned out such a figure. Flip it over to the back.

6. Bend the top layer to the right.

7. We open one more pocket.

8. "Valley" fold the sides.

9. Expand.

10. We open the pocket from above, making the folds indicated in the figure.

11. It turned out like this. We flip again.

12. We outline a couple of side folds.
13. We open the pocket as we did earlier.
14. We have the basic shape of the "bird". It is used for many other origami as well.

15. Below on the right side we outline a line.


How to make a bird costume with your own hands Carnival bird costume
Scenario for 25 years girl cool houses
Examples of serious nominations for rewarding employees
The script for the anniversary of the girl (young woman) "A star named ...
Comic nominations for a corporate party