With the right choice of size and material from which it is made, such a lanyard can play the role of a guard, preventing the fingers (brush) from slipping onto the blade, and, of course, prevents the knife from falling out of the hands. The skin, in my opinion, is not very suitable for reliable extreme use, as it tends to get wet, dry out, crack and eventually tear at the most inopportune moment. It is better to use modern synthetic braided cords with the most minimal elasticity (it is desirable that the cord does not stretch).
You can weave such a lanyard yourself from several thin cords of different colors, with high strength and practicality there will already be some element of individuality, decoration and balm for the soul of those who are not alien to it!))


For better fixation on the hand in some extreme conditions, for example, if you are on a tree and still cut (chopping) a branch or bough, and you have only two hands, and it’s not very close to the ground - a few meters (!) To additionally to exclude accidental loss of a knife (or machete) from your hands, you can use devices for tightening laces on clothes, preferably with sports, military or tourist clothes from a reliable, proven manufacturer.

The photo also shows the ways of fastening the lanyard - a "deaf" method (quick replacement is not possible), and fastening with a sliding loop, with the possibility of a quick change.
People who are full of practicality, rationality and who are alien to all sorts of tsatski and trinkets may not read the article further, because we will talk about lanyards that are more decorative than having practical use! Personally, I myself am not a supporter of any trinkets, but since I have already taken up the topic, I think that it is necessary to reveal it more fully, whether you like it or not - "took up the tug - do not say that it is not hefty" (c)!))

An example of factory lanyards for Kizlyar knives.

Of course, such a lanyard also has a practical function - you can quickly snatch a knife from your pocket (and so on), for example (for those who like to quickly snatch it), or you can not snatch it quickly (for those who do not like to quickly snatch )(joke)))! By the way, in my opinion, it is much more convenient and faster to grab a knife from your pocket by the lanyard than if you have a knife in your pocket on a standard clip and, again, you don’t “shine” a pocket knife - it’s not at all visible than in the case with a clip-on mount - or maybe it’s a bunch of keys on your “bauble” and you are a simple “nerd”, and not a potentially dangerous owner of a piercing-cutting one, which needs a different “approach from around the corner” (pah-pah -Ugh))!?


There are a lot of types of weaving, as well as materials for weaving. The brightest and most voluminous lanyards are obtained from a cord (paracord) of bright, "acid" colors, plain, not variegated colors and the less textured it is, that is, it will have a smoother surface and closer to a round shape - the better the lanyard will look . ... Unfortunately, I did not find such a cord. (((You can, by the way, use a building cord, but for lack of a better one, use colored, better voluminous, shoe laces (for those who want to quickly and without problems finding material ), I also draw your attention to the various drawstrings from clothes!


Ways of attaching to a knife can be even more different than those of lanyards with a loop (see above), you can use small adapter rings, for keys, etc., or strong fishing bypass rings of a suitable size, but, for reliability, only from a well-known manufacturer!
In some cases, it is more preferable to fasten the lanyard to the knife through a key ring or carabiner, in order to avoid rapid abrasion of the junction of the lanyard with the hole in the knife. We must not forget about the unmasking effect of connections using metal objects (rattling), so the choice is yours.

Very good and, if I may say so, "noble", in my opinion, woven leather lanyards are obtained, although, given here in the example, due to the method of fastening, they are more like key chains.

Quite practical and bright lanyards made of a cord with a vinyl color coating - they are not afraid of pollution, moisture, they are easy to clean, the disadvantage is that they are stiff, especially in cold weather and have some "memory" of their last position (bend).

A lanyard is a special type of weaving, which is made with a cord and is used to decorate handles of various kinds. Until today, they are used to decorate weapons of any kind, especially if they are melee weapons. In simple words, lanyard - a loop of a cable, or rope, located at the end of a saber, or other weapon. In the Russian army, the presence of such a lanyard on a soldier spoke of his special merits to the fatherland and showed that this was a distinction. Lanyard weaving can be done even by beginner needlewomen!
Lanyards were used for convenience and as a decoration for a knife, they were attached to its handle. All the items that riders used before had lanyards on their ends. Therefore, the initial function of weaving a lanyard is considered to be convenience for a person who uses this or that thing.

The secondary function is beauty. It was made as a decoration. When the owner of the weapon had free time, he could design all kinds of lanyards from various materials with his own hands. Knowing the schemes and methods of weaving a lanyard, for example, from leather, a craftsman could profitably decorate his melee weapons.

Possessing some schemes, types of weaving knots, a person is able to profitably and without problems make an ornament in the form of a lanyard, even for checkers. Let's consider some of them.
We learn the technique of weaving a lanyard with an analysis of the main types
Simple knot.No wonder the node is called that. Therefore, almost everyone, at least once in their life, resorted to using it. It is performed by knitting first a knot up, and then inward to the first knot.
Straight knot.When connecting the ends in a simple knot weaving pattern, perform it twice for both sides.
Simple and straight knots, adjacent in weaving technology, therefore it is not surprising that people who know how to perform the first know the basics of the second.
Lanyards are fashionable to perform in such ways as:- snake
- hunting knot
- Cobra
- square weave
- Round weave - ball
- Rhombus weave.
In this article, you will see how to make a paracord lanyard using the simple knot technique.
Since paracord is one of optimal materials for weaving a lanyard, then we will use it in business.
You will need:- Paracord or strong cord.
Yes, only this material will be needed to complete the craft. Start making the lanyard by making a simple paracord knot.
Step-by-step master - a class for doing crafts:- Find the middle of the rope.
- Make a loop in this section of the paracord.
- Thread the end of the rope through the loop. A simple knot is ready.
- Thus, perform simple knots, according to the right amount for you.
- Attach to the desired weapon through the hole on the handle.
- Check the ease of holding this design.
If everything suits you, then the craft is ready. We will be glad if this master class is useful for you.
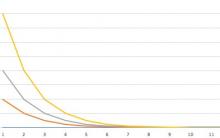
The lanyard allows you to visually lengthen the handle, even with a short knife to apply chopping blows. This ability was convincingly demonstrated by the participants of the rope-cutting competition. This device can make the handle longer, even replace it. With the help of a lanyard, you can move and extend the reach of the knife beyond the border of its contour.

The lanyard is able not only to protect the tool from falling out, but also to free the hand, at the same time, allowing you to maintain quick access to the knife. Such fastening is especially convenient when working at height, in a boat, in hard-to-reach places and during manipulations associated with the need to often put down the knife and quickly take it.
However, it should be noted that each specific lanyard cannot perform all functions at once. Most often, it is intended only for the execution of any one specific task.

There are various ways to fasten lanyards. They attach it to the hilt, hilt, through a hole in the hilt itself, or through a ring, a shackle - a swivel. Each method has its positive and negative sides. For example, fastening through a ring is more compact and mobile, but fastening through a hole is simpler and more reliable, fastening through a shackle, especially if it is tight along the axis, allows you to stably orient the lanyard and quickly find it by touch. You can attach the lanyard freely, with a knot, with a clip, on a loop or secure it with a through clip, a winding of thin wire. In a word, everyone chooses the method of fixing according to taste and needs.
Lanyards are knitted from the most diverse material from a decorative cord: to a chain and birch bark, but it is believed that the best material is leather.
Therefore, when doing crafts, choosing material for them, be careful after studying its characteristics. After all, working with weapons is not only fascinating, but also fraught with danger.
Video on this topic of the article
We wrote that one of the principles of this direction is the use of the same things for different purposes. Today we want to introduce you to one of the examples of this approach. The handle for a knife or ax, woven from paracord, allows you to conveniently use it for its intended purpose, but if necessary, it will provide you with several meters of the strongest cord that can come in handy in field conditions. To make such a thing, you will not need any special skills or special tools.
Paracord (eng. Parachute cord, paracord, 550 cord) A lightweight nylon core cable originally used in American parachute lines during World War II. After landing, paratroopers used slings to solve various problems. Now paracord is used as a universal cable by both the military and civilians.
Necessary materials and tools
- Base in the form of a knife blade or tourist hatchet
- Thin nylon cord (paracord)
- Scissors
- Lighter
1. Put the item on top of the paracord

2. Cross the two ends of the cord on the right

3. We make a loop on the right side and pass the cord under the handle to the left side

4. Tighten the loop tightly

5. Move the right side of the cord to the left over the handle

6. Make a loop and pass the left cord under the handle

7. Pass the end of the cord through the loop so that you get a knot

8. Tighten firmly

9. Do the operation from step 7 in mirror image

10. Repeat the previous steps until the cord covers the entire handle

11. Secure the cord and burn the ends with a lighter

When making knives for the handle, I usually use textolite or wood, but sometimes I resort to weaving.
When people think of braided hilts, they usually think of a single color cord wrapped in a circle. Boring!
So I decided to come up with beautiful technique using cords of two colors. This is the second knife, the handle of which I decorated in this way. In the first case, I wove with black and luminous cord. I sat in front of the TV, holding a knife in one hand, and in the other I had black and luminous cords. I started experimenting and this is what I came up with.
I hope you will enjoy.
Instruments

You will need:
- ruler,
- paracord (2 colors),
- lighter,
- multitool (you can use simple pliers, and something sharp to cut the cord).
Cut and gut


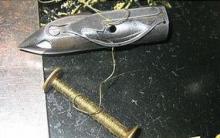
Cut the required length of each color paracord, I do this sparingly. Remember that it is easier to cut off the excess than to build up if it is not enough.
Go ahead and don't forget to remove the inner strands. To do this, you need to make sure that they are not soldered to the outer shell, and pull them out.
Get ready to weave


Wrap the cutting edge of the blade with electrical tape to prevent cuts.
Pass the cords into the hole from which you start weaving, a couple of centimeters. Now you need to think. Whichever side you put the cords on, they will leave a ledge on it, so I always leave it on the inside of the handle. The inside is where your fingers rest on the handle, not your palm. If you do this, then the knife will be more comfortable in your hand.
In my opinion, there is logic in this.
So, after you thread the ends of the cord into the upper hole, glue their ends to the metal of the handle. Then they will lie more evenly and will not interfere during weaving. Just don't stick your fingers together.
Weaving


Do you know how the first knot is made when you lace up your shoes? We will use this node.
Flip the cords to the side where the glued ends are. The black should go under the orange, then drape it over the orange (just look at the photo and it will become clear).
After that, turn the knife over to the other side and do the same steps now on it. The cord must be well tightened. Then turn the knife over again and repeat.
Entertainment

While weaving, I like to watch an interesting show. But remember to pay attention to what you are doing.
ending


After the weave approaches the bottom hole, one cord will be closer to it, the other a little to the side. In my case, black turned out to be closer. Thread the near one into the hole, and continue wrapping the handle around the far one and thread it through the other side. Now tie a knot, and with the rest of the cords you can do whatever you want. I usually hook on a fun bead and then tie the knot again. But I didn’t have anything at hand, so I just cut off the edges a couple of centimeters below the knot.
resin coating


Now you need to completely wrap the blade with electrical tape and other parts that should not have resin on it. Of course, it can be removed from steel, but why waste time on this.
Stir in a small amount of glass fiber resin. I used 30 ml, but half would have been enough for me. I just didn't have a smaller measuring cup handy.
Take an inexpensive brush and gently apply the resin all over the lacing. Let it soak in, if necessary, apply the resin again. Then clamp the blade in a vise to dry the hilt.
After a few minutes, take out the knife and turn it over so that the resin does not solidify as a drop on the side of the handle that is pointing down.
Not so many people in our world are familiar with the concept of a lanyard. Many have seen this interesting decoration, but generally do not know anything about its types and functions. But lovers of edged weapons often use a lanyard in their everyday life, moreover, many of them know how to weave this accessory on their own.
Lanyard - an original type of weaving, which is used to decorate the handles of various weapons - pocket and hunting knives, checkers, sabers, as well as tools. Weaving is done with a leather cord or a synthetic cable, which is also called paracord.
 The history of this interesting device goes back several centuries.. And if now the lanyard often performs only a decorative function, then initially it served to prevent the loss of the weapon and its slipping out of the hand. For the first time this term was mentioned in the days of chivalry, that is, in the 14th-15th centuries. In the Russian army, this accessory was an obligatory part of the military uniform, as well as an insignia on premium weapons. The presence of a lanyard on a weapon spoke of the special merits of a soldier to the fatherland.
Types and functions
The lanyard, although it is a simple rope loop and looks like an ordinary modern key chain, makes it much easier to carry weapons and work with hand tools. Depending on its "duties", this woven bracelet can be of two main types:
- with a loop that is worn on the brush - this option is more functional;
- with lace or tail - more suitable for decoration and ease of use.

Both types of this accessory are successfully used in our time for the following purposes:
- the ability to visually lengthen the handle of a weapon or tool;
- the ability to quickly free your hand and not lose the tool;
- protection of the hand from cuts when slipping it onto the blade;
- distribution of the load on the hand during work or impact.
- comfort when fastening, quick access to the knife in your pocket.
Along with this list, the main purpose of the lanyard is the convenience in using a weapon or tool, because it is this factor that can become the key to a successful battle and well-done work.
Weaving tools
Weaving a lanyard for a knife is a simple matter even for a novice master. This is a simple and exciting activity that does not require special skills and serious expenses.
In order to create a lanyard with your own hands, you will need:

When all the materials and tools are at hand, you can look for suitable patterns for weaving a paracord lanyard.
Most often, the weaving pattern is an alternating knitting of straight and simple knots. The result of combining these knots are such fashionable schemes today as cobra, ball, square, snake, rhombus.
Manufacturing instructions
It is better for a beginner to get acquainted with lanyard weaving using the example of the easiest technique of a simple knot. So, in order to make a lanyard for a knife, you need:

Having mastered the most elementary technique, you can proceed to a more complex craft and weave a lanyard from a paracord of two colors:
- take 2 cords of different colors, each about 25 cm long. Tie the ends of the cords together so that the accessory is bright and clearly visible;
- fold the cord in half, put on a carabiner and use it to measure the length of the future keychain;
- after folding in half, two free ends of the cord are formed next to the carabiner. One of the cords (for example, blue) must be braided over the rest. To do this, so that the blue cord is placed under the bottom, and then superimposed on top, forming a loop;
- the free end of a cord of a different color (for example, yellow) is pushed into this loop. Tie a knot, thereby fixing the carabiner clasp;
- the keychain turns the other way. With the help of tweezers, the yellow cord is pulled through the already finished blue loop. This stage is repeated until the moment when the length of the key fob reaches the required mark. The two-tone lanyard is ready to use!
Mounting methods
Before you start creating this unique accessory, you need to think about methods of attaching the lanyard to a knife or other tool.
For example, you can attach the decoration to the handle through a special hole. This is the simplest and most reliable fastener option.

Mounting through a ring or shackle is also possible, this method is compact, mobile and allows you to quickly find a pocket weapon by touch. You can attach a lanyard using different techniques: with a knot or with a clip, on a loop or a special paper clip. Each method is good in its own way and depends on the tastes and wishes of the owner. The main thing in this matter is to fix the accessory in such a way as to maximize the comfort and safety of the future owner.


Flower party: a bouquet of positive emotions
Words of teachers in a congratulatory scene for parents
Who's Who by Relationship Her mother-in-law calls her mother-in-law mom
Your mother is my mother-in-law Riddle mother-in-law calls my mother-in-law
How to make a scene for a wedding “Three girls under the window Comic scene three girls