Do you have a lot of time and are you ready to sit for hours trying to improve the colors in your photo, make it sharper or remove digital noise? This is a bold decision! For those who value time and want to perform all the above operations to improve photos in one click, we suggest using the online service for correcting flaws in the photo site. The simple and user-friendly interface of the site will help you deal with the most common digital photography problems in less than a minute:
- faded colors or incorrect color reproduction;
- digital noise in the photo;
- blur;
- red-eye effect on photos of people.
By uploading your photo to the service page of the site from a computer or via a link, you immediately receive a finished improved photo, with color correction, noise reduction and sharpening only in the right areas. At the same time, color saturation is adjusted and red eyes, if any, are removed.
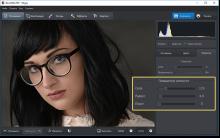
Finer manual photo correction settings
After the first photo processing, you will see a number of settings marked with checkmarks. They will allow you to select the necessary parameters more accurately (cancel or activate the function of noise removal, photo sharpening, light correction, saturation enhancement, digital temperature adjustment).
Save enhanced photos. Free photo hosting. How to show your enhanced photo to your friends
Enhanced photos can be saved to the Pho.to service (even without registration) or downloaded to your hard drive. A couple of clicks and you will share the link to the enhanced photo with your friends on Facebook, Myspace, Twitter, LinkedIn or other social network. You can also easily post improved photos to your blog or website using embed codes: HTML, BBcode or a code to embed photos in a flash shell.
Is your photo lacking clarity? This is very easy to fix in the PhotoMASTER program! Read the article and learn about three ways to sharpen your photo with this photo editor.
STEP 1. Upload a photo to work with
After launch, you will be prompted to add an image for work. Click "Open Photo" and specify the path to the file. The picture will appear on the screen. In the menu on the right, you can adjust the exposure, contrast, saturation of the photo, etc. Set the scale to 100% and move on to sharpening.
STEP 2: Sharpen the Entire Image
In the tab " sharpness» determine the strength of the effect. Increase the "Radius" if you want the outlines of objects to become more noticeable. Safe values for the “Threshold” parameter are from 3 to 10. If it is equal to 0, then the changes will affect every pixel in the image, because of this, small defects will become more noticeable in the photo.

STEP 3. Add clarity to individual parts
Go to menu "Retouch" > "". Adjust brush size, opacity and feathering. Select a section of the photo to edit. Click on the "Sharpness" tab and adjust the settings. They are identical to those presented in the step above. Save the changes by clicking the "Apply" button.

STEP 4. Smoothly sharpen the photo
If you want to use sharpening to focus on the top or bottom of the photo, then use the "" function, which is located in the "Retouch" section. Designate the area in the photo to which you want to apply the filter, and then select the optimal sharpening settings in the tab of the same name in the menu on the right.

Now you know how to improve the clarity of a photo in three easy ways in PhotoMASTER. But that's not all the features of the app! Let's take a closer look at other software tools. Or you can do it right now from our website.
STEP 5. Change the color of any items in the photo
If you need to change the color of a particular item in a photo, then use the " " In chapter " Retouch". Simply select the desired element in the image, and then adjust its settings in the menu on the right: hue, saturation, exposure, and more. One moment - and the subject in the photo will take on a different look!
STEP 6. Sign photos
You can add a text comment to the photo. This feature will be especially appreciated by photographers who want to sign their work. Open the " ". In the block on the right, enter the text and click " Add an inscription". Customize the design of the comment to your liking: color, font, size and other parameters.

STEP 7. Edit photos in 1 click!
You can apply stylish effects from the gallery to your image. You will find all available options in the tab of the same name. With them, you can turn a modern photo into an atmospheric retro shot in one click! The catalog contains several variations of this effect. Try them all!

Sound interesting? Try all the functions of the program yourself. The download will take less than five minutes, after which you can install PhotoMASTER on your PC and improve any photos!
Found an old photo in the bins? Unfortunately, paper is not the most reliable medium, and the discovered image, almost a hundred years old, is unlikely to boast of the gloss and clarity of the image. Do not rush to mourn a damaged photo or spend money on a professional restorer, you can restore it yourself! A convenient program for photo restoration PhotoMASTER will come to the rescue. Read how to restore the original look of an old photograph and preserve family history.
PhotoMASTER will help restore even a badly damaged photo
Restoring photos in the PhotoMASTER editor
To save a valuable family heirloom from further destruction and restore its original appearance, you need to convert a paper photograph to digital format. The easiest way to do this is with a regular camera or smartphone. However, this method has disadvantages:
- third-party light sources can leave glare in the picture,
- the photo may be blurry and fuzzy,
- uneven camera position distorts the image.
Ideally, it's best to scan the photo, as this will preserve the original colors and avoid flare.
Now that you have a digital copy, you need to download the program for restoring old photos from our website. Install it on your computer and run it. Open the scanned image in PhotoMASTER and let's get started.
Restoration step by step
- Trimming the damaged edge
If the edges of the image are very frayed, which is very likely after so much time, it is better to get rid of them immediately without regrets. Go to the "Composition" section and select "Cropping". PhotoMASTER offers several cropping options: free frame proportions, keeping the original proportions, as well as a number of standard aspect ratios: for a VKontakte post, for iPhone and iPad, 4:3 size and others. Choose a grid type that will help you correctly frame your image.

Trim frayed edges and yellowed frame
Now select with a frame the part of the picture that you want to leave. The main thing is not to get too carried away so as not to spoil the composition. In cases where the defects at the edges are too deep, for example, the picture is torn to the middle, it is better to partially correct the problem areas with retouching.
- We remove defects
Be patient, as this part of the processing is the most time consuming. However, restoring photos in Photoshop and other editors takes no less time. At the same time, it is much easier to master PhotoMASTER, besides, there are convenient tools for quickly removing defects in a photo.
Go to the "Retouch" section. Here is a whole set of tools that will help mask torn corners, eliminate traces of bends, hide spots that have appeared from time to time and similar problems.
The main instrument of work will be repair brush. It will perfectly cope with both point defects and large damage. Adjust the brush size according to the problem area. If you need to remove a spot from a photo, click exactly in the middle with the brush, and the defect will disappear. If you need to repair a scratch, gently run the brush along it.

Removing a scratch from a photo
In this way, you have to completely retouch the picture. Be patient and it will be rewarded with amazing results! If the brush categorically “does not take” some defects, leave them for processing with the next tool, which we will talk about later.

Photo before and after treatment with a repair brush
Another very useful feature is stamp. It will allow you to quickly and effectively remove unwanted objects from the frame. For example, a red spot in the background can be easily eliminated. Mark the area to be hidden, and then choose the place from which you will take the donor background.

Removing a Scratch with the Stamp Tool
To remove the glare that appeared in the process of converting a photo to digital form, brighten dark areas, sharpen or blur some fragments of the image with a handy tool "Corrector". Select the desired area and adjust the color, toning and sharpness settings.
The corrector can be very useful if in some place you did not manage to carefully use the healing brush and noticeable bumps appeared. Select this unfortunate fragment and slightly increase the blur value. The defect will not be so noticeable.

Slight blurring of the curtain area after removing a large scratch
When restoring portraits, the option will allow a little more "Perfect Portrait". With its help, you can automatically make the skin smoother, the eyes more expressive, and the face brighter.

The Face Lightening style will smooth out remaining imperfections and make skin tone more attractive.
- Increasing the clarity of a photo
Over time, any paper photographs fade, and the technology of the beginning of the last century did not provide the high detail that modern SLR cameras. And yet you can make the photo a little more expressive! In the "Enhancements" section there is a "Sharpness" tab, go there and increase the value of the parameter to the desired value. You will notice that the image has become more expressive.

Sharpen the image to make it clearer and more expressive
- Bringing back the old
If it seems to you that in the process of processing the photo has lost its unique retro flair, this can be corrected. Go to the "Effects" category. Here you will find vintage filters. With their help, you can restore the touch of antiquity and the former charm of photographs from the past.

The Retro 2 effect will color the picture in a pleasant sepia
See how the photo restoration is done in the program: before and after.


Satisfied with the result? Then save the resulting image to your computer. You can print it on paper to replace the damaged old one or publish it on social networks.
Memory is with you forever
Now not a single precious photograph that has come down to you from the last century will be lost. Young great-grandparents will smile from the family album, and time will no longer make their faces fade. Entrust the restoration of old photos to the PhotoMASTER editor!
I present to your attention the smartdeblur program to eliminate blur and defocus. Its first distributions and sources can be downloaded at github.com/Y-Vladimir/SmartDeblur , the latest paid distributions are available at smartdeblur.net.
Below you can see the result of processing the blurred image. The photo was taken with a Canon 500D camera, EF 85mm/1.8 lens. Focusing in manual mode to get blur. As you can see, the text is absolutely unreadable, you can only guess that this is some kind of dialog box.
And this is the result of processing:

Almost the entire text can be read, although there are some distortions.
Let's remember the theory
During distortion, each pixel of the original photo becomes a segment (during normal blurring) or a spot (during defocusing). All this is superimposed and as a result a distorted photograph comes out - this is called convolution or image convolution. The law according to which one pixel is smeared is called the distortion function or PSF (Point spread function).
To restore the image, we need to reverse (reverse) the convolution, but take into account the noise. But it's just not that simple. The convolution theorem and the Fourier transform come to the rescue. I don’t think it’s worth describing the theory in more detail on this blog. Since the very purpose of the record is to give a link to the program and say what it can do. If you are interested in theoretical issues, then the author devoted three articles to them:
- habrahabr.ru/post/136853
- habrahabr.ru/post/147828
- habrahabr.ru/post/152885
Description
SmartDeblur demonstrates the restoration of out-of-focus and blurry images.

Main functions:
- High speed. Processing photos with a resolution of 2048*1500 takes about 300ms in Preview mode.
- Selection of settings in Real-time. No need to press the Preview button, everything is done automatically, you just need to move the settings sliders.
- Processing takes place for a photo in full resolution. There are no small preview windows and Apply buttons.
- Restoring out-of-focus and blurry images
- Adjusting the PSF View
The main emphasis was placed on processing speed. As a result, it outperforms commercial counterparts.
True, the program has a number of features and bugs - at some values, the photo is covered with ripples.
Comparison
Let's compare the quality of processing with paid analogues.
Let's take the 2 most famous programs:
- Topaz InFocus - topazlabs.com/infocus
- Focus Magic - focusmagic.com
We will take advertising images that are on their official sites - this ensures that the parameters of the programs are optimal (most likely, the developers selected the photos well and selected the settings before publishing the advertisement on the site).
Lubrication recovery:
topazlabs.com/infocus/_images/licenseplate_compare.jpg
Processing with the following parameters:

Result on the Topaz InFocus website:

The second example is defocus restoration.
Taking an example from the Focus Magic website: focusmagic.com/focusing-examples.htm

AKVIS Refocus is a photo focus fixer that improves the clarity of images, sharpens them, and adds artistic blur and bokeh effects. Refocus will improve the quality of your photos and increase their aesthetic value.
Digital cameras help capture the most important moments, but sometimes the photo is fuzzy, hazy, and an insignificant background object is in focus.
In such cases, AKVIS Refocus will help. The program helps to improve the sharpness of fuzzy, blurry, out-of-focus pictures. You can correct the entire image or "bring into focus" only a certain object, highlighting it against the background of background elements. With the help of the program, you can also add shooting effects with a shallow depth of field.
The program works in five modes: and .

The mode helps to sharpen a fuzzy shot, make the image clearer and more expressive, and shift focus from one object to another.
Even if the photo is good and does not need processing, you can always focus on individual fragments, for example, highlight the eyes by applying the selective focus technique. Usually this technique is used when shooting portraits, macro photography, when photographing close-ups. With AKVIS Refocus, you can edit an already finished photo: select an object, set focus settings for it, and, if necessary, blur the rest of the area.


Mode, also known as " tilt-shift", allows you to leave a strip of a clear image (sharpness zone) and blur the photo at the edges, with smooth transitions between areas, adding side effects e. This mode gives the objects in the image a "toy" look. Life-size people, buildings, cars look like miniature models. Photographers achieve this effect with a special lens. tilt-shift. Using AKVIS Refocus, you can bring any photo into the world of miniature models!


The mode allows you to focus on a specific subject in a photo while blurring the rest of the image. Unlike the previous mode, it allows you to set the shape of the sharpness zone (ellipse, rectangle). When taking photographs, a similar effect is achieved by opening the aperture as wide as possible. With AKVIS Refocus, you can blur the background of an image by selecting the in-focus and out-of-focus areas and setting the bokeh parameters.


The mode allows you to simulate the movement of objects on static images. It creates the effect of a fast-moving object by blurring the image in a linear direction.
You can apply the effect to an entire image, or shift focus to specific areas by blurring the background. Add more dynamics to your images!


The mode creates a circular blur, usually caused by rotating or zooming the camera while the image is being captured. In this mode, you can select one of two blur types:
linear blur creates the illusion of an object moving towards or away from the viewer.
ring blur creates the illusion of rotation of the image.
With visual blur effects, your photos will gain more expressiveness and depth.


Now the advanced techniques of professional photographers are available to everyone!
You don't have to be an expert to get great results with AKVIS Refocus. The program is easy to use, even a beginner can easily master it. The program includes several ready-to-use presets that allow you to quickly get started and help you get familiar with the program. You can watch the photo processing in real time and compare the original image and the result.
AKVIS Refocus is available in two versions: as a standalone program ( standalone) and as a plugin (plug-in, plugin) for graphic editors.
functionality depends on license type. Try all the features of AKVIS Refocus during the trial period!
The program is available in Russian.


Own business: opening a mini-hotel What you need to open a hotel
Cheese production as a business
Fast food on wheels as a street business
How to quickly draw up a financial plan for a business project
Ideas on how to start a business from scratch with no money