Landscape- This is one of the most popular and widespread genres in photography. Sooner or later, all the masters of their craft pass through the passion for landscape photography. And there are reasons for this: when shooting a landscape or panorama, you can get gorgeous results even without the use of expensive equipment and a specially equipped workshop or studio with special lighting. All that is required to create a masterpiece is a camera and, preferably, a tripod, as well as certain professional skills and a fair amount of patience. It should be noted that very often final result depends not only and not so much on the camera, but on the skill of the photographer. Of course, any photography is, first of all, a creative process, but there are a number of rules, the observance of which will allow you to avoid common mistakes made by novice photographers.
Lighting
The object of attention of the landscape photographer, first of all, is nature. Of course, the landscape can be urban, and rural, and sea; it can be panorama or macro photography; buildings, animals and even people can be present in the pictures, however, the main difference here is the absence of artificial studio lighting. Landscape photography is done in natural conditions. This means that the issue of illumination should be approached very seriously, since the final result often depends on the light, or rather on the play of light and shadows. The most favorable for shooting landscapes are morning and evening, when the sun is low in relation to the horizon. It is at this time that the most contrasting images are obtained with a rich and varied play of light and shadows. As a rule, at noon, such results cannot be achieved due to the blinding sun and the almost complete absence of shadows - the pictures come out bright, but lifeless and “ flat". Not the most successful time of day is also late evening, after sunset. To shoot at dusk, you need a powerful device with a good lens and a noise reduction system, as well as, preferably, an external flash. Otherwise, the pictures will be blurry, grainy, with a lot of digital noise. It is equally important to choose a suitable position in relation to the light source, in particular the sun. It is not recommended to shoot against the sun, as you risk getting completely overexposed photos. Ideally, the light source should be behind the photographer.

Shot composition
An equally important condition for obtaining a truly successful landscape is the composition, that is, what gets into the frame and how the objects in the frame are located in relation to each other. It is not enough just to choose a picturesque area - often beautiful landscapes in the pictures seem banal, and, on the contrary, in the most ordinary environment you can create a real masterpiece. To do this, you need to understand what exactly is the main subject of the picture, why you are shooting it, and due to which the photo can become more expressive. It is necessary to remember some golden rules of the photographer:
. Rule of thirds. When building a picture, try to mentally divide the frame into three equal parts horizontally. If you want to draw attention to the landscape, then it should take up two-thirds of the picture. Conversely, if it is necessary to emphasize the beauty of the sky, the horizon line should run along the lower horizontal line.
. golden section rule. In the same way, mentally divide the picture into three parts horizontally and three parts vertically. The most significant objects should be located at the intersections of these virtual lines. It is best if the main object is one, for example, a tree, a house, a stone or a flower. ()
. Diagonal Rule. Objects such as a road, a river, a path should be placed diagonally across the frame. The picture will look more lively and dynamic.
And finally, one important nuance for a professional landscape photographer is the mandatory use of a tripod. Without this accessory, it will be very difficult to create a truly professional picture, since ideal lighting conditions are rare in nature, which means that even a slight hand shake can provoke blurry and fuzzy pictures.
Of course, all these rules are just the basis of your creativity. However, their application in practice will greatly facilitate the process of mastering the technique. landscape shooting.
Show html code to embed in blog
landscape in photography
Landscape is one of the most popular and widespread genres in photography. Sooner or later, all the masters of their craft pass through the passion for landscape photography. And there are reasons for this: when shooting landscapes, you can get gorgeous results even without the use of expensive equipment.
Landscape It is an expanded picture of nature. It would seem that it could be easier than taking a picture of the view you like. However, a few useful rules for landscape construction will help you to create high-end photographs.

Rice. 2
The basis for constructing a spectacular landscape are the unbreakable rules of composition. This is where the law of thirds comes in handy. Mentally divide the frame with imaginary horizontal lines. Always position the horizon line so that it intersects the landscape at a height of one third of the total height of the frame. (Fig. 1.2)
There may be exceptions if, for example, you want to emphasize the symmetry of the composition as in Fig. 3 (sea and sky).

Fig.3
In the landscape, it is of great importance main character". It can be a tree, an interesting building or group of buildings, an unusually shaped cloud, a yacht, or something else. The main character should be placed at the intersection of 3 vertical and 3 horizontal lines according to the rule of thirds.

Rice. four
Versatility is one of the main characteristics of a good photograph. It is difficult to achieve the effect of spatial depth in the frame, but this is aerobatics. This is where the knowledge of the principle of perspective comes in handy (Fig. 5).

Rice. 5
Use a wide-angle lens, it will help you create the effect of the third dimension. But at the same time, remember to fill the foreground. AT landscape photography the center of the composition is almost always the horizon line. Unfilled areas of the foreground turn into compositional "holes". A flower, a tree branch, a gate, and similar seemingly insignificant elements of the composition can compensate for the emptiness of the foreground.

Rice. 6

Rice. 7
Practice: the low point is often the best when shooting landscapes. A dull grassy lawn in the foreground can be brightened up with an unexpected flower. A pile of picturesque boulders will be a suitable impetus for the viewer’s gaze to move along a winding path deep into the frame to a picturesque hill (“the main character”), as in Fig. 6.7.
Remember that the person is not looking at your image with a fixed gaze. The gaze moves along obvious or invisible lines that connect the individual elements of the composition. If these lines are diagonals, your landscape will gain dynamism and become much more interesting. The natural appearance of diagonals in the frame can be achieved by a good choice of shooting point. In this case, the left diagonal is always more expressive than the right one. A single diagonal is most effective when it is at a 45-degree angle to the horizon (or the bottom edge of the frame).

Rice. eight
Converging diagonal lines, as you know, are the basis of the principle of perspective (Fig. 9).

Rice. 9
Practice: When two objects of equal size appear in the frame, choose a shooting point from which one of them will appear smaller than the other. This will create the illusion of versatility in the image.

Rice. ten
An unusual angle for a landscape is just as possible as for any other genre of photography. Top view will save you from being caught in the frame of the sky or the horizon line. But you probably will not have problems choosing the right shutter speed for too bright sun (Fig. 11).

Fig.11
The advantage of a low vantage point is that the size of the subject in the foreground optically increases in the frame. This is especially important when you want to make a still life with a landscape in the background. Use a wide-angle lens, which will create a deep perspective in the frame, but even distant objects will remain in focus.
Photography is light. When shooting panoramic landscapes, the photographer always has to wait for a natural spotlight to appear in the gaps between the clouds, which will brightly illuminate the desired area in the frame. The most important thing here is to be patient, although the ability to catch the slightest changes in the weather also does not hurt. It is hardly worth shooting a landscape in rainy or cloudy weather. But as soon as it begins to clear up, the sun shines through the clearings between the clouds. Try to catch a ray of sunlight sufficient to illuminate the landscape.

Rice. 12
It is under such conditions that the contrast between the bright sun and gloomy clouds can be especially expressive. An important factor in successful outdoor shooting can be even the past rain, which cleared the air of dusty suspension, dispersed atmospheric haze and significantly improved visibility.

Rice. 13
Understanding the nature of light and its ability to turn even the most boring view into a stunning canvas is a fundamental skill for a serious photographer. The most spectacular landscapes are obtained at dawn and at sunset.

Rice. fourteen
The sun gives side light, high contrast and deep shadows make the space more expressive.
If you're shooting on a clear sunny day, beautiful white clouds can bring nature to life, as shown in fig. 15-16

Rice. fifteen
Rice. 16
If you decide to become a landscape photographer, get ready to travel. Your true friend will be a tripod. And the heavier it is, the more successful the pictures will be.
Landscapes are different: mountainous and flat, rural and urban, sea or forest. Landscapes can be shot at any time of the year, at any time of the day and in almost any weather.
The most beautiful are landscapes in which there is water. Whether it's a fast mountain stream, a waterfall or the vast expanse of the ocean - such landscapes always attract the viewer's attention with their beauty (Fig. 17-18).


Practice: Use a tripod and shoot at a slow shutter speed to capture the movement of the water (Fig. 19).
Before this post, I only wrote about travel, but today I will break the tradition and share with the readers of LiveJournal a small article about shooting landscapes, which I wrote for one of the photo magazines.
I didn’t explain in detail all the nuances and load photo terms, so I explained in simple language what aspects need to be taken into account in the process of shooting and in preparation for it.
The landscape theme is closest to me, so I want to talk about shooting in this genre in my article.
I must say right away that I have never studied this craft anywhere, I do not have a diploma of a graduate of a photography school. Everything came by itself. I bought my first DSLR three and a half years ago and still use it today. During this time, I managed to take several dozen good shots and write more than 50 photo essays. Someone even thinks that I can shoot masterpieces, but from the outside, you probably know better.
Unfortunately, I don’t have many opportunities and free time to travel yet, but at the first opportunity I try to break out of the web of everyday life somewhere far away from the city into nature, taking my camera with me. First of all, I'm going to relax my soul, unload emotionally and be distracted. I have no thoughts in my head to shoot a masterpiece at all costs, rather, on the contrary, it seems to me that before that I had already given out the maximum of my capabilities and there will never be a better shot than before.
Very often we travel with the whole family or with friends...
Childhood spent in the summer in the countryside, apparently, left an imprint in my mind, so I shoot many of my landscapes in the Russian outback. I really like the greatness and diversity of Russian nature, the monuments of wooden architecture of extraordinary beauty, remote and half-abandoned villages and rickety huts and fences familiar to every Russian person ...
These pictures really impress me!
Professionals, on the other hand, believe that the "landscape" genre does not quite suit many of my photographs: some sites, as well as the organizers of most photo contests, define my pictures in the "architecture" or "cultural heritage" section. But I photograph what is close to me and pleases the eye, and it doesn’t matter to me what genre it is called. I would call my work simply "Photo for the Soul".
To the traditional question: "How is it filmed?" I can talk long and hard, but in the format of this publication, I would like to briefly go over the main points that allow me to take good photos.
Getting ready to shoot
I did not take a single more or less decent shot by accident. All my travels and short outings are well planned and prepared...
The most important aspect in landscape photography, I think, is the choice of shooting location (the so-called location). You can take as many pictures of a beautiful view of the park from the window as you want, trample the shore of a nearby lake in search of the perfect shot, or shoot a sunset near the nearest grove. You may be able to do a few good photos, but you will receive the most beautiful works only by moving in time and space.
AT school years I was seriously involved in orienteering, participated in all-Russian and international competitions, and along the way was also involved in tourism, so I am relatively well versed in maps. This helps me a lot in choosing a location and preparing a route. I would even say that studying maps and terrain is a hobby of photography.
The current possibilities of the Internet are truly limitless, so all ideas are born after studying information from the worldwide network.
On the maps google maps, Google Earth, Wikimapia, Panoramio (died to death) - I look at photographs and unique places from satellites. On many roads, by the way, in Google maps you can "ride" in a virtual machine and preview the surroundings in advance. I look for interesting notes and articles on popular sites for photographers, travel forums, as well as in networks. There is a lot of information about the monuments of wooden architecture on the Sobory.ru website. Separately, I would like to mention reserves, national and natural parks. These territories, by definition, should be of interest to landscape painters. I put all the information received together and get optimal route.
To get to some locations, it is sometimes necessary to provide additional means of transportation, such as a boat, bicycle or skis.
If possible, it is better to visit the object before shooting, conduct reconnaissance and "try on" angles - this will not be superfluous.
I visit both objects of "pilgrimage" for photographers and places where photographers have not yet reached. I like the second option a lot more, because the output is often an unexpectedly pleasant result and always a unique picture. In those areas where dozens or hundreds of shots have already been taken before me, I try to approach shooting outside the box and bring something of my own to the picture.
8
Choosing the Time to Shoot
This is the second point I would like to talk about. I take most of my shots during the so-called "regime" time: about an hour after dawn and an hour before sunset. Soft and warm light gives the image richness and saturation of colors and details the texture of objects. Transitions between bright and dark areas are smoother.
In addition, in the morning and (less often) in the evening, fogs are likely to form, which emphasize the depth of the image, beautifully scatter light and blur the contours of objects, making photographs more mysterious and fabulous.
Naturally, it is important to understand where the light source will be at the time of shooting. To do this, on the Internet, I look at the exact time of sunrise and sunset, and then, focusing on the sides of the horizon, I superimpose the direction of movement of the luminary on the map.
And, of course, the most important thing is the weather.
When the chosen shooting point is not far, it is enough just to look out the window and at the promises of weather forecasters on the phone. And if I have to travel for a long time, then I get acquainted with the forecast from at least three sources and look at the proposed map of the movement of atmospheric fronts. It helps to correct the route right in the direction of travel.
After analyzing the above points, I already have a clear timetable in my head and approximate pictures that will subsequently appear on the matrix of my camera. I must say that almost always it turns out to carry out the plan, but in some places you have to return again ...
Technical component
I shoot with Sony A65 and three lenses: Sony CZ16-80, Minolta 70-300, Samyang 8mm. There is also a portrait fix Sony SAL-50F18.
The first lens is universal, I shoot about 80% of all frames with it. It has excellent sharpness and color reproduction.
I mainly take landscape shots on a aperture covered up to f / 8 - f / 13 (this ensures maximum sharpness throughout the frame) with the lowest possible ISO value in auto (not always) focus mode. I set all these parameters, including shutter speed, in manual mode. If there is a need to get beautiful rays from the sun in the frame, you can cover the aperture and a little more.
I record the frame on a memory card in jpg and raw format, and I need the second one only for safety net, if I suddenly have to draw out shadows or lights. From the shadows, information is restored much better than from the overexposed areas, so most often I shoot the landscape with underexposure.
Forgive me, many photographers, but I rarely use a tripod. It is clear that at night, in low light, etc. conditions without it anywhere. But during regime hours, the light changes rapidly and, as a rule, it is enough for me. Sometimes you even have to run from one shooting point to another in order not to miss the moment. But I love to run and extra charging never hurts :) The tripod in this situation significantly reduces efficiency. Sometimes I shoot with exposure bracketing, but here, as a rule, I don’t need a tripod. Even panoramic shots in 90% of cases I do with my hands.
About panorama shooting
I do some of my work in panoramic technique - I stitch together several frames taken from one point with an overlay. Such pictures in the final version look like quite ordinary ones. And the point here is not at all the desire to shoot scenes for posters or get transcendent pixels, just a panorama gives volume, depth and sharpness to the entire frame, allows you to direct the viewer’s gaze from the foreground to the middle and background, create the effect of being in the frame, and, of course, gives wider coverage.
I really like photos with an interesting foreground, so I try to build a frame (be it a panorama or a single shot) from there. Stones, flowers, leaves, etc. can be used as the foreground. If there is nothing to catch the eye, you can improvise by dragging, for example, some snag.
Treatment
I post-process the frames in Photoshop Ps5. I mainly correct the shadows-lights, contrast, saturation, apply filters and sometimes the technology of expanding the dynamic range of the image (HDR). I do not welcome photo collages. In Photoshop, I also stitch panoramas, mostly in automatic mode. Hands finalizing inconsistencies and geometry.
It should be noted that the use of a photo editor allows you to improve the frame, but the source must be of high quality. If the picture frankly did not work out, then no editor will do anything good out of it.
I am critical of many of my shots. It so happens that at the time of shooting you lose sight of some moments, and simply neglect some nuances. After some time, you begin to understand what could have been done better.
Here, in a nutshell, is all. But perhaps I missed something.
Summarizing all of the above, I want to say the following: if you are into photography, do it with soul, be creative and improve your skills. Choose your location responsibly, plan your route, study the weather…
I wish you all good luck, interesting trips and beautiful memorable shots!
Although at first glance landscape photography may seem very simple, in fact it is much more than “point the camera - click the shutter”. The goal of landscape photography is to convey an inner state, to express something more, and not just to show the landscape in front of you.
We see reality every day. That is why, in my opinion, landscape photography should not simply reproduce it. Objects should not be in front of the viewer or occupy the entire photo: the composition should lead the eye to the final point of the picture - the point of interest, your subject.
Like any other art form, landscape photography has its own rules. It takes a lot of time to master the lighting, composition, subject selection, post-processing, and the final results will vary from person to person.
There are plenty of videos out there with tips and ideas on this topic, but the bottom line is that it doesn't matter unless you go out and start taking as many photos as possible every day to understand what works and what doesn't.
These are 25 tips and ideas for landscape photography. I hope you find them useful (details about each of them are in the video):
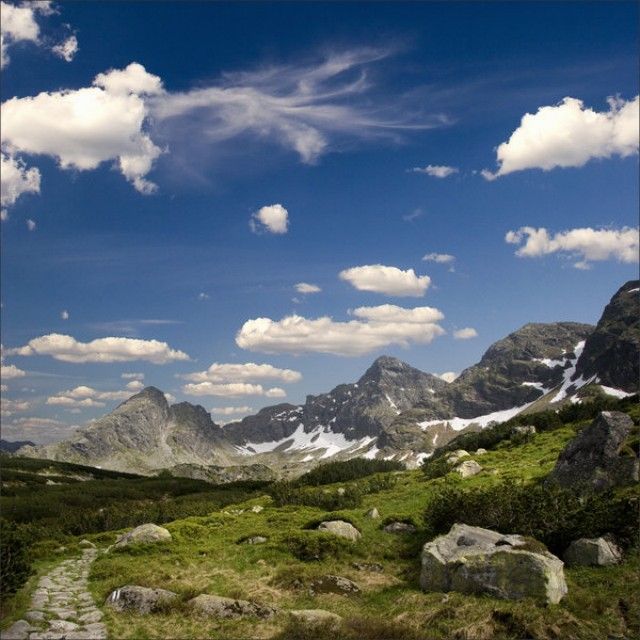
1. Shoot the same subject at sunrise and sunset. Different light, different angles, completely different results.

2. A low-angle shot changes the perspective dramatically, creating a more interesting shot... a picture you don't see every day.

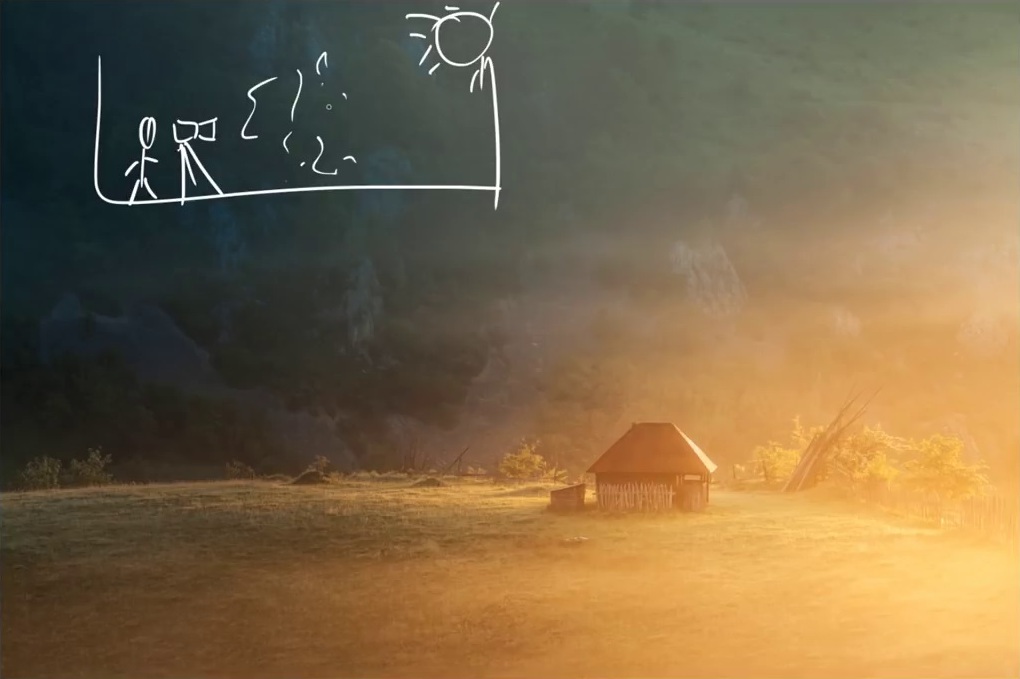
3. If it is foggy at dawn, shoot against the light so that the fog is illuminated by the rays of the sun.
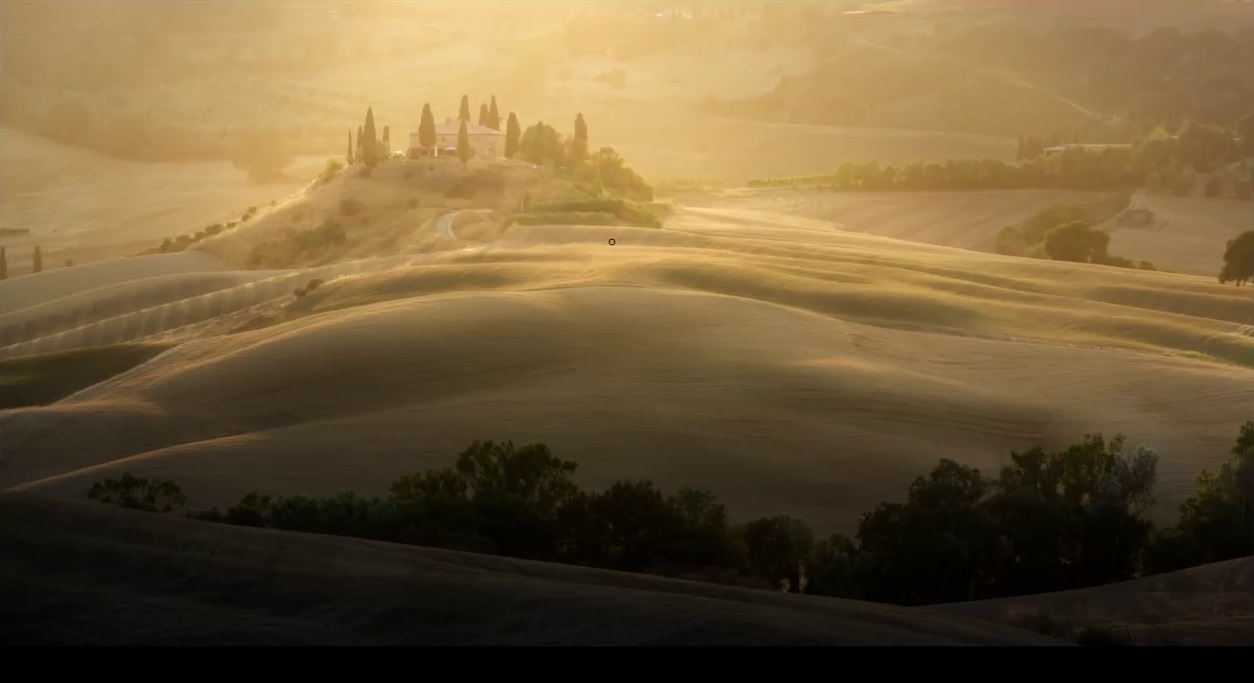
4. Silhouettes are best obtained before dawn, with a cloudless sky.
it simple idea how to create something interesting in an uninteresting moment. All you need is an interesting shape.

5. Dark areas direct the eye towards light areas.

6. Long exposures will help to tell more about the weather: wind, temperature, movement of clouds.

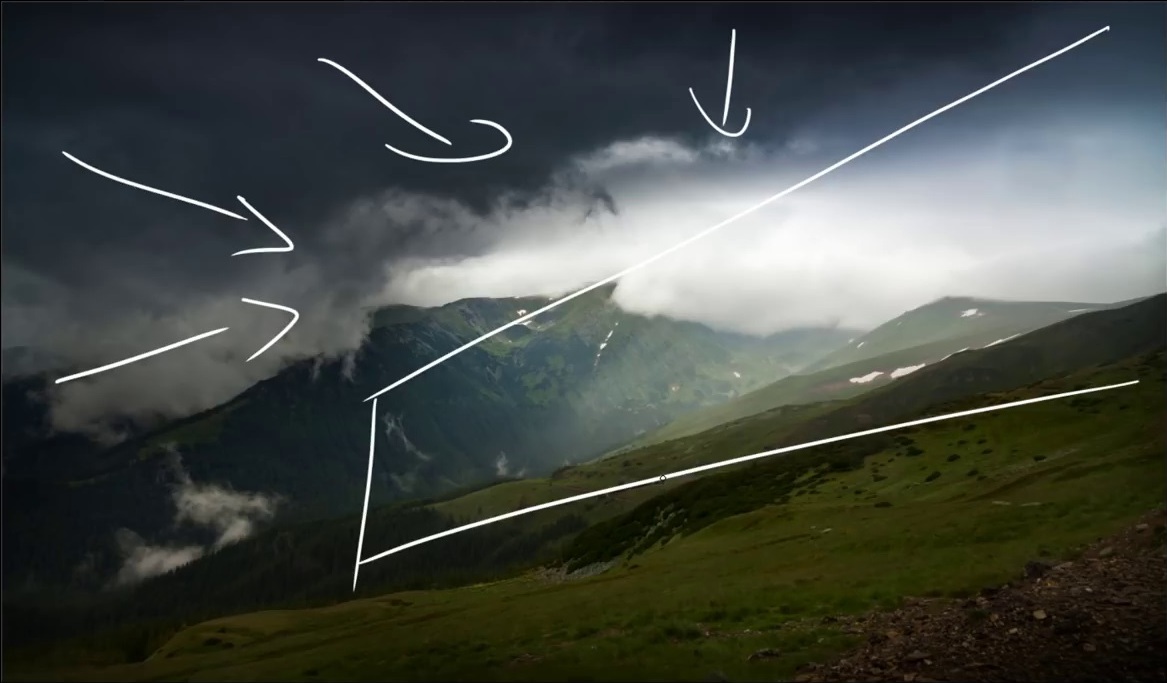
7. If there are dark clouds in the sky, this does not mean that you need to stay at home.
Light in the gaps between the clouds, through the clouds - a beautiful moment worth capturing.
8. A bright spot of color in a sad gray landscape can make a strong impression on the viewer.

9. Pay attention to the background when you want to highlight the subject, especially when shooting in the forest.
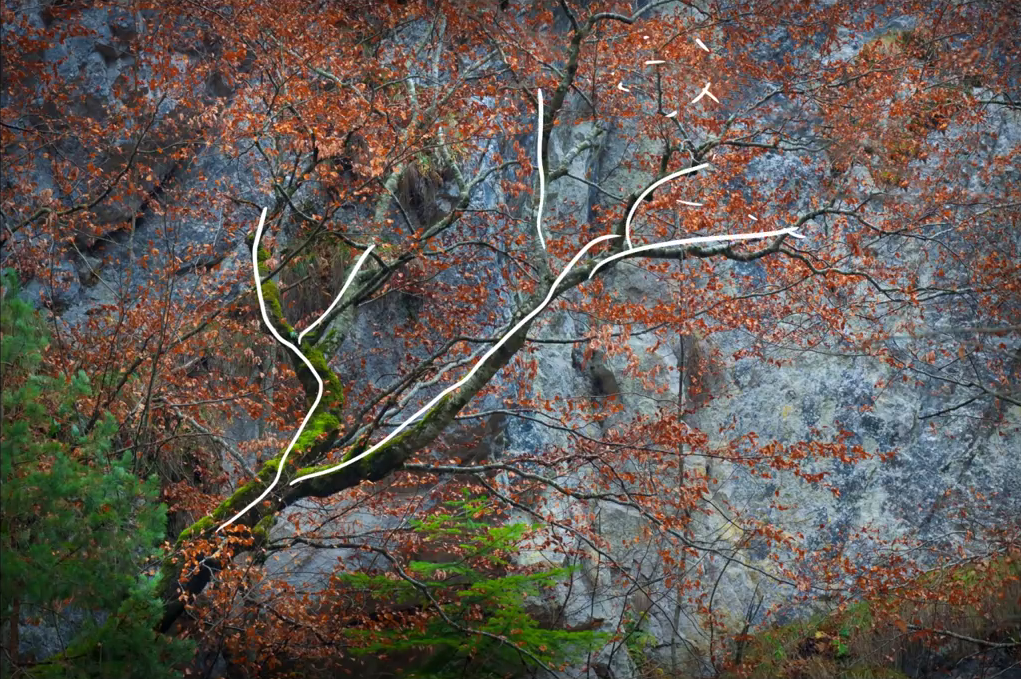
10. Foggy days in winter can be boring.
But find a lone tree and place it in the center to emphasize the subject. Negative space will convey a sense of great emptiness and how small O tree on its background.

11. Reflections are always beautiful.
Earth is not always, and reflections can help get rid of unwanted elements.

12. Move the camera while pressing the shutter.
This works best when the subject is clearly separated from the background.

13. Contrast can be very helpful in separating the subject from the background.
A small white flower on green leaves, slightly highlighted with light, can create a simple yet beautiful photo.

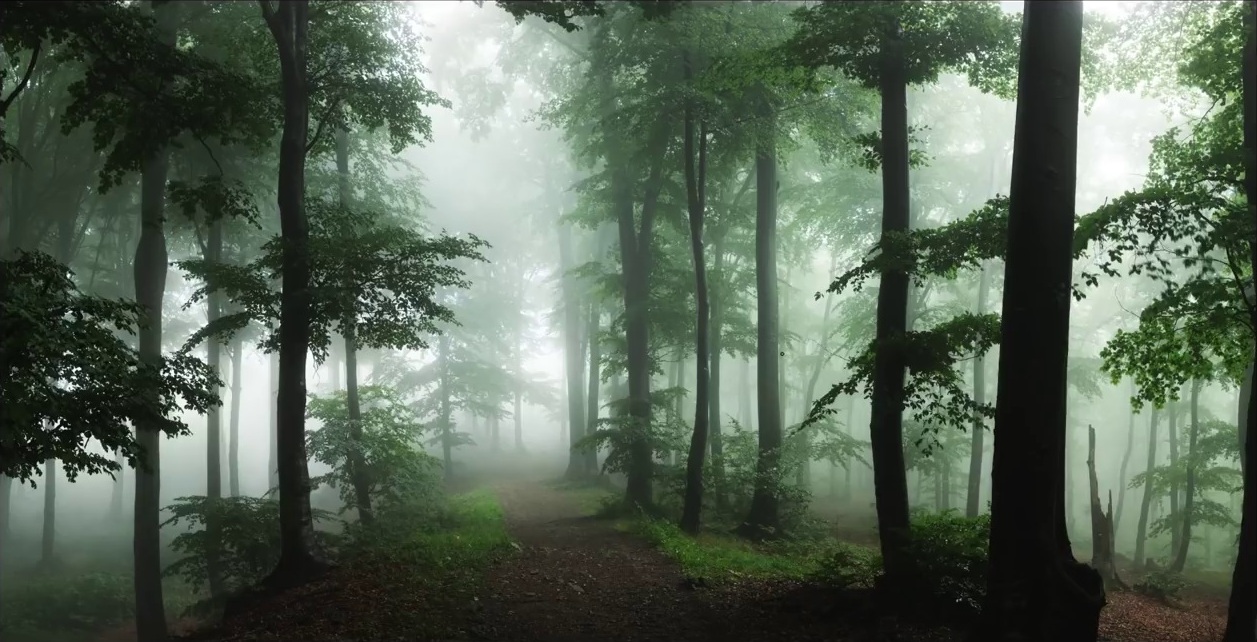
14. Panoramas are a great way to convey the scale of a landscape in a forest.
15. Cloudy skies at sunset may offer nothing...
... or to give an almost miracle, when the sun's rays break through the clouds for just a second.

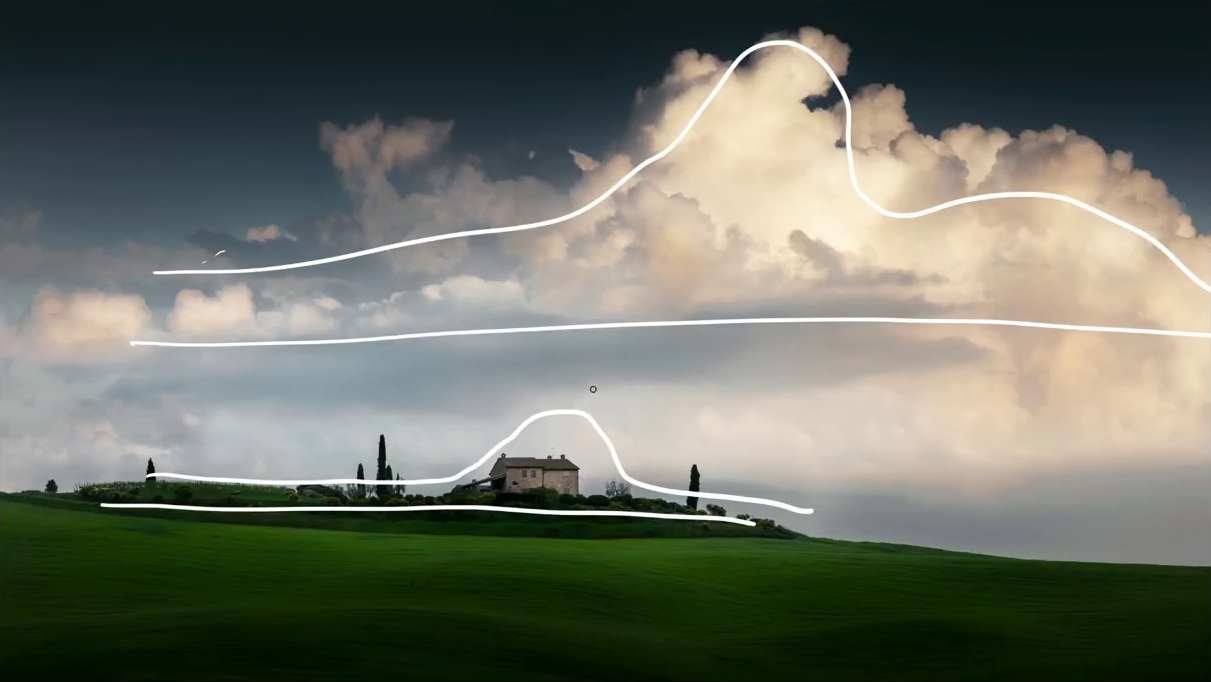
16. Sometimes the sky can become a mirror of the landscape - when the clouds follow the lines of objects on the ground.
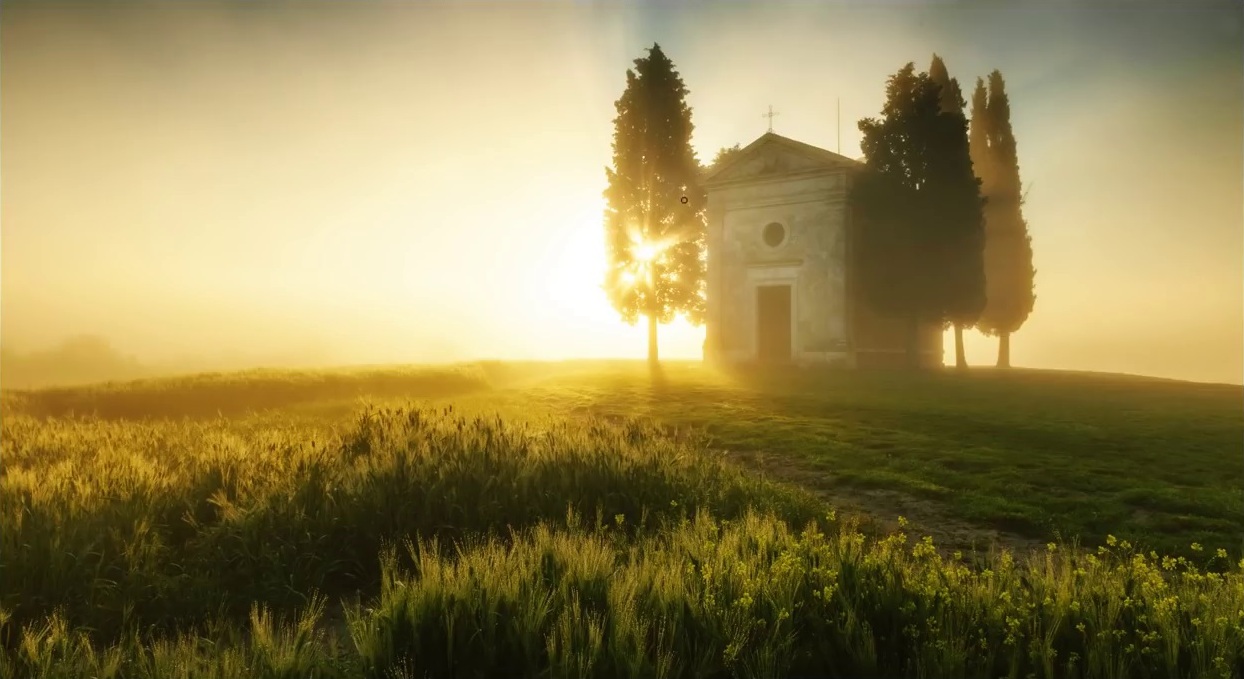
17. A foggy morning is a wonderful time, especially if at some point the sun breaks through the fog.
Choose your shooting position so that your subject is in the mist, between you and the sun.
18. A light at the end of a forest path, when everything else is dark, can make for a great shot.

19. The best time to shoot waterfalls is early spring when snow melts in the mountains.

20. Photograph trees that look unusual... especially old trees.

21. The mountains in the background, behind the houses, can convey the magnitude of the landscape - use a telephoto lens for shooting.

22. When shooting in urban areas, look for complex dynamic lines. In addition, several vertical plans will add volume to the image.

23. Separate the illuminated area from the surroundings with a telephoto lens - and get a great photo.

24. When shooting, think about other perspectives - this can give a unique look to a simple subject.

25. Don't forget to see the details.
Sometimes a large landscape can take your attention away from smaller elements. Textures are a great thing, they can almost look like abstract art.

A detailed analysis of all examples is in this video:
I hope you liked the tips and found them useful. Keep filming - the only way become a better photographer!
About the Author: Toma Bonciu is a Romanian-based photographer specializing in landscape and travel photography. His other works are on his website and pages in
Greetings, dear readers! In touch with you, Timur Mustaev. Some amateur photographers consider landscape to be one of the most elemental genres of photography. To some extent, I share their point of view: go where you like, but shoot everything that comes into your head.
Plus, unlike studio shooting, which requires considerable financial costs, nature will not disappear and will not require anything in return, except for caring for it, and the situation changes depending on the time of year, giving scope for imagination.
But is the landscape really that simple? Let's figure it out together.
And let's start the debriefing, perhaps, with the definition of this genre and its place in human reality.
landscape in photography
Landscape- This is a genre in which the center of the image is nature.
This direction originated in the era of the absence of cameras, when well-known and not so famous artists went to the open air and conveyed what they had taken away with the help of brushes and paints.
That is why understanding the meaning of this genre should be learned from realist artists.
Pictures, like nothing else, allow you to feel the beauty of nature, they are inextricably linked with inner world a person, with his feelings, mood and love for life in general.
And in photography, a landscape is not a thoroughly accurate redrawing of this or that corner of nature, but its own worldview.
Modern landscape photography is quite versatile. Exhibitions of such materials instill in the viewer an artistic taste and develop the imagination by drawing associative parallels between real life and pictures.
The relationship between photography and life has given rise to a new direction - the urban landscape, in which the dominant is not nature, but the brainchild of society - the city with its numerous streets, architectural objects, squares, as well as an endless stream of cars and pedestrians.
The urban and classic landscape captivates even the most stingy photographers! And there is an explanation for this: shooting in this genre, you can get excellent shots without using expensive equipment.

All you need is desire, patience, a tripod, a SLR camera, and some skill in using it.
Shooting in this genre, as, in fact, in any other, is, first of all, a creative process, accompanied by your own vision of what is happening, but, oddly enough, there are many rules, the observance of which will save you from failures.
Landscape photography
Close your eyes for a moment and imagine: there are vast expanses of unprecedented beauty in front of you and it seems that as soon as you press the shutter button, the most beautiful image that the world has never seen will appear on the camera display ...
Capture this episode in your memory and open your eyes, your fantasy will remain a fantasy, and you will never know how to photograph a landscape if you neglect the rules listed below.
- Maximum Sharpness. Many photographers practice shooting landscapes wide open, but "many" is not a good indicator of good work.
A classic technique during landscape photography is focusing on the entire image (shooting with a covered aperture).

Usually it is enough to make simple camera settings to get a sharp and moderately exposed photo: a slider in the f / 11-16 region, or you can trust the machine if you shoot in . However, to avoid shaking, it is best to shoot landscapes with or .
- Presence of meaning. For any photo, it is important to have a semantic center of the composition, so that, as they say, the eye has something to catch on. Anything can serve as the center of attention: an interestingly shaped building, a tree, a mountain, a ship in the middle of the sea, etc.
- Rule of thirds in the overall composition of the frame. The location of the semantic center in relation to all the elements and details of the image is as important as the presence of sharpness.
The reference says: the photo looks most advantageous when the objects being photographed are conventionally separated by lines that divide the image into three parts, both along and across.
- Thoughtful foreground. Place the semantic centers on the front of the photo, leaving the “air space” in front, so you can create an effect of lightness and convey depth.
- dominant element. The secret of successful nature photography is revealed - either the sky or the foreground should dominate in the picture.

If your photos do not fit given description most likely, they will be considered boring and mundane.
If it so happens that the sky during the photo shoot is uninteresting and monotonous - shift the horizon line to the upper third, so you will not let it prevail over the rest.
But if it seems that the airspace is about to explode or collapse to the ground with lava flows - give it 2/3 of the frame and you will see how much the plot of what is happening can change.
- lines. There are endless ways to reflect the beauty of nature in full. One of them is the technique of including active lines in the composition. With the help of lines, you can redirect the viewer's gaze from one semantic point of the photo to another, while creating a kind of closed space.
Lines not only create patterns in the photo, but also add volume. This also applies to the horizon line, beyond which you constantly need an eye and an eye.

- Traffic. Many consider landscape shots to be calm and passive. But this is not necessarily the case! You can add life to a photo with the help of water or wind, for example, capture with a SLR camera a riot of the ocean or a flowing waterfall, a breath of wind or falling leaves from a tree, birds taking off or people walking.
The influence of weather and time on the quality of landscape photography
The golden rule of the landscape: "The scene and the plot can change dramatically overnight, depending on weather conditions and seasons"
It is wrong to assume that best time for natural shots - a sunny day.
In cloudy weather, in terms of lighting effects, shooting is a pleasure: hail, rain with snow and thunderstorms can fill any landscape with an ominous, mysterious mood.
However, there is a side effect - the likelihood of getting your feet wet, getting sick and saying goodbye to the DSLR forever, since moisture can have a devastating effect on all electronics.
To avoid this, plan your day in advance, take your packing seriously: think about what to wear and what to wrap your camera in. For these purposes, it is best to purchase a waterproof case, or at least one that protects the lens from drops on the lens.

Shooting in the rain is not necessary - it's just one way to achieve artistic images.
This creates a very soft diffused light, giving the pictures a lightness and a special sleepy look.
A forest covered in fog will look much more mysterious and attractive than on a sunny day.
Although if the shooting takes place in the summer or autumn, the light penetrating through the foliage can create an interesting, wide aperture.
At sunset, using , you can take pictures of no less interesting landscapes, especially if the foreground is slightly backlit.
To avoid bunnies, use a hood or. This filter in landscape photography is simply irreplaceable.
Night shooting in technical terms, the most difficult. Shooting nature in its full nature is pointless due to the lack of light. Therefore, you need to go where there are artificial light sources - the city.

In this case, you should not use the flash without interruption, raise the value to 800-1600 and go towards the city landscape!
A brief educational program on landscape photography has reached its point of no return! Hope, this article was at least somewhat instructive and helpful. I think that I have conveyed to you the meaning of how to photograph a landscape correctly in order to achieve the desired results.
If you are an aspiring photographer who wants to achieve positive success in photography, then everything is in your hands. To begin with, it is best to start with the concept of your SLR camera. And one of the video courses below can become an assistant. Most novice photographers, after studying this course, have a different attitude to SLR camera. The course will help to reveal all the important functions and settings of the DSLR, which is very important at the initial stage.
My first MIRROR- for owners of a CANON DSLR.

Digital SLR for beginners 2.0- for owners of a NIKON DSLR.

Subscribe to blog updates, and share links to articles with friends.
All the best to you, Timur Mustaev.
Related Articles


How to disable ads on Android: remove pop-up ads
The Russian received a term and a million fine for "piracy Negative consequences of the law
Identification of key factors
The criteria for classifying organizations and individual entrepreneurs as small and medium-sized businesses have changed
See what "Royalty" is in other dictionaries Pitfalls of legislation