Where to begin
I understand perfectly well that not all beginners can be surprised by such terminology as shutter speed, aperture, focal length. Nevertheless, I advise you to first study the "Photography Tutorial" ("Landscape" is its direct continuation), and at the same time refresh the terminology on the "Photo Dictionary" page, so as not to return to explaining key concepts: it is more convenient (and more useful) than run each time on the links and back. And most importantly, it will come in handy not only for reading how to shoot a landscape. As I understand it, you intend to take pictures, and not just read :)
Lens
You can shoot landscapes with absolutely any lens, from fisheye to telephoto. And if you have only one lens with which you get great pictures, then you should not buy another one - especially “for landscapes”. And then the text should be taken solely for reference, and not run to the store for wide optics, so that "it fits more into the frame."
In general, I advise non-professionals to shoot any subject with one lens and learn how to do it in such a way that all ideas come out with a bang. For
Buying expensive optics (or a new camera) will never add to anyone's ability to shoot.
Still, there are some rules to be aware of. Before you start shooting landscapes, you need to choose the “right” lens from your collection (or the correct focal length if there is only one lens). For owners of soap dishes, compacts and other cameras with non-replaceable lenses, the question does not disappear. Their lens is tightly built into the camera, but they also need to be able to use. Put it in the “wide angle” position, you don’t need to “push out the zoom” here. More precisely, this is not always necessary. Next, we read together with the "mirrors" how to shoot a landscape correctly :)
So, we take a wide-angle lens, or set the existing one to the minimum focal length. Wide-angle optics give a larger field of view, greater sharpness and therefore are more often used for landscapes. Of course, at a medium angle and at a telephoto position (and even with a very long telephoto lens), you can also shoot landscapes with not the worst result, because a lot depends on your intentions. But still, the landscape is more often shot at wide angles, since the landscape implies spaciousness and depth of field across the entire field (which is difficult to achieve with long-focus optics).
We will consider all examples on a specific (and quite budgetary) model: the Pentax DA 16-45 mm f/4 lens. Consider that I promoted it :), but owners of Canon and Nikon should not be upset, or fall into a "religious dispute"! Your technique is just as good and even better! Let's get down to business. We are now interested in the numbers on the 16-45 lens. This is the focal length. Since I have a digital SLR, and the aspect ratio of the frame (matrix) for Pentax is approximately 1.5, then we multiply 1.5 by our numbers and we get an equivalent focal length (EGF) of 24-68 mm. I made this recalculation so that you can compare your focal length with it. Who did not understand: I strongly recommend reading the Focal length in 35 mm equivalent (EGF) again :), since only the equivalent focal length will be indicated below. As a result, we have a lens with a wide angle (everything less than 35 mm is "wide"), a small telephoto position of 68 mm, and a constant aperture of f4 for different ends of the "zoom". As you can see, this is not the most outstanding "zoom", but its wide angle is quite decent.
What is distortion
So, we put the lens in the widest position, in this case it is 24 mm. Of course, you should not shoot portraits at a wide angle, since a wide-angle lens (even an expensive one!) By virtue of its design, can give (and does!) Geometric distortion, or as they say, "distortion". What is distortion?
This is the curvature of the image in the lens due to the uneven increase in objects from the middle of the lens (group of lenses) to its edges. 
And now the same thing, but simpler: this is when straight lines look crooked, the central part of the picture is sticking out, the background seems further than it actually is, and the perspective is distorted :) Why is this happening? In any lens, in general, everything is worse at the edges, there is only one consolation - with distortion, the sharpness of the image is not violated. Of course, in a specialized wide-angle fix, distortion is minimized, but even there it is still there.
In the picture, geometric distortions are clearly visible to the naked eye, the shooting was carried out at the widest angle (EGF = 24 mm). It is especially noticeable how the house on the right is littered on its side, looking more like the Leaning Tower of Pisa than a residential building. What if he falls? :) How to shoot a landscape and live all your life with this grief in your heart? Is distortion a disadvantage of an image? or lens? Of course, the lens is involved (and the wider the angle, the more distortion), but there are a lot of creative questions, and no one knows the exact answer.
One thing is certain: distortion is always a smaller drawback than an unsuccessfully composed frame :)
Well, for the sake of completeness:
The absence of distortion is always a lesser advantage than a well-composed frame :)
And already in the case of an ultra-wide-angle fisheye lens, distortion from the category of shortcomings smoothly turns into undoubted advantages :) And in general, there are pictures where in this way they try to emphasize the expressiveness or dynamics of the plot. In the end, it is useful to add: distortions in themselves are very bad :) Well, they explained ... completely confused! another will say. In fact, the situation is this. Empty and deserted highway. There is no traffic light, but you need to go to the other side. Of course, you will cross - do not wait, in fact, when they put a traffic light :) but break the rules traffic- this is very bad ... it's better not to violate! What about the conclusion? And the conclusion is simple: everything comes with experience! :)
To reduce distortion, or vice versa, increase its influence (for example, in artistic purposes), you need to know that such distortions are especially pronounced if you shoot from the bottom up such a frame where there are vertical lines (pillars, trees, walls of buildings, etc.) and especially if these lines are located closer to the edges of the image. Distortion is significantly reduced if you zoom in (increase the focal length). And, of course, no one forbids the use of high-end optics, such as
the SMC Pentax DA 15mm f/4 AL Limited lens, or a similar wide-angle and high-quality prime, also exist with a wider angle (and powerful aperture). Optics of a similar class are available in many other systems, but I don’t have the opportunity to write reviews of all the “landscapers” due to lack of time. There is only one common drawback of such lenses - it hits on the spot at a price, and not in the eyebrow, but in the eye. But even the most expensive of them cannot ideally correct distortion. Therefore, many correct the distortion in Photoshop, and we will return to shooting landscapes with our 16-45 / f4.
Landscape and Aperture
In general, a wide angle is good for landscapes, but for a portrait, a focal length of 50 mm and above will be optimal. For landscapes, as a rule, the aperture is covered - so that everything is sharp, "from the navel to infinity", as is often the case with compact cameras: in landscapes, you can not cover the aperture at all :). A DSLR is harder to use (whatever they say in advertising!) - a fast lens can blur the foreground when focusing on distant objects. And not even very fast, as in our case - look at an example:
Landscape #1. Path to the sea.
aperture f4, shutter speed 1/2000, EGF 39 mm.

Zooming in, we can see that the foreground pebbles are slightly blurred. Why? It is known that various kinds of distortions increase towards the edge of the lens and decrease towards its center. By covering the lens with a diaphragm, we make only the central part of the lens work. Those. reduce distortion. These are the laws of optics. This also applies to sharpness - with a decrease in the aperture opening, the depth of field (depth of field) increases. I won't torture you with proofs: believers look for materials in the Bible, or believe everything the preacher says; atheists will take a physics textbook and find in the optics section the formulas for constructing optical systems and the properties of a simple lens; photographers will just trust their experience - the choice is yours :) Let's get back to the picture. Here, the f4 aperture was set as open as possible for this lens, as a result, the depth of field is small and the pebbles in the foreground did not “fall” into this depth of field - they are slightly blurred. Why is the foreground blurred? Because focusing was carried out at a distance far enough from it (along the coastline). To "focus attention" on the pebbles, it was necessary to focus on them, and then everything else would be blurred - both the sea and the coastline. But what if we want to have a sharp frame across the entire field? That's right, shoot the landscape with a soap dish! And the unfortunate owners of DSLRs will have to think very hard with their heads :) - for example, how to clamp the aperture: and for this you have to read the instructions, and then study the camera, and then look for where this lever or wheel to control the aperture is, and even think in what position to turn this wheel, and what do the numbers mean, which will change and how sharp it will be - in general, everything is not so fun at all ... :)
But seriously, the very fast shutter speed used in the picture made it possible to cover the hole up to 11 (in this case, all the light rays that form our picture pass closer to the center of the lens lenses!), And then we would get a sharp picture from pebbles in the foreground - to the sea inclusive. At the same time, a shutter speed of 1/250 sec was obtained, which is more than enough for static shooting. In theory, with a focal length of 39 mm, a shutter speed of 1/60 sec would be enough, but I do not recommend reaching extreme values (both shutter speed and aperture) without much need.
Landscape #2. Path from the sea :)
aperture f8, shutter speed 1/500, EGF 24 mm.

Blurring the near (or far) part of the picture in a landscape is not at all necessary. That is why I advise you to cover the aperture even on a compact - to develop a habit called "correct photography". For a SLR camera, this is a necessary reality - unless, of course, you want to deliberately blur part of the picture. On the right you can see a similar example, but made with the aperture held down and focusing on palm trees and girls :) ⇒
Yes, yes, this is the same path, but now it no longer leads to the sea, but back :) But now we are not interested in palm trees and girls, but in a completely different way. In this photo, both the far and the foreground are quite sharp. This is easy to verify by zooming in to compare the cloud with nearby pebbles on the path.
Here, the aperture could be covered up to 11 - a shutter speed of 1/500 of a second made it possible to do this, turning into 1/250, which would also be quite enough for a wide angle. With such good lighting, photographing landscapes is very comfortable, almost any camera can handle this, including a soap box on the machine, and, I think, any photographer :)
It is generally accepted that landscapes are best shot with the camera held horizontally. However, as you can see from the last two shots, they may well stretch from the bottom up! If the plot requires it (and it required it here!), then with vertical (they also say "portrait") photography, the landscape looks no worse than horizontal.
What is hyperfocal
The thirst for sharpness to the horizon is almost a sine qua non when photographing a landscape. How to focus correctly? The easiest way to do this is to set the lens to infinity (the icon next to the distance scale). In this case, everything will be sharp from some border to the horizon, which allows you to fully focus on choosing a composition without being distracted by focusing the lens. However, in this case, the depth of field will be somewhat less than the maximum the lens can provide.
Here you can focus not on infinity, but directly on the said near border, so that the horizon remains sharp enough, and the near border of the depth of field moves even closer to the foreground. This is called setting to hyperfocal distance.
Therefore, when shooting a landscape, it is important to remember:
Focusing on the hyperfocal provides maximum sharpness from half that distance to infinity.
Sometimes this half is just not enough for the sharpness of the foreground. There is a simple formula for practical calculations, which, to be honest, I never use myself :-)
H \u003d F 2 / D * C, where
H - hyperfocal distance
F - focal length (not EGF, in meters)
D - aperture number (denominator)
C - circle of confusion = 0.043 / 1500 /k (i.e. 1/1500 of the length of the film diagonal in meters, k is the crop factor of your camera).
Get the hyperfocal distance in meters.
When shooting landscapes, doing such calculations is extremely inconvenient, so you can combine the “infinity” symbol on the lens scale with the division of the depth of field scale, which corresponds to the set aperture. If there is no scale (almost always with new optics!), then learn to determine the distance by eye. In general, nothing unusual, everything is as always :)
Below is a table of hyperfocal distances for some cameras, typical focal lengths in EGF (for clarity of comparison) and most landscape apertures. The distance must be divided by 2. For example, on a DSLR with a 50 mm lens and F8 aperture, focusing on hyperfocal will be 7 m, which means we get a depth of field from 3.5 m to infinity. As you can see, the smaller the matrix, the wider the angle and the more the aperture is clamped, the more opportunities to capture both near and far ground in sharpness.
| Hyperfocal in meters | ||||||||
|---|---|---|---|---|---|---|---|---|
| Matrix size | EGF | F2.8 | F4.0 | F5.6 | F8.0 | F11 | F16 | F22 |
| 36х24 k=1 | 24 mm | 7 | 5 | 3,6 | 2,5 | 1,8 | 1,3 | 0,9 |
| APS-C k=1.5 | 24 mm | 4,8 | 3,3 | 2,4 | 1,7 | 1,2 | 0,8 | 0,6 |
| APS-C k=1.5 | 28 mm | 6,5 | 4,6 | 3,3 | 2,3 | 1,7 | 1,1 | 0,8 |
| APS-C k=1.5 | 35 mm | 10 | 7 | 5 | 3,6 | 2,6 | 1,8 | 1,3 |
| APS-C k=1.5 | 50 mm | 21 | 15 | 10 | 7 | 5,3 | 3,6 | 2,6 |
| APS-C k=1.5 | 100 mm | 83 | 58 | 42 | 29 | 21 | 15 | 11 |
| Compact 1/1.8" k=4.8 | 28 mm | 2 | 1,4 | 1 | 0,7 | - | - | - |
In this situation, the compact feels best here (not even with the smallest matrix). A real landscaper! I did not give compacts with smaller matrices, they already have everything sharply from slippers to the horizon. It's okay, such cameras have a lot of other problems :)
How to shoot a landscape in summer :)
And shooting a landscape in summer is easiest, because good lighting is much more common than in winter, and the colors are more saturated. But no one canceled the other subtleties of landscape photography.
Shot #3 is typical enough: sharpness at infinity is especially important for landscape photos, in which the background is as important as the foreground. But the shooting of the magnificent Ladoga landscape at the source of the Neva was carried out for greater effect from a very low point, which made it difficult to get the depth of field from the stones (close to the camera) to the horizon, which is far from these stones. Setting to infinity did not help: everything was great except for the foreground, which stubbornly did not want to fall into the depth of field even with such a clamped aperture.
On the other hand, setting the hyperfocal to a distance closer than infinity helped - focusing on a stone in the water (I estimated the hyperfocal by eye). The aperture was clamped to f11 (I didn’t want to clamp narrower than f13-16 due to possible diffraction) and, of course, the widest angle helped. As a result, the depth of field moved to the closest stones, while continuing to reach the horizon at the same time.
The focal length for landscapes is usually chosen less than the standard one, this provides both a greater depth of field inherent in short-focus optics and wide-angle (more space will fit into the frame). In landscape No. 3, all the possibilities were used: the "correct" hyperfocal, sufficient aperture, the widest possible angle (for this lens) was taken.
Of course, the landscape can be shot at a longer focus: it all depends on what you want to shoot, on the angle, on the ability to get closer. For example, I did not have such an opportunity - to "frame with my feet", photographing landscape No. 4 - because I would have drowned with the camera, and I wanted to get a bigger parachutist, because he is an important "detail" of the landscape ... :)
The following landscapes are shot at a wide angle. If the gorge with a mountain river (No. 5) were shot at a long focus, then either a cloud or a river would fit into the frame, because it can be extremely difficult to step back. In the mountains, an abyss often gapes behind you, or an impregnable wall rises like a block: there is nothing to do here without a wide-angle lens! But it happens even worse: when your shoes are torn in the mountains, the matter can end much more sadly than your legs broken into blood. Yes, and you will have to break them much more if you jump barefoot with a camera over a pile of fragments of stones, and, of course, not in order to immediately go back, but in order to take a more beautiful angle :)
You can often hear that the photographer shoots landscapes only twice a day: in the morning and in the evening. That's right, sunsets and sunrises are incredibly beautiful. But still the main highlight is the expressive sky! Reflections of clouds on the water can bloom even the most nondescript pond, in this case, midday photography can be a lot of fun.
In general, you already understood how to shoot a landscape correctly. We develop a route, we don’t jump into the abyss, we don’t climb into the water, we don’t climb rocks, and, most importantly, we carefully choose the lens and shoes :)
Photo number 7 will tell us about shooting a sunset in the evening. Here you need to remember that the sunset can quickly disappear, so you need to choose a shooting point in advance in order to determine the angle - what and how will be in the frame (and, of course, so that the place is not taken by photographers who have come running from all over the area! :)) - in Basically, be ready.
We immediately set the exposure, we measure the sky, because at sunset we need a good rendering of the upper part of our wonderful landscape. A well-exposed lower part of the frame is not needed with whitewashed skies and without any sunset. You will learn about such mistakes and methods of measurement at the end of the page.
So, since such lighting requires slow shutter speeds, it is best to use a tripod, or set the maximum aperture. Because I didn’t have a tripod handy, I chose the latter, as a result of which I got quite acceptable shutter speed. And I turned on the flash for the foreground to fix and at the same time highlight the impact of the wave on the stone for a greater effect. As you can see, sometimes you can shoot a landscape with a flash :)
Landscape No. 7: The Ninth Wave :)
7. 
Aperture f4, shutter speed 1/60 s, EGF 24 mm.
A typical example of a multi-angle shot with near, medium and far shots. Do you know what is the hardest thing about this photo? This is to protect the lens from salt water splashes :) A protective filter wound on the lens can be a great help to the photographer in such situations.
How to shoot a landscape. Tips for photographing typical landscapes:
8. 
aperture f8, shutter speed 1/500 s, EGF 27 mm.
I will not list further common tips: avoid symmetry in the frame, do not cut the image (or head) in half with the horizon line ... be sure to use the "rule of the golden ratio" (or the simplified "rule of thirds") to place the semantic centers of the photo not in the center , and on lines a third of the distance from the edges of the frame, or the intersections of these lines...

Take only multi-plane shots, with obligatory focus (sharpness) in the foreground.
First, symmetry can often have its own charm, especially when it comes to converging lines of perspective. In addition, many photographers deliberately use perspective geometry, whether or not there is a lack of symmetry. Or lack of availability :) Perspective can not only emphasize the depth of space, but also direct the wandering gaze of the viewer to the desired point in the frame (in the center, which is not without meaning). For example, like this:
Cityscape: perspective :)
9. 
Secondly, the semantic centers of each photograph can be different from the third one... a normal person will not place, say, a lonely tree (or a person) all the time at the same point in the frame. Nevertheless, such tips for shooting landscapes (and not only) are almost always given ... To put it simply, in order to take excellent pictures, you can follow the rules no less than break them - and at the same time get an excellent result. As well as not getting :) If everything was so simple - follow a simple set of rules and get a masterpiece - the photo would have to be buried ...
Imagine, a certain critic comes to a photo exhibition and says: “Oh, this is an excellent still life, the apple coincides with one of the points of the golden ratio - what an unsurpassed composition! ). And here is a landscape worthy of Aivazovsky's brush: the horizon line is not in the center, but, as expected, is shifted by a third from the edge of the frame! Pay attention, gentlemen, the next photo is a real masterpiece, everything is sharp to the horizon ... "
However, it smells strongly of insanity, doesn't it? :) Nevertheless, I see nothing wrong with knowing these rules and applying them creatively, but not stupidly following them always and everywhere. For beginners, I advise you to start shooting by observing these rules rather than by denying them, but very carefully and unobtrusively. I will allow myself to philosophize a little, so you can safely skip the next paragraph :)
The photograph must first of all express any intention, idea, or worldview of the photographer; or to be at least just beautiful (and, of course, technically of high quality), but even all of the above is by no means a guarantee of a masterpiece ... And the amount of money earned by a professional for pictures is by no means a measure of values - this is a measure of the values and prestige of his customer, advertising, for example, toilet paper :), or stale in warehouses and unclaimed, but already made (in a large batch!) Unsuccessful model of army boots :) And also money is a measure of the punctuality of the order fulfillment by the photographer and the promotion of his name ... This is by no means a stone in the garden of professionals, this is just a stereotype of the cultural and moral values of a market economy :) Non-commercial photographs of your obedient servant should not be considered as some examples of creativity, in any case, these pictures should not be such examples, since they were selected purely for educational purposes.
How to shoot a landscape in winter
There is nothing worse and more boring than photography in winter... Fingers get cold on the camera release button. The dead season, there is no greenery, no bright rich colors, but there is only the gloom of an overcast sky and the cold-gray melancholy of snow. The icy air leads to a sad thought, and whether the jacket will crack from the frost, whether it will crumble with frosty patches right under the feet of the dumbfounded photographer ... :) Maybe even abandon photography until the summer, and the camera on the mezzanine? However, I like the following example much more than another brightly colored summer picture, as well as a white winter landscape that is sharp to the point of pain in the eyes. We are all so stubbornly chasing sharpness, aren't we?
Landscape No. 10. Winter evening.
10. 
Lens 50/1.4, ISO=400, aperture f2.4, shutter speed 1/6 s, EGF 75 mm.
This winter evening was shot with a high-aperture "portrait camera" at ISO=400, and without a tripod. I remind you that if the sensor sensitivity is not explicitly indicated, then ISO = 100 is the default :) Why is the aperture set to 2.4 when the lens aperture allows you to open it right up to 1.4, thereby reducing the shutter speed, or ISO, by more than half?
The perspective of the story (or twisted plot) was such that I didn't want to blur the foreground even further, which was inevitable with the widest aperture possible. By the way, shooting in such lighting without a tripod is not a sign of laziness and bad photo habits of the author (as you, of course, thought), but simply the author was too cold to run home for a tripod and back for a photo and ... frostbitten hands :) I was so confident in the aperture power of his lens and tenacious hands that he did not consider it necessary to carry a tripod along with him, or run after him. Okay, you won’t be fooled - I confess that I specifically took this fix so as not to take a tripod :) But, of course, this is not the only thing. You should know: if you like the “frame”, you need to shoot it right away, because you won’t do exactly the same, even if you go back. It will be difficult (or impossible) to find that point of view, besides, the lighting will change, and in general - everything will not be the same. But this does not mean that the author calls for clicking everything indiscriminately. You should always ask yourself the question: do I really need this frame? Why not come back here later, when the lighting changes and everything will be completely different? :)
Ordinary winter.
11. 
Aperture f11, shutter speed 1/750 s, EGF 24 mm.
A couple of helpful tips. In severe frosts, you need to remember that the battery runs out quickly - think about a spare if you plan to shoot a lot, and the camera (and lens) can fog up if you bring it from the street into a warm room without a case. Do not neglect the lens hood, it not only helps with the backlight of the sun, but also protects the lens from snowflakes. "And what is a hood?" - I was asked in one of the letters. Whoever laughs at the question of a beginner, he does it in vain: we all once learned for the first time what a camera, lens, lens hood is ...
This is a 67mm threaded lens hood 16-45/4 lens with hood


12. 
A green spot spoils a good picture in general. Unfortunately, this does not always happen, otherwise no one would forget to carry a lens hood on the lens :) And especially in bright sunlight. Naturally, this applies not only to photography in winter!
This is exactly what Alexander Sergeevich would have written if he had known about the birth of photography, which was officially recognized 3 years after the death of the poet. And if the aperture of a pinhole camera can hardly be called a modern lens, then one fact does not raise the slightest doubt: the poet clearly understood the art of creating a winter landscape! . The mysterious long shadows that the trees cast on the sparkling snow can become the basis of many fabulous winter scenes.
| Landscape Winter morning. |
Three pines :-) |
13.  Aperture f8, 1/500 s, EGF 30 mm. |
14.  Aperture f4.5, 1/1000 s, EGF 36 mm. |
High humidity and frost are a sure companion for successful shooting of a winter landscape, but this is unlikely to be confirmed by the photographer's whitened fingers, forever frozen to the shutter button :) Therefore, never leave the house in such cold weather if you don't want to... capture trees silvery with hoarfrost, light overflows of shadows lying on the snow, and crystals of frost wonderfully sparkling in the sun, sparkling with joy! This is a real finest hour for lovers of great sharpness of the picture :)
Landscape #17: Frost and sun. Landscape #18: Photographer's star.
aperture f8, 1/1000 s, EGF 31 mm. lens 50 / 1.4, f4, 1/1500, EGF 75 mm.
17.  18.
18. 
Brr... -16-18 Celsius, the star has not yet appeared to the photographer, but the snow in photo No. 17 really sparkles beautifully ... But in No. 18 there is some incredible mixture of landscape and macro. And why "Star of the Photographer"? After all, an icicle is depicted in the foreground and a drop is captured "at a speed of 1/1500 sec", and the Sun is in the background, distant plan.
However, the Sun is a star. central object solar system, a hot plasma ball with a diameter of 1 million 392 thousand km, with a temperature of 15 million degrees. And although this star is located about 150 million km from the Earth, it gives our planet energy for all processes, which means life for the entire biosphere of the planet, and lighting for the photographer :)
We know that photography is impossible without light!
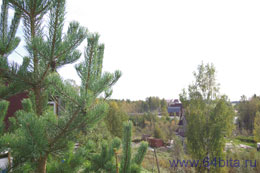
How to shoot a landscape in autumn.
The reasons for unsuccessful autumn shots are not a terrible camera and cheap optics, but the photographer’s lack of experience in choosing a plot, the nature of lighting, and even the state of air transparency. The air should not be saturated with moisture (and even more so with exhaust gases), but clean and transparent! Clear, sunny days and no wind are best for expressive photos if you want every leaf to be visible. The choice of the most advantageous lighting option determines the success of the picture and makes shooting golden autumn a pleasure in every way.
Fallen leaves create an excessive yellow variegation in the foreground and make it too light, which can impair the transfer of depth of space. And then the frame is built so that the foreground is in shadow (of course, there are exceptions to the rule, if, for example, you need to focus the attention of the audience on fallen leaves.) However, falling leaves attract the eye in their own way, they bring dynamics to the plot, create the atmosphere of golden autumn is even more tangible! A riot of crimson, yellow, green and blue colors give rise to a magnificent autumn palette.
№ Falling leaves

aperture f6.7, 1/250 s, EGF 24 mm.
When shooting a landscape during the “golden autumn”, the shadows are well illuminated by the reflected light flux from the yellow foliage, so the shadows were worked out quite well here. Actually, nowhere is it necessary that they look completely dark in the photographs.
Determination of exposure when shooting such autumn landscapes usually does not cause difficulties. The camera itself does a great job! The only thing I did not want here was to clamp the aperture harder (it is quite sufficient) so that the shutter speed remains no longer than 1/250, otherwise the falling leaves could be a little blurry. I still doubt whether this decision is correct or not, since local blurring against the background of a clear image could enhance the dynamics of the falling effect. Or not?
That's the trouble, now I can't sleep from the problem :-)
Autumn is beautiful, sad and rich in colors. As the poet said -
But an illustration of this will be a photograph not of the Boldin autumn, but taken in a completely different place ... where I ended up by the will of fate, desire and the arrangement of the stars ... :-)
Ancient Russian city of Kashin.
No. 19. Kashin autumn!

aperture f8, 1/125 s, EGF 24 mm.
In fact, I don’t like autumn (and the lush nature of wilting too!), So I limited myself to just a couple of photos. To beautifully remove the crimson, you need to wait for a good soft light, then the picture will play with colors even better. Look for good light and then any, even a cheap camera, will cope with the landscape! And to avoid blurring small parts, catch the moment of stillness and, in addition, use a tripod or stop.
But in this situation, I was more interested in finding an interesting angle. You know, when there is no main subject in the landscape, the search for an unusual angle is, sometimes, as necessary as the light and the richness of colors combined :-) Otherwise ... the photographer will have a dull time!
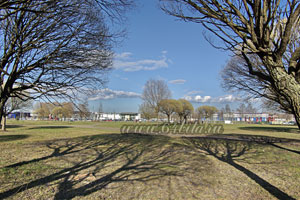
How to shoot a landscape in spring.
It is very easy to shoot spring: ringing streams, buds, blossoming nature, first green leaves, flowers, buzzing cockchafer and other joys. And my spring at 24 mm at f8 turned out like this ...
20. 
Photography of architecture.
When you pick up a camera, it is sometimes very difficult to determine whether you are shooting architecture or a city landscape ... But the point is not in the name, but in choosing a shooting point, so that the view of your beloved city is not spoiled by advertising signs that hang even buildings of the historical center, depersonalizing and killing not only our history, but also a part of inner world each of us - even those who disliked the lessons from the school bench :)
There was a time when city blocks were buried in green parks, and mothers walked with strollers near flowering lawns, and the hubbub of happy kids was heard from kindergartens. But this is what happens if money becomes an end in itself, and useful deeds are forgotten in favor of the golden calf. Now entire neighborhoods are being built not for people to live in, but for profit. We are looking at a completely documentary photograph of the near future, where there is no place for people...
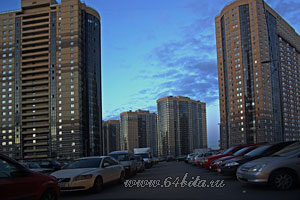
And this shot is documentary because it is not a collage, not a montage, but a very real photograph, so to speak, a sketch from nature.
Who said that you can't shoot architecture from the bottom up with a wide-angle lens? Possible geometric distortions? But a wide angle will be beneficial, emphasizing the lines of perspective converging upwards, thereby enhancing the effect of the height of grandiose buildings. A fantastic mixture of an old tower and an ultra-modern skyscraper made of glass and steel (the water tower of the Vodokanal Museum in picture 24), and the majestically bizarre architecture of the Church of the Savior on Spilled Blood - both were built in St. Petersburg, and especially for photography with a wide-angle lens :). What? Well, of course I'm kidding!
In both shots, the aperture is open to f6.7, EGF 24mm.
24.  25.
25. 
At such a wide angle (focal 24 mm), even a not very clamped aperture of 6.7 gives a large depth of field over the entire height of buildings, and already from a close shooting distance. With a wide-angle lens, this is no problem, the difficulty lies elsewhere.
What to do if it is undesirable to shoot the architecture from the bottom up? This often happens, and the reasons may be different:
1. the frame requires a horizontal construction of the plot ... uh-uh ... on the contrary, the plot requires :)
2. I want to cover the entire building, and not just the upper part.
3. we need an architecture without geometric distortions.
Climb onto a neighboring building? For example, like this, with a winning viewing angle. Well, just a whole tour of St. Petersburg: here you have the Peter and Paul Fortress (bastions and the cathedral on the left in the background), and the Neva with a "meteor" on hydrofoils, and the Admiralty (foreground) with a ship on a spire (65 kg, by the way) - one of the symbols of the city, and the Hermitage to the right (green building).
Petersburg, city center.

Aperture f8, shutter speed 1/750 sec, EGF 67 mm.
But shooting from a high point is not always possible. Yes, and point 2 was not fulfilled, it was not possible to cover the entire building of the Admiralty, but it dominates here as the main object of photography. The solution is obvious, it is on the surface! You should graduate from the Academy of Arts and draw any architecture with brushes on canvas in the perspective in which you intended. I don't get it, what do you really dislike?
Well, well, well ... we take the camera :)
City landscape, Petersburg, stock exchange building.
27. 
Aperture f6.7, shutter speed 1/180 sec, EGF 51 mm.
As you can see, everything is simple - we stepped back and set not the widest focal length of 51 mm, which does not contribute to distortion. And they received an architectural monument of Russian classicism from the French architect Jean Francois Tomá de Thomón, who created a real ancient Greek temple from Pudost limestone: a rectangular building framed on four sides by a colonnade ... and most importantly, almost without geometric distortions :-)
It is unlikely that the artist in the photo would have turned out better, because in this case she herself would not have got into the frame, but someone has to draw pictures, right? :) Please note that the girl uses a tripod to draw the landscape, and rightly so! ok, let's have an easel...
What to do if there is nowhere to go back?
Nothing, put a wide angle!
Smolny Cathedral.
aperture f7, shutter speed 1/320 sec, EGF 38 mm.
 By the way, this cathedral was shot not with a specialized shift lens (which removes perspective distortions by shifting the lenses parallel to the plane of the matrix), but with an ordinary ... compact. The secret of the picture is simple - distortion and noise are removed in Photoshop :) It never occurred to the Great Rastrelli, who founded the cathedral in 1748, that his creation could draw without a brush and canvas (and then correct it to disfigure in the editor) any painter dude, nothing who understands neither painting nor architecture:) But why go far ... Here I look at this Smolny Cathedral and wonder: what a dude shoots architecture like that :-) It's incomprehensible to the mind!
The bottom of the building is cut off, which is unacceptable for classical photography of architecture and, moreover, for its construction. Well, it’s necessary to disfigure the architect’s masterpiece like that ... Honestly, I didn’t shoot it, but the camera! It was easier for Rastrelli, thank God he didn’t have such bad photographic equipment! :-)
Pussy riot and the like! Please do not desecrate museums, churches and cathedrals. Temples should be viewed not as places for sacrifices to the gods (which no one has seen), not as a place for trade without taxes, and not as a platform for your cheap "political" self-PR. These are historical sights, works of architecture by great masters and architects of the past. These buildings are our Russian culture and history. The museum is not a place for dancing, sex and other destructive orgies! Do not be a cattle, do not offend my feelings of a deeply unbelieving person and other cultured people! I perfectly understand what performance and freedom of expression are. Exactly as long as it does not interfere with others.
Now let's take a closer look at all aspects of photographing architecture.
In fact, there are special requirements for this genre, especially in terms of the so-called. documentary or classical photography of architecture. To begin with, let's start with the obvious: the photo must be well-exposed, the horizon is not littered to the side, and the focus should be on the building, temple, monument (i.e., on the subject), and not the tree standing in front.
Special requirements are accurate transmission the shape, color of the object and its proportions. Buildings must be completely in the frame, cutting off the roof or spire is unacceptable! The lower part of the building should also be in the frame, and if it does not fit, try to step back or find a different angle. It is highly desirable that people, advertising and cars parked nearby do not get into the frame (if possible). Nothing should distract from the main subject of photography! And even if this cannot be avoided, then you need to shoot so that the car does not block a quarter of the building.
The same applies to pedestrians and onlookers... A person clearly posing in front of the lens in the foreground always distracts attention, even if it does not block anything, because this is completely unacceptable for classical and, if you like, documentary photography of architecture. Why? Well, we are talking about the genre of "architecture" now, and not a full-length portrait :-)
As you have already noticed, the author of these photos did not really fulfill (to one degree or another) the requirements for documentary classical architecture, since he gravitates more towards other visual means, which should not bother you. You can draw the viewer's eye to the main subject of shooting in a variety of ways, and by no means only by the rule of thirds, the golden ratio and other geometry. Everything you need to know is said, but how you use it, you will decide for yourself.
The next picture of the creation of the architect Auguste Montferrand - St. Isaac's Cathedral - I cite as an example of such a discrepancy with the listed requirements, although imperceptible. There are no major mistakes, however. Foliage frames the temple and even directs the eye towards it, creative issues are resolved, color rendition is in order, with the problem of onlookers (who strive not only to get into the frame but also to obscure it) it was radically finished with a Kalashnikov assault rifle by choosing a certain shooting point and a long wait for the moment of desertion :-) And the minuses are in the trees that slightly cover the bottom of the building and, in part, the colonnade, as well as in a slight distortion, but Montferrand is not to blame for this :-) In terms of artistic shooting, they are not minuses, but what about a classic approach to the genre of architecture? And yes, and no, and not quite ... But it will pull on a postcard with views of the city.
Petersburg, St. Isaac's Cathedral.

Aperture f8, shutter speed 1/250 sec, EGF 30 mm.
By the way, all this abundance of temples indicates that under the Soviet regime they were not destroyed everywhere and purposefully due to the complete rejection of religion, as is now commonly claimed, but, on the contrary, they were preserved. There was rejection, but the temples remained. All masterpieces of architecture were kept and saved in the USSR at the expense of the state, like everything that was owned by the state. And museum values too, although the media (the mouthpiece of the bourgeoisie) scream that the Bolsheviks plundered, robbed, destroyed everything. Go to the Hermitage or the Russian Museum, admire the results of looting and destruction.
The following urban landscape really is such, because it was filmed in the city, and the theme of architecture in one form or another is always present in such a genre. Or it should be present :-) Here is the Kazan Cathedral in St. Petersburg (more precisely, the view of its wing from Kazanskaya Street), was built in 1801-1811 by the former serf (!) Voronikhin Andrei Nikiforovich in the Russian Empire style. No, not a typo, not a vampire :-)
At first, this temple served as a charitable institution, then as a monument of Russian military glory, under Soviet rule - a museum of the history of religion and atheism with rather wonderful and terrible exhibits from the time of the Inquisition (funnel through which water (or molten tin) was poured into the mouth of heretics), "Spanish boots" for crushing leg bones, "weeping" icons with copper tubes behind the eyes, and other historically interesting exhibits about religion), which immediately disappeared from the temple after it ceased to be a museum and again became a charitable institution: first, a joint museum-religious, and , finally, a building that has finally departed from worldly life.
But not for photography of architecture :-) The exhibits are lost, but the temple remains... The soft evening sun often creates lighting with such a color scheme that will benefit both the most unprepossessing photograph and the magnificent creation of architects.
Left wing of the Kazan Cathedral.
It is right, if you look from Nevsky Prospekt :-)
30. 
Wide angle, aperture f8, shutter speed 1/180 sec, EGF 24 mm.
For all its merits, the shortcomings of a shot in this genre are obvious - it is not suitable for documentary architecture for a number of reasons (you will find it yourself!), but it will be quite enough for a good urban landscape. By God, the author tried, highlighted the main subject with both light and color, and hid everything unnecessary in the shadows in order to emphasize the elements of architecture. You can throw a stone at me, but I did not dare to call a tow truck :-) Go for it, you will do better!
Common Mistakes
Below is another example on how to properly shoot a landscape. Or rather, how wrong: the horizon is littered (the horizon line is not parallel to the frame line), there are other disadvantages - glare, especially clearly visible in the enlarged image. The obstruction of the horizon spoils the picture, it's bad taste. An obvious technical marriage hopelessly harmonizes with a creative marriage: what, in fact, is depicted? what did the author want to show, what did he dream to convey to the viewer?
The beauty of nature? A masterpiece of architecture? A bunch of ideas?
Hmm ... It concerns not only the night landscape :)
The horizon is littered
31. 
Let's consider another defect, which is called "overexposed sky", we will see an example below. This terribly ugly thing is also called "low dynamic range of the camera" by many. Or a narrow photo latitude :) It is believed that the dynamic range is a disadvantage of digital cameras, unlike film ones. In fact, the film also can not convey details well, both in the shadowy places of the plot and in the illuminated ones. Such embarrassment usually occurs in bright sunlight due to the high contrast of dark and light areas of the image. And now the real blue sky looks completely whitened in the picture with a well-exposed foreground. Or, on the contrary, the sky is normally worked out, and the foreground below is completely dark, no details are visible. Or vice versa :) But you really want a blue sky, a bright sun, and green grass in the shade!
That is why it is not advised to shoot at noon, when the sun is at its zenith and especially bright. Some people try to pull out the missing details in Photoshop, assuring that this can be done from a RAW file without problems, unlike jpg ... Indeed, patience and work in Photoshop will grind everything, however, it is better to solve the problem BEFORE, not after. Because anyone graphics editor- this is such a thing in which a beginner can easily and without difficulty make a bad photo out of a good one, but on the contrary, even with difficulty it will not always work :)
Shot #32: The sky is completely overexposed... Shot #33: How to properly shoot a landscape.
32.  33.
33. 
Snapshot #32. There are no details in the sky, everything is illuminated. Indeed, the low dynamic range may be the root cause... But I ignored this fruitless idea and simply shortened the shutter speed from 1/180 to 1/750 sec., without changing the aperture - and got picture number 33. The low dynamic range suddenly became incredibly large! :)
You can do this even on the machine - by measuring the exposure in the sky, and not in the shadow areas and shoot. Aimed at the sky, it turned out the sky. We measured the other way around - it turned out the other way around :) Quickly, simply and angrily. The downside of this holy simplicity is obvious and is that you are shooting either the sky or the ground in shady areas! :) But even here you can cheat by highlighting the foreground that has fallen into the darkness with a flash. In such cases, it should be turned on forcibly, even if the blunt camera machine thinks otherwise. Of course, the foreground must be (and in the photographs of beginners it usually is not), and it must not just be, but be within 3-4 meters, otherwise a weak flash may not reach it. And no closer than a meter and a half, so as not to overexpose the near details ... In addition, do not try to highlight the Eiffel Tower with a flash against the backdrop of the city landscape - it definitely won’t fit :)
The second way. You can take a measurement on the light part of the frame, remember it and take a measurement on the dark area. Before this, the automatic mode can be used as a photo exposure meter, i.e. first you learn the opinion of the automaton (to set the initial exposure), and then you experiment. Here you should set manual control and, without changing the aperture, set the average shutter speed - between the dark and light parts of the measurements. Then point the camera where you want (not just the sky or a dark area) and take the shot. It is convenient if the camera has a "memorize exposure" function so as not to torment your brain's RAM. In this case, point the camera at the desired point and take a picture without switching to manual mode.
There are other ways, for example, exposure bracketing (it’s also a plug, or an auto plug) - you get 3 shots with different exposures: darker, normal, lighter. Then choose the best one :) In addition, many cameras have an exposure compensation function: -/+ (darker/lighter). Sometimes it is called compensation. Here it is useful to read the instructions for your own camera: whether to turn the wheel, press the button, or rummage through the menu.
In general, there can be many functions, and manual control replaces everything: you just click several pictures with the same aperture and different shutter speeds.
Sometimes it's easier than rummaging through the menu, painfully remembering where they hid this bracketing ... Or maybe it's called an auto plug? Or maybe it's not in the menu, but on the buttons? Is it better to use exposure compensation? Or compensation in the instructions is called a correction? Or am I looking in the wrong place, or maybe I forgot something? Devil!
One hundred thousand devils, hell, devil and underworld! thrice and forever damn that satanic day when I bought this infernal digital vacuum cleaner from the devil's shop! Burn with blue fire in a wooden coffin dog instruction in Turkish-Chinese!
To make it easier, a lot (and not just bracketing) is easier to do with shutter speed and aperture. Sometimes it seems to me that modern cameras are completely overflowing with duplicating each other (and therefore meaningless) functions that incredibly complicate the menu, and working with the camera, and the learning process ... Forget everything! In fact, in the camera you need to study the following things well: focal length, shutter speed, aperture, ISO, focus, flash. Although these things have been improved, they have not fundamentally changed for many decades, for example, autofocus appeared, but manual focus no one canceled, and sometimes you can’t do without it at all. Do not torture the camera, shoot in aperture priority mode and / or manual control. And everything else - from the crafty uncle with horns ...
However, it happens that the narrow dynamic range of the camera still interferes with simple human happiness. achieve good result with a "bad" sky, you can wind a good gradient neutral gray filter on the lens - a half-colored glass that transmits one half less light. There are other filters, for example, polarizing, ultraviolet, neutral gray (can be used for other tasks). The light filter itself is "bad" because it costs extra money, it's bad because cheap filters can worsen sharpness, and expensive ones cost more :), and besides, it is only suitable for lenses with the right diameter, which have a thread for filters. This means that most compacts (as in the case of RAW) fly by, because there is neither thread nor RAW in them ... I'm not talking about soap dishes, which do not have any manual settings for shooting. The owners of these cameras solve the problem in 5 ways:
You can also be satisfied with the result in different ways. When nothing works out, then you need to decide what is more important - light or dark places. Or rather, choose the main subject and try to take measurements on it. If the object is small, then in advanced cameras you can use "spot metering". If you have a soap box and such functions are missing as a class, and the object is in the light part, then we trust the automation. If in the dark, then you can highlight it with a flash to work out the details in the shadows. However, in landscape photography, you want to shoot everything, and the main object may simply be absent! Then I advise you to find it, or re-read paragraphs 1 to 5 :) Now you understand why it is very bad when there is nothing to catch the eye in the landscape !?
I would not advise beginners to immediately run to the store and buy filters for all occasions. Firstly, there are a lot of subtleties for working with filters, and secondly, you need to be able to use filters, certainly understanding how, why and why, otherwise you will not get the result you were striving for by investing money. You need to come to this approximately the way you came to the conclusion that you already just need a SLR camera, and not a compact one. Or vice versa :) The only thing that can be unconditionally advised is a simple and inexpensive protective filter that will protect the lens from dust, dirt, splashes and mechanical damage. It can be chosen according to the following principle: the more expensive the lens, the more justified the purchase of a filter.
Well, actually, that's all for now, but the topic "how to shoot a landscape" is, of course, not exhausted by this. Rather, it short information about what and how you can shoot with budget optics. When I prepare the following materials, I will post them on the site.
Good luck with your pictures!
Landscape photography includes a number of genres. It includes, but is not limited to, landscape photography, weather photography, astrophotography, bird and wildlife photography. Each of these categories implies the possession of relevant special skills and can be expanded.
If you are just starting your quest as a landscape photographer, here are a few things to consider:

1) What do you want to photograph?
Because nature photography is so vast, you can spend a lot of time in each sub-genre. Therefore you must ask yourself important question- what do you want to photograph? Do you want to photograph plants and insects? close-up? Do you love the natural world in macro or are you more fascinated by magnificent mountain ranges and lakes?

Perhaps you more interesting than a bird and larger animals than sunsets and sunrises. Knowing what you like and what you want to photograph is a great first step.
2) What equipment will you need?
When you know what you want to photograph, you will know what equipment you need. If you're shooting landscapes, a wide-angle lens will come in handy, while for wildlife and bird photography, a zoom or telephoto lens will do.

A tripod is great for landscapes and astrophotography, but if you're trying to photograph a bird in flight or an animal in motion, knowing how to use your camera will be your greatest asset.
3) Location and planning
What you want to photograph depends on the choice of place and time of day, as well as the time of year. Look around your location beforehand to see the direction of the light, any potential safety issues, or terrain features. Then return to the most right time days for a photo session.

If you are photographing flowers, pay attention to the time of year when they bloom. To photograph birds, you need to understand a bit about their habitat and the time of day they are active. If you want to photograph more dangerous wildlife, it's best to go with someone experienced.

The national park is a great place for scenery and wildlife. Please note that you may need to apply for special permits to film in some parks, and that in some areas they also have seasonal or temporary restrictions. This matters to your planning if the constraints include shooting time.
4) Reading light
As with the previous tip, the direction of the light can be determined by first visiting your location. You can also do online research in the area or transcribe it from other photos taken of the location.

If you are shooting landscapes, arrive about an hour before sunrise/sunset and get ready to shoot. This way you can focus on your composition and maybe even take some test shots. Play with white balance, exposures and different camera angles.

If you're waiting for wild animals to show up, use this time to get your camera settings right. When an animal shows up, you should be ready to take pictures constantly, trying to capture the perfect moment.
Shooting closer objects or colors gives you more time to experiment, but be careful not to let the light be flat. Take a reflector with you, or try to find angles that give you shadow, shape, and volume.

Conclusion
Nature photography is not only vast, but filled with interesting sub-genres and subjects to capture. For beginners, in most cases, it is better to conduct preliminary research before shooting. The more you learn about your subject and how best to photograph it, the better you will be at it.
As for wildlife, patience is a great help here, as you will need more time to observe. If you love nature, this is a great way to explore and capture those fleeting moments. Decide what you want to photograph. Take the equipment you need. Explore, plan and try to catch the best light. And above all, have fun!

Landscape photography is the ultimate test for the photographer, but often the ultimate frustration.
Ansel Adams
Landscape? Everything seems obvious. You see a beautiful picture - press the button. But in this case, you get an insensitive photograph. It will not express your thoughts, feelings and attitudes to what you saw. Before the camera shutter clicks, you must hear the “voice” of the landscape, and then your photos will become unique and will be recognized from thousands of other pictures.
Here are some tips from professional photographer Declan O'Neill to help you understand how to take a beautiful photo.
1. The landscape should be "talking"
You will need time to understand the landscape. You just need to stand and watch how the light changes contours and shapes. The sun is moving and the forests and rivers begin to look very different. Light gives the landscape a unique sound, light brings mood and emotions, and the earth is a huge canvas on which the sun creates its delicate drawings. For me, photography is a story about how light changes the landscape. So the decision about whether to photograph this landscape at all and how to build a composition, I make by asking myself the question: “Will I tell in this photo about how light and landscape interact?” And this question makes me refuse many shots that, despite their beauty, still do not reveal the topic I have chosen.
2. Get up early
If I were given the choice of what to shoot: sunrise or sunset, I would choose the first one. I have nothing against sunset shots, but I understand that I can’t add anything new to the millions of photos that have already been taken.
But the dawn is always amazing. You never know what you'll see while you're waiting in the dark. It's like a photo hunt: you can get a picture that you have dreamed of for many years, or you can not take anything. Dawn light can vary from ash pink to warm yellow hues.
Keep an eye on the weather forecasts, and if the night is very cold and the sky is clear, then in the morning you can catch very unusual clouds and a couple of effects that will disappear by the time the rest of the world wakes up.

3. Look around
It's so easy to see the obvious shot and forget to look around. The photo of willows was taken on Lake Wanaka in New Zealand. This lake is one of the most beautiful landscapes in the world, but at sunset the sun sets behind the surrounding mountains and they look beautiful, but somehow usual ... Deciding that it was not worth taking the “water/sunset” photo, I went to the car and suddenly saw these trees.

Obviously a beautiful shot is not always the best. Take a look around.
4. Use Software to Plan Your Photoshoots
I constantly use two programs. The first is The Photographers Ephemeris. The principle of its work is as follows: you set any point in the world, day, time, and it shows where the sun will be at that moment. You can plan the time of the photo shoot and choose the shooting point. If you are a serious landscape photographer then this is for you.

The two photos below demonstrate how the position of the sun can change the look of a landscape and the atmosphere of your photo.
The first one was taken in the evening in September (early spring in New Zealand). The sun reflecting off the river makes it silver.

The second photo was taken in the morning in July (mid-winter in New Zealand).

A 1:50,000 scale map showing the terrain is also useful.
In New Zealand, I used MapApp NZ South Island for iPhone. Sat Nav - not detailed enough and do not indicate relief. A good map will allow you to get an idea of what the area looks like and choose a shooting point. If you're good at maps, you'll save a lot of time by choosing where you want to end up, instead of running down dirt roads looking for the best location.

5. Equipment is not so important
The best equipment won't make the best photographs, just as the best pen won't help you write the greatest novel. Of course, every photographer needs equipment, but you should treat it the way a writer treats his tools: it's just a means of communicating what's going on in your head to other people. You need your own point of view, and it does not matter what will be in your hands at that moment: a smartphone or a Nikon D800.
You are the creator of the photo, and the camera only takes it. If you think that a higher resolution or a faster lens will allow you to take cooler photos, then welcome to the techno circus!

6. No need to finish the photo
There are thousands of photos on the Internet taken with ND filters or processed in editors so that the water on them looks like smooth silk.
Why don't you let nature speak for itself? She does it just fine without any effects and filters! When editing a photo, it's like you decide how the landscape should actually look. You're telling a story that doesn't exist: where is that emerald green grass and the bright orange sunset sky? These artificial, photoshopped photographs often leave the viewer blank.
Landscape photography should invite us to look and explore, it should appeal to our innermost thoughts. It may be metaphorical, but this metaphor must be born in the mind of the viewer.
Well, if you want to create your own version of what a lawn should look like, why not paint?

7. Bad weather is great
Clouds and showers are not the most encouraging weather, although in fact it provides much more exciting opportunities than a cloudless day.
This photo was taken in Marlborough ( New Zealand) on a rainy evening, at the end of a long exhausting day spent looking for pictures. It will take a lot of patience and optimism to drive hundreds of kilometers in the rain, but trust me, you will be rewarded. The main thing is to keep your eyes open and you will always find something to photograph.

Interestingly, when I submitted this photo to a photo bank, it was rejected on the grounds that I had edited it into monochrome. Actually, it is not. Nature sometimes surprises us with very unusual phenomena, such as, for example, in this photo.
8. Go back
Luck plays a big role in getting beautiful shots. If you find a place with good potential, go back there again and again. And you will almost certainly be able to take better pictures than before.
These photos of Lake Tanichwa in New Zealand were taken five days apart. I am sure that when I go back there again, it will look different again.


So, after I gave 8 tips, I give the last one - do not listen to any advice! More precisely, listen to yourself and clearly understand what advice suits you and what does not.
For example, there is a common belief that there should be some kind of object in the foreground of the landscape. This is due to the opinion that the landscape itself is too boring, and it is imperative to place a shepherd or a herd of cows in it for greater interest.

But if you place some object between the landscape and the viewer, then this object must also tell some kind of story, and not just be there.
Top Photographers break all accepted rules.
In general, all of the above can be combined with one single sentence: decide what is interesting for you in this landscape, and then take a picture so that the photo itself tells the viewer about what you thought.
Yes, planning a trip is also a job that will help you create beautiful pictures. Wherever you are going to go, you need to properly prepare and collect as much information as possible about these places. Check out satellite imagery and maps of the area - they will help you understand which mountain peaks, if any, will be highlighted at sunrise or sunset. For example, I shot in Abkhazia:
Look for photos of the same area taken by other people. It doesn't matter what camera they were taken with. Even soapbox shots can help you get a rough idea of where you're going. Try to highlight the features of the area that are interesting for you, which can be captured in the pictures - a tree of an unusual shape on the shore of a reservoir, for example.
Explore the area
At landscape photography it often happens that a person tries to capture a beautiful natural event too late. For example, you saw an amazing sunset and began to fuss, trying to somehow photograph it. This is the wrong approach, and get good shots it will be difficult for you.
Therefore, always try to pre-investigate the surrounding area. For example, if you're staying on the shore of a body of water, take your time to explore the surrounding area, look for interesting angles, unusual rocks, streams, or something else like that.

Walk through the forest along the pond, find a higher slope and climb it - so you can find something really worthy to shoot. Do not forget to take test shots during your walks, which you can watch in the evening and choose the most interesting places - a kind of backstage. And the next time the sun goes down, you'll already be in the right place with your camera ready to take great photos without fuss.
Remember that the landscape is first and foremost light!
One of the main mistakes of amateurs is shooting at noon, when the sun is shining at full power, and the lighting is very harsh. Such pictures always come out quite flat, and the colors are dirty. Therefore, the ideal time for landscape photography Sunrise and sunset count. During these hours, the lighting is especially soft, and the photos begin to play with other colors.

Take a compass with you when you're out and about picking out locations to shoot, it will help you determine where the sunrise and sunset will be.
Choice of photographic equipment
Always take a tripod with you. Better to take it with you than another lens. A tripod turns even an ordinary camera into a powerful tool that can take beautiful landscapes in any conditions. It is important that with the help of a tripod the camera can be set to any height - at least 20 cm, at least 2 meters. The weight of the tripod will only matter to you if you decide to shoot in gales.
In any case, the tripods have a hook on which you can hang a couple of stones in a bag for stability. The lens is best used wide-angle. It is best suited for landscape photography.
Don't be afraid to shoot from a low position
For example, if you like interesting flowers or moss-covered rocks, lower your camera on a tripod.

This way you can focus on the foreground, and the photo will become more expressive.
What depth of field to use?
AT landscape photography it is important that the whole shot is sharp - both the grass in front and the mountains in the distance. To achieve the desired depth of field, you need to use large apertures: from f / 8 to about f / 16. Know that the larger this value, the sharper the image will be. But do not forget that at large apertures, sharpness may become worse due to possible photo defects.
How to avoid problems with dynamic range?
Dynamic range is a parameter that refers to the difference in brightness between the darkest and brightest parts of a scene. When you shoot sunrises or sunsets, the camera often cannot handle the high dynamic range, resulting in overexposed areas or dark spots in the photo.

To avoid this, simply do not shoot in backlighting. For example, instead of shooting the sunset itself, rotate the camera 90 degrees and try to capture mountain peaks or a clearing flooded with sunset rays.
How to make a landscape voluminous?
We always see a three-dimensional image because we have two eyes. But the camera has only one "eye", and to create volume, you need to make an effort.
The three-dimensional effect in the picture is created due to the tonal and spatial perspective. You can enhance the volume with the help of light. The most voluminous landscapes are obtained with side and back lighting.

Try to choose a point for landscape photography so that in the photo there are both close objects and distant ones. It is good if there is a smooth transition between the foreground and background, for example, in the form of a stream flowing between them.
Stay up late and get up early
This is actually very important advice. Always get up an hour before sunrise and go take pictures, no matter the weather. Yes, sometimes getting out of a warm sleeping bag at 4 am is quite difficult, but it's worth it. Do the same thing an hour before sunset.

Don't forget that after the rain, there are stunningly beautiful sunsets with rainbows, and you'll have to get wet to capture them.
Show patience
Beautiful lighting is quite rare, and you will have to be patient to wait for it. Successful shots are rare, and you still won't be able to churn out hundreds of successful landscapes a month, and no amount of advice will help here. The best photographers involved shooting landscapes, sometimes spend 10 days to take a single shot - and all this time they are waiting for the right light.

Therefore, always calculate the time of your trip. If, for example, you stay in one place for only a couple of days, then getting a good shot will be quite difficult, but it's worth a try!
Now, dear readers, you know how to shoot a landscape and if you don't want to miss new articles about photography, please subscribe to the blog.
Exists Golden Rule photographing landscapes, and no matter how much advice you are given, without following this rule exactly, you will never achieve results comparable to the pictures of professionals. Landscape photographers can only take pictures twice a day. First, at dawn: it's best to start shooting 15-30 minutes before sunrise and 30 minutes to an hour (depending on the brightness of the light) after sunrise. Secondly, at sunset. Why only twice a day? That's the rule. The fact is that only at dawn and at sunset you can find soft warm light and subtle shadows, which allow you to get professional-quality lighting for landscape photography.
The tripod is your best friend

Now you know the schedule of a professional landscape photographer: you need to get up before dawn and skip almost every dinner. If you have no problem with this, then it's time to reveal another important secret: since you will be photographing in low light conditions, you should always use a tripod. Every day. Constantly. In landscape photography, there are no shots taken without a tripod. I must warn you that one morning you will definitely see an amateur next to you taking the same pictures as you, but without a tripod. He doesn't know yet that he will get the most blurry, overexposed and fuzzy photos of his entire life.
Tripods: The Benefits of Carbon Fiber
Latest Models tripods are made of carbon fiber. Such tripods have two advantages: firstly, they are much lighter than traditional metal tripods, and are not inferior to them in stability, and secondly, carbon fiber tripods do not resonate like metal ones, i.e. the risk of vibration is reduced. But there is also a drawback. As you might expect, these tripods are not cheap.
Aperture priority mode


For professional landscape photographers, the main shooting mode is aperture-priority mode (on the dial switch it corresponds to the A or Av setting). The reason for its popularity lies in the fact that it allows you to solve creative problems. What I mean? Let's say you're photographing a tiger with a wide-angle lens and want to make the tiger (in the foreground) in focus and the background blurred. In aperture priority mode, it's easy enough: set the smallest aperture value available for your lens (for example, f/2.8, f/4, or f/5.6) and focus on the tiger. That's all! The camera and wide-angle lens will do the rest: you will get a sharp photo of a tiger with a completely blurred background. Thus, you have just mastered one of the three main techniques for using the aperture. Low aperture values (plus a wide-angle lens) allow you to focus on the foreground subject and blur the background. But how do you get a sharp image of both the tiger and the background if you want to see the tiger in the photo in the surroundings? The aperture should be set to f/8 or f/11. These two values are best when you want to capture a scene as our eyes see it (without creative background blur). Distant objects in the background will be slightly out of focus, but not too much. This is the second method of working in aperture priority mode. The third technique is when you need to get the maximum clarity of the entire image: foreground, environment(middle) and background. Just choose the maximum aperture value (f/22 or f/36).
Correct composition

The next time you buy a travel magazine with beautiful landscapes or study the work of the masters of digital landscape photography, pay attention to images with vast expanses. You will find that in almost every photo there are three elements. The first one is the foreground. For example, if the sun sets in the sea in a sunset photo, then the image does not begin with the water surface, but on the shore. The coast becomes the foreground. The second element is the main subject. In the case of a sunset photograph, it could be the sea reflecting the setting sun, or the sun itself. The last, third element is the background. In the sunset photo, it is the sky and clouds. All three elements are needed to create an impressive landscape photograph. The next time you shoot, ask yourself: "What should I choose as the foreground?" This nuance is often forgotten by amateur photographers. Always remember the three elements of a landscape, and you will be able to convey its beauty and scale.
Another reason to take pictures at dawn
An additional advantage of photographing at dawn (and not at sunset) is that the water in the lake, river, sea, etc. will be calmer, as it is always less windy in the morning than in the late afternoon. Therefore, if you want to get a mirror image on the water surface of the lake, then it is better to take a picture in the early morning, and not late in the evening.
Shooting waterfalls

Want to get a picture of the silky streams of a waterfall or stream like a pro? The secret is to leave the lens shutter open for at least one or two seconds. Water will flow, and everything else (stones and trees near a waterfall or stream) will remain unchanged. The procedure is as follows: select the shutter priority mode (set the dial to S OR TV) and set the shutter speed to one or two seconds. Even when shooting on a cloudy day, the shutter open for a few seconds will let in enough light to give you a completely blown out image. That's why professional photographers take pictures of waterfalls at dawn or just after sunset, when there is much less light. In addition, they use a neutral density filter. This is a special filter that is screwed onto the lens and reduces the amount of light entering the camera. Under these conditions, you can leave the shutter open for a few seconds. There is so little light coming through the lens that you get a sharply focused photo of the flowing water flow. If you do not have such a filter, but the waterfall or stream you are interested in is located deep in the forest (i.e. hidden in dense shade), then a similar effect can be achieved using a simple trick. Mount your camera on a tripod, set aperture priority mode, and choose the largest aperture available (f/22 or f/36, obviously). The lens shutter will stay open longer than usual (in dense shade, this is not a problem), and you will get the same effect of a "silky" stream of water.
When shooting waterfalls, you can use a polarizing filter instead of a neutral density filter. This allows, firstly, to remove reflections in the waterfall and on the stones, and secondly, to reduce the amount of light entering the lens, which makes it possible to use large shutter speeds. High shutter speeds increase the silky effect, so try different settings (4,6,10s, etc.) and see which one gives you the best result.

Want some great advice on how to photograph a forest? Don't take pictures of the ground. The ground in the forest is often not very attractive (fallen branches, rotten leaves - all this does not add to the aesthetics), which is why many professional photographers do not shoot the ground - it contrasts too much with the beauty of the trees. Of course, if the forest flooring looks normal, it can be added to the frame, if not, it is better to save the frame. And one more piece of advice. It is better to photograph in the forest on cloudy days, as it is very difficult to take a forest shot in bright sunshine. However, there is one exception to this rule: if there is fog in the forest on a sunny day, then the sun's rays breaking through the haze can be very impressive.
Skyline

The answer to the question "Where should the horizon line be?" simple enough. Do not repeat the mistakes of amateurs and do not place the horizon line strictly in the center of the photo, otherwise your landscapes will always look like Polaroid shots. First, decide for yourself what you want to focus on: on the ground or in the sky. If the sky looks great, make sure the horizon line is in the bottom third of the photo (emphasis on the sky). If land or water looks more interesting, then the horizon line should be in the top third of the photo. Most importantly, any of these methods will give your photo more depth and color.
Boring sky? Changing the rules
If there is nothing interesting in the sky when shooting a landscape, you can abandon the one-third rule and leave the minimum necessary part of the sky in the frame. Capture 7/8 of the land or water and only 1/8 of the sky. As a result, the audience's attention will be drawn to a more interesting foreground.


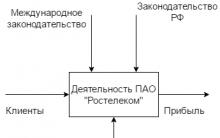


Quality requirements
Peat resources Milling peat extraction
Closed Joint Stock Company Transtelecom
Setting up Wi-Fi equipment
Pasteurization drawer for the selection of "heads" during rectification