Another master class on creating miniatures for paper dolls. And again I was drawn to retro gizmos. This time, an elegant vintage camera made of wood with an accordion and brass trim elements has become the object of imitation.
With the advent of spring, more and more people want to take pictures. In the city, you can often see smiling passers-by posing for the camera. And by coincidence, I just read The Apothecary's House. Matthews(readers will understand). Apparently that's why I was visited by the idea to make a miniature camera.
As usual, I'm not looking for easy ways, so my choice fell not on a modern camera, but on a folding wooden retro camera.
Immediately about the result. By tradition, to compare the photo of the prototype and the finished miniature.
After evaluating the scale of the work, I decided that to make a miniature, I would mainly need paper, thin cardboard, wire, a piece of an aluminum can, paper glue and super glue.
Master class on creating a miniature camera
Frame
I used thin cardboard 0.3 mm thick, so I had to glue all the details in two layers.

The first photo is the front and back of the case. The second photo shows the inside of the case.

loops
How and from what to make miniature loops? If you ever tried to make a wardrobe for dolls, then you asked yourself this question. I solved this issue in the following way. I took an ordinary aluminum can and cut into small pieces. You can take a tin can from under canned food, such loops will be stronger. And ideally, brass tape would be suitable for these purposes. I'll definitely buy one for myself.
Then she rolled one end into a tube. Having thus made three loops, I strung them, alternating direction, on a piece of wire 0.5 mm.
To make the loops hidden, I glued a layer of paper on top of them.

Furs (accordion)
Since the camera is small, I had to make an accordion out of paper. To do this, I took matte black paper 65 by 120 mm. The result was an accordion in a section of 15 by 15 mm. The length had to be adjusted in the course of collecting the camera.

Lens
An important part of the camera is the lens. For its manufacture, again, black paper was needed. I cut two strips 1 and 2 mm thick. I wound a 2 mm strip on a 4 mm thick knitting needle, forming a ring 1 mm wide. Over this ring I wound a millimeter strip, equaling along one edge. At first I experimented with sizes, so the rings are separated in the photo, but it’s better to immediately glue one ring onto another.

Then I glued a small circle to the bottom of the lens. I could stop there, but it seemed to me that something was missing. Digging through my stocks of the necessary "trash", I found a wonderful part of the watch mechanism, which was perfect for my lens.
And the last detail is the lens. It had to be replaced with regular clear nail polish. It took three drops.
Painting

The first stage of painting is a primer with white acrylic paint. After complete drying, in order to get rid of irregularities and roughness, I sanded the surface with sandpaper. Then one of the difficult steps is imitation of the tree structure. Each time you have to experiment to understand which way of painting is better.
I mixed two shades of brown acrylic paint: very light and very dark. After painting with light brown paint, without waiting for drying, I dipped a wet brush into dark brown paint and carried it several times in one direction. It turned out that the paints mixed a little already on the surface of the part, forming stains similar to the structure of a tree.
Retainer
Like it or not, it’s quite difficult to make a very small and inconspicuous latch that would hold the camera closed. I did not bother, and simply bent the hook from the wire.
I fixed it with carnations: one for fixing, and on the other I hung the hook itself. Carnations can be replaced with wire by bending it.

Pen and decor
Because The camera is portable, you need a pen. For greater credibility, she made it from a light piece of skin. Fixed with glue.

To make it look more like the original, I drilled holes on the front part and inserted small studs from the clock mechanism.
This is how the camera looks when folded (first photo), and in the second photo, if the camera is expanded.

Now I won’t be surprised if the dolls in my absence will arrange a retro party and click each other on an old camera)).
For lovers of retro gizmos for the doll world, I have.
How to make a camera out of cardboard in a few hours? This and other secrets were shared with a correspondent of the Minsk-Novosti agency at one of the master classes on assembling a Pinhole Mini 135 lensless camera on the eve of World Pinhole Day.
It took the participants of the master class three hours to construct a real camera from improvised materials. The process was supervised by a photographer, the head of the Minsk community of pinhole players "Ekvator" Aleksey Ilyin.
- Pinhole is a lensless camera in which, instead of a lens, there is a small hole through which light penetrates into the photographic material - explains A. Ilyin . - It is made from improvised materials: matchboxes, cardboard, tin cans. If there is an old camera in which the shutter does not work, the lens is broken or missing, then it can be turned into a pinhole.
Of course, such an invention - not an alternative to digital cameras or cameras in smartphones/mobiles. And it is hardly used by photographers or photojournalists for commercial purposes. You can’t call it a way to save money on buying a camera either. Rather, it is more like entertainment, an exciting process. For fans of pinhole photography, there are even many sites where experienced and novice pinhole photographers share their funny and captivating shots.
- Shooting with a pinhole, you begin to understand how the camera works, how light spreads and the picture is obtained. Especially when he made the device with his own hands. After all, a digital camera works according to a certain algorithm, which can only be interfered with sometimes. But with pinhole you have to do everything yourself, - notes A. Ilyin.
Pinhole photo of Alexei Ilyin Pinhole photo of Alexei Ilyin Pinhole photo of Alexei IlyinDesigning a miracle device, as it turned out, is quite possible at home. To do this, you will need a photographic film, black cardboard with a density of 220-300 g / m 2, a cassette from a developed film and stationery: a ruler, scissors, a plastic spiral from a notebook, superglue, a black marker and a stationery knife. Camera drawings can be downloaded.
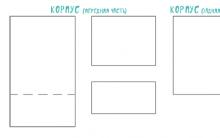
- First you need to glue each of the three drawings - the body,shutter and« black room» - to the cardboard and circle every detail, - introduces A. Ilyin. - For the shutter you will need thick cardboard (3 mm).
Black Room EnclosureYou need to do it carefully so that when gluing everything comes together. It took about 40 minutes to transfer the drawing to cardboard.
Now cut out the details with scissors. Small holes - with a clerical knife using a ruler. So the cut lines and corners are neat. When all parts of the homemade device are ready, we push the fold lines with a thick needle so that the camera turns out to be absolutely even.
Now we cut out a 1 × 1 cm square from a tin can, paint over the inside with a black marker and make a small hole in the center with a needle. We glue the plate with black electrical tape to the square hole from the inside of the “room”. And now our lens is ready.
As A. Ilyin pointed out, light will enter the film through this hole. The smaller it is, the clearer the picture will be. The optimal diameter for Pinhole Mini 135 is 0.15-0.2 mm.
Let's start creating the "room". On the outside we glue the square part of the shutter, insert the tongue so that it can go back and forth and fix it with a lid on top.
- From a plastic spiral we will make a frame counter. All it takes is one loop., - photographer notes. - We sharpen it and glue it with superglue so that the tip enters the back window of the “black room”.
Thanks to this find, which will make a distinctive click as it passes through each perforation window in the film, we will be able to count the number of frames used: eight clicks - one frame.
Now we take two cassettes: one with a new film, the other with a small piece of film. We cut off the ends of both, glue them with tape.
In the dark, rewind from one cassette to another. We put the film in the “room”, insert its petals inside both cassettes and seal the valve of the “room” with superglue.
We glue the camera body around it and wrap it with black electrical tape.
— What is it for? - I'm interested.
- To ensure complete light isolation, - prompts A. Ilyin. - Light can enter through the joints.
Well, that's all, a unique camera is ready. It remains only to figure out how to use it.
- To take pictures with a pinhole, you need to know the shutter speed, that is, how long to open the shutter to get a picture, - explains A. Ilyin. - On a bright sunny day - for a second. If the objects are in the shadow, then increase to 4-5 seconds. In cloudy weather - from 6 to 10 seconds. At dusk - from 30 seconds to 5 minutes. At home in dim lighting - up to 10 minutes.
There are various calculators for calculating exposure. For example, the PinholeCalculator mobile app. All shutter speed calculators ask for a focal length. In our case, this is the gap between the conditional lens and the film: the thickness of the case.
- Shooting with a pinhole is carried out only in a stationary state: we put the camera on a flat surface or a tripod, - notes A. Ilyin - Beautiful and interesting are not only landscape photos, but also pictures of people. The main thing is that the person being filmed should remain absolutely motionless for some time.
Now it remains to put all the knowledge into practice, and after - display the treasured photographs. Can't wait to find out what happens.
By the way, World Pinhole Photography Day is celebrated on April 29th. On this day, pinholists put aside all their business and enjoy the process of shooting with a lensless camera. And then they share their best work on the Worldwide Pinhole Photography Day website (http://pinholeday.org/). Try it too! You can send a photo until May 29.
For reference
Master class on "canned" pinhole photography - shooting on photo paper - will be held on the basis of the art space "Workshop" on April 2. Organizers - Minsk community of pinholists "Ekvator".
Photos of the organizers and from the Internet
On this day, October 14, 1884, American George Eastman patented photographic film. He spent 7 years inventing a roll of light-sensitive film, practically no different from the one we photographed on before the advent of digital photography. He also invented a new type of Kodak camera that could be loaded with 100 frames of film.
It seems to me that this is a great occasion to tell children, most of whom have never seen film cameras, but are good at taking pictures on their parent's phone, about how pictures were taken before. And even more interesting if you can assemble a film camera with your own hands!
About five years ago, we got a cardboard camera, which we ourselves assembled from a ready-made kit. We bought a set on Amazon for $ 20, like this: http://www.amazon.com/Noted-STD-35e-Pinhole-Camera-STD35/dp/B000Q8Z83U/ref=pd_cp_p_2
It contained nothing but cardboard and rubber bands to secure the cap to the lens. Inside you need to insert the film and you can start taking pictures. You point at what you want to shoot, lift a small piece of cardboard above the lens up - and you're done! Now you need to remember to rewind the film.
The main thing is to shake it as little as possible during shooting and shoot during daylight hours and preferably not at home.
How does he work? Light enters through a hole (pinhole), which in this camera plays the role of a lens. Back in the 13th century, Roger Bacon built the first pinhole chamber, which looked like a room with a hole in the wall. And Leonardo da Vinci described this phenomenon as follows: “When the images of illuminated objects pass through a small round hole into a very dark room, you will see on paper all those objects in their natural shapes and colors.” And he also came up with the idea that the pinhole can be used for sketches.
Here are some of our pictures that I especially liked:
our ocean


i sit on the sand

our home in LA

playground in front of the house

Here are some more pictures I found online:
You don’t even have to buy a kit, but just download the camera blank and make it yourself according to the instructions (the pictures are links):
And you get this camera:
Thank you Francesco Capponi
But, for example, there is a video on how to make a camera from a matchbox yourself:
And for very kids you can make a cardboard toy :)
On this day, October 14, 1884, American George Eastman patented photographic film. He spent 7 years inventing a roll of light-sensitive film, practically no different from the one we photographed on before the advent of digital photography. He also invented a new type of Kodak camera that could be loaded with 100 frames of film.
It seems to me that this is a great occasion to tell children, most of whom have never seen film cameras, but are good at taking pictures on their parent's phone, about how pictures were taken before. And even more interesting if you can assemble a film camera with your own hands!
About five years ago, we got a cardboard camera, which we ourselves assembled from a ready-made kit. We bought a set on Amazon for $ 20, like this: http://www.amazon.com/Noted-STD-35e-Pinhole-Camera-STD35/dp/B000Q8Z83U/ref=pd_cp_p_2

It contained nothing but cardboard and rubber bands to secure the cap to the lens. Inside you need to insert the film and you can start taking pictures. You point at what you want to shoot, lift a small piece of cardboard above the lens up - and you're done! Now you need to remember to rewind the film.
The main thing is to shake it as little as possible during shooting and shoot during daylight hours and preferably not at home.
How does he work? Light enters through a hole (pinhole), which in this camera plays the role of a lens. Back in the 13th century, Roger Bacon built the first pinhole chamber, which looked like a room with a hole in the wall. And Leonardo da Vinci described this phenomenon as follows: “When the images of illuminated objects pass through a small round hole into a very dark room, you will see on paper all those objects in their natural shapes and colors.” And he also came up with the idea that the pinhole can be used for sketches.
Here are some of our pictures that I especially liked:
our ocean
i sit on the sand
our home in LA
playground in front of the house
Here are some more pictures I found online:
You don’t even have to buy a kit, but just download the camera blank and make it yourself according to the instructions (the pictures are links):
And you get this camera:
Thank you Francesco Capponi
But, for example, there is a video on how to make a camera from a matchbox yourself:
And for very kids you can make a cardboard toy :)


 institution")


What payments are due upon dismissal of one's own free will?
What is the endurance limit?
Comparative analysis: concept, types and examples Carried out according to several criteria at once
Calculation of KPI in Excel examples and formulas Carried out by several criteria at once
Requirements input stream