Crystal… From this word it really blows with magic. I don’t know about the magical properties of crystals, but a variety of useful physical properties they definitely have. Crystals are widely used in modern electronics, optics, and other fields of technology. And, of course, the crystals are simply beautiful. They attract the eye with their regular shape and natural symmetry. And this applies not only to precious crystals, but also to crystals grown from improvised means.
We already know something about the crystalline state of matter from the article on. It's time to move on to practical exercises 🙂
The crystal growth experiment has a number of features. One of these features is the duration of the experiment. The thing is that a good and beautiful, and, most importantly, a large crystal cannot be grown quickly. This takes time. That is why the experience of growing crystals for nine days developed in the rubric, where you could observe the progress of the process and, perhaps, even conduct your own experiment in parallel. This article is a summary of the information obtained during the experience. So, instructions for those who want to grow a crystal themselves.
For this we need:
- The container in which the crystal will grow. It is best if the container is transparent, such as a glass jar. In this case, it will be convenient to monitor the progress of the process.
- A small piece of cardboard to cut out the container lid
- Funnel
- Filter paper or any material with which it will be possible to filter the solution. You can use a napkin.
- Thread. It is better to take a thinner and smoother thread, for example, silk.
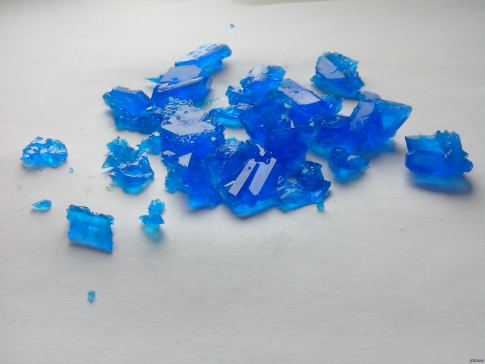
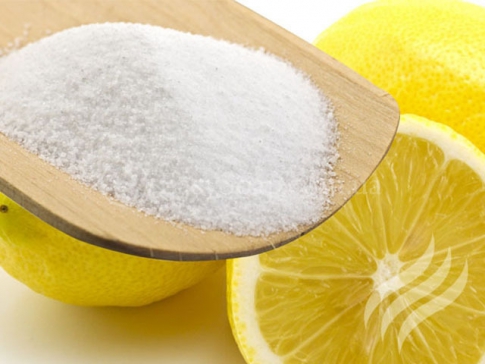
- And, of course, the substance from which we will grow the crystal. Copper sulphate is used in the experiment. The crystal from it should turn out to be a beautiful blue color. In addition, getting blue vitriol is quite simple - it is usually sold in any gardening store. If you could not find blue vitriol or are just too lazy to go to the store, then you can use any crystalline substance, for example, ordinary table salt or sugar.

Before starting the experiment, I must warn you, in case you want to repeat it, about personal safety measures. You will be working with chemicals that can harm you. Do not use food containers for your experiment, use protective equipment (gloves, glasses), wash your laboratory glassware thoroughly. If chemicals come into contact with skin or eyes, rinse thoroughly with water. If swallowed, seek medical attention.
Well, with the formalities over, let's get started.
Day 1.
As I said, growing crystals is a procedure that has some peculiarities. Another feature of this experiment, in addition to the duration, is the need to grow the so-called seed, i.e. a small crystal, on the basis of which a large crystal will grow. You can do without a seed, but in this case it is difficult to grow a beautiful single crystal. Therefore, it is better to grow a seed after all, especially since there is nothing complicated in this.
Prepare a saturated solution.
Let's pour some copper sulphate into a glass container (hereinafter I will talk about copper sulphate, since it is he who is involved in the experiment, but you use the substance that you managed to find).

Pour salt (and copper sulfate is sulfur-copper salt) with a small amount of hot water. The use of hot water is mandatory, because. at elevated temperatures, the solubility of salts increases.

It is better to place the container in a water bath so that the solution does not cool prematurely.

Stir the salt until dissolved, and then add more salt and stir again. We repeat this until the salt ceases to dissolve in water.
Thus, we have obtained a saturated salt solution.
Now the resulting solution must be filtered. This must be done so that no foreign particles, such as dust or impurities, remain in the solution. Foreign particles can serve additional centers crystallization, i.e. other crystals will begin to form around them, but we do not need this. At this stage of the experiment, this is not very critical, but later the purity of the solution will be very important.


After filtering, you need to throw a few salt crystals into the solution - seeds will begin to form on them.

Now the container needs to be placed in a place where a more or less constant temperature regime will be ensured (the windowsill is great for this), and covered with something to prevent foreign impurities from entering.

The solution will begin to cool and supersaturate, i.e. salt will begin to become more in solution than it can dissolve at a given temperature. The salt will begin to crystallize, and the grains of salt that we added to the saturated solution will become the centers of crystallization. You will have to wait 2-3 days. After that, we proceed to the next stage of the experiment.
Day 2
It can be seen that crystals began to form at the bottom of the vessel.

Day 3
The crystals have grown. In principle, they are large enough to be used as a seed, but I will try to keep them for another day.

Day 4
Well, enough time has passed, and we have formed a good seed material. It remains to choose the right candidate.

Pretty pretty already, isn't it? But we will not stop there and will continue our experiment.
It seems that the resulting mass of crystals is a monolith, but in fact it is not difficult to separate the crystals.

Try to choose a crystal of the most correct shape. I chose far from the largest available, but I liked its shape the most. The more correct the shape of the seed, the more correct the shape of the crystal will be in the future. To make the dimensions of the seed more clear, I put a match next to it.

Now you need to tie a thread to the seed. As I wrote at the beginning of the article, it is better to take a less fuzzy thread so that side crystals do not form on its protruding fibers. Do not use wire as a hanger.

Now the thread with the seed must be passed through the lid of the container and fixed on the reverse side. You need to fix it so that at any time it is possible to adjust the height of the suspension. For example, you can with reverse side wind the excess thread around a match or secure the thread with a paper clip.

Now we need to prepare a fresh salt solution. It is done in the same way as for the seed: dissolving salt in hot water until it stops dissolving, filtering the solution. In this fresh solution we place our seed. Make sure that the seed does not touch the bottom and walls of the container, otherwise the crystal will begin to grow in an irregular shape.

And now we have two ways. The first one is more complex. It requires more attention and effort. The fact is that the most beautiful and regular crystals are obtained when the crystallization process is slow. Therefore, we need to ensure smooth cooling of the salt solution. To do this, we need to place our seed container in thermo-vessels, constantly control the temperature of the solution. In simple terms, there is quite a lot of fuss. But the reward for such efforts is worthwhile - the crystal will turn out to be as clean and regular as possible.
The second way is much easier. You have placed the seed in a hot solution and you can forget about it for a while, leaving the crystallization process to chance. With this method, the growing crystal may not be an ideal shape, but the growth process will be faster.
I chose the second way. In the end, after going down the easier path and gaining some experience, I can always do a more complex version of the experiment. Moreover, it must be borne in mind that fast option experience - this does not mean at all that it can be spent in a couple of hours. Even with an accelerated experience, the crystal will grow for several days. In the case long term The experiment can take up to 1-2 months.
But in both cases it is necessary to monitor the growth of the crystal. Once again, you don’t need to take out the crystal and touch it - this may affect its shape. If side crystals begin to form on a crystal or thread, they must be carefully removed so that they also do not spoil the shape of the main crystal.
And one moment. If you lowered the seed into the solution, but it did not increase, but quite the opposite, it dissolves, then this means that you have prepared an unsaturated solution. The procedure for preparing the solution will have to be repeated.
So we continue to monitor the growth of the crystal. If you have any questions, you can contact me in the comments or through the form.
Day 5
During the day, the crystal grew significantly. In the photo, the crystal is compared with a match and a crystal - an understudy of the seed, which I left yesterday just in case.

However, as you can see, the shape of the crystal is not ideal, there are many defects. This is the result of the rapid growth of the crystal. But I still like it 🙂
I updated the solution as I did before, and lowered the crystal back into it. Since the crystal size increased significantly compared to the previous day, an adjustment in the height of the seed suspension was required. The experiment continues.
Day 6
Crystal has grown. Again updated the copper sulphate solution.

Day 7
The crystal barely fits into my glass! Do not forget to clean the thread from growing small crystals.

Day 8

Day 9
Well, here comes, I think, the last day of the experiment. The latter is not because the crystal will not be able to grow further, but because it has become too crowded in my laboratory glassware. We take out the crystal, cut the thread to the very root and blot it with napkins. We are one step away from admiring our work of art. The fact is that if you leave the crystal as it is, it will collapse pretty soon. To prevent this from happening, it must be "dressed" in a protective shell. The best option is to cover it with clear varnish. You can also place it in a hermetically sealed container, for example, in a jar. But it seems to me that the best option is to cover it with varnish. This will give it additional brilliance, and it will be possible to observe it, as they say, live, and not through glass.

And now you can take a good look at the crystal. Of course, his form was not perfect. But I deliberately chose the fast way of crystal growth instead of the qualitative one. In any case, I was pleased with the result. In nine days, the crystal grew more than seven centimeters in length - a pretty good result!

I even wanted to give it a name. Give the same large and unique precious stones names. For example, how the famous diamond was given the name "Count Orlov". My crystal, of course, is far from a diamond, but it is dear to me in its own way 🙂 Therefore, not without a share of humor, I decided to call the resulting seven-centimeter pebble the Kid.
Good luck with your experiments!


Reading time: 7 minutes
Growing a real crystal is quite simple, interesting and informative. This article talks about how to do it at home.
Crystals are formed from any substances whose atoms and molecules are grouped into an ordered structure. They do not require a lab to grow. special devices. The simplest reagents that are always at hand will do.
Growing a crystal is one of the easiest and safest chemistry experiments available at home. Even a young child can carry it out school age under adult supervision.
The reward for your efforts will be an item of extraordinary beauty that you create with your own hands.
Types of crystals
- A monocrystal is a solid large crystal, for example, an artificial stone. It is formed under the condition that the crystallization processes are extremely slow.
- A polycrystal is formed when crystallization proceeds rapidly. In this case, many tiny crystals are formed. This is how metals behave.
Ways to grow crystals at home
One of the most simple ways growing a crystal - cooling a saturated solution. What processes take place?
- In warm water, the substance chosen for the experiment (for example, salt) dissolves completely.
- The temperature of the solution is lowered: this reduces the solubility of the salt. An undissolved salt is formed, which precipitates.
- The formation of a precipitate begins with the formation of small grains both in the solution itself and on the surface of the container in which it is placed.
- If there are no foreign inclusions in the solution (ordinary dust particles, villi, etc.), and cooling occurs gradually, these grains-crystals coalesce into larger and regular crystals.
- Rapid cooling causes the formation of many tiny irregular crystals at once, which do not connect with each other and inhibit each other's growth.
The crystal will also grow if the solvent (water) is gradually removed from the saturated solution. How to do this and what will happen in the vessel?
- Dishes with a saturated solution must be kept at a constant temperature for a long time.
- The ingress of litter and dust should be excluded, as well as slowing down the evaporation of water (for this, it is enough to cover the container with paper).
- You can grow a crystal on some kind of suspension in the middle of the container (then it will acquire the correct shape), or at the bottom of the container.
- If the crystal grows at the bottom, it must be rotated periodically to achieve symmetry.
- In place of the evaporated water, a solution of the same consistency should be added as it was at the beginning of the experiment.
The basic principle in this case remains the same: the slower the processes that affect crystallization go, the more beautiful, larger and more correct the crystals will turn out. If the original crystal, which served as the basis for growth, had an irregular shape, it will fill in the missing parts during growth and take on a configuration typical of the nature of its substance. So copper sulfate will eventually grow into a rhombus, and salts of potassium chromium alum form an octahedron.
It is believed that at home only a small crystal can grow from improvised means. This is not so: with due attention, there is every chance to grow a crystal of any size and weight at home. In fact, for this it is enough to continue the crystallization procedure until the desired result is achieved. Of course, you must immediately choose a container that is suitable in size.
Preservation of crystals
Failure to comply with storage conditions may lead to the destruction of the crystal. It is necessary to familiarize yourself with the characteristics of the selected substance in advance in order to avoid disappointment at the end of such a long and painstaking work.
Thus, the chiseled edges of an alum crystal, under the action of ordinary dry air, will fade due to loss of moisture and crumble, forming a gray powder. The same will happen with sodium sulfate and thiosulfate, salts of manganese, zinc, nickel, Rochelle salt. The only way out is to place the crystals in sealed transparent vessels. Some recommend covering the crystals with clear varnish, but this only delays the death. And yet - lacquered edges lose their original luster and look artificial.
High temperatures destroy crystals grown from copper sulphate and potassium alum. The life of such crystals can be extended by storage in a domestic refrigerator. However, even here they will last about 2 years.
Another problem of crystals of water-soluble substances is that they are destroyed by temperature changes due to moisture, which is stored in a small amount inside them. For this reason, specks, chips appear, the edges are washed off, and the gloss is lost.
Perhaps the most stable of the substances popular for growing crystals is table salt.
What can you grow a crystal from in 2019
In addition to the above substances, crystals at home can be grown from sugar.
It is much more difficult, but at the same time more interesting to grow artificial stones (amethysts, quartzites, rubies, etc.). This is a rather laborious process that requires special equipment to maintain a constant temperature, pressure, humidity and other indicators important for the success of the experiment. In other words, to get an artificial stone, you need a real laboratory.
What should be the substance for home growing a crystal?
- Safe, non-toxic. Not all substances with a crystalline structure correspond to this requirement. For example, potassium cyanide KCN (or sodium sulfide Na 2 S) also forms crystals of its characteristic shape. But it is impossible to conduct experiments with him at home, because he enters into an oxidation reaction with oxygen in the composition of the air and releases toxic substances that are dangerous to humans.
- Second important quality- stability. That is, the selected substance must enter into a reversible reaction with water. In addition, resistance to temperature fluctuations is important. Some organic substances can be irreversibly destroyed when exposed to hot water (hydrolysis reaction).
- The cost of reagents. As you know, the first experience (or several) may not be very successful, therefore, for starters, it is better to opt for inexpensive and affordable substances.
- Yes, growing crystals will require a lot of purified water - this should also be taken care of in advance.
- The ability to dissolve in water. Before starting the experiment, you should find out what consumption of the selected substance for a given volume of water will be required. To grow a sugar crystal, for example, you need to dissolve at least 2 kg of sugar in 1 liter of water. So it is better to pre-graph the solubility of the starting material. To do this, subtract the mass of the same volume of the filtered solution from the mass of a glass of water after the dissolution is completed and the temperature stabilizes. This will help to get an idea of how much substance for crystallization is needed for a given volume of water.
How to grow a salt crystal
It is easiest to practice on a regular table salt. Then you will not need special chemical reagents, only salt and purified water.
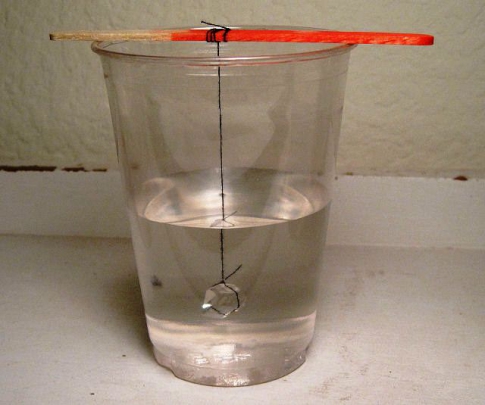
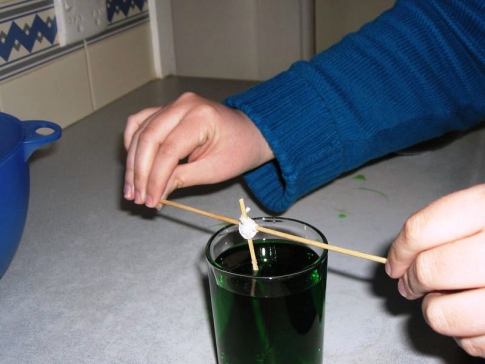
Step 1. Prepare a salt crystal by tying it with a thin thread fixed in the middle of a small stick (pencil, pen).

Purpose: to place the crystal so that it is immersed in the solution, but not in contact with the surface of the vessel.
 We tie a salt crystal to a thread and place it in a glass
Step 2. Pour warm water into a container (transparent so that you can observe the growth of the crystal) and add salt. Stir until the salt is completely dissolved. Then add salt and repeat. It is necessary to salt the water until the salt stops dissolving. This is noticeable by the appearance of sediment at the bottom of the vessel.
Step 3. The solution must be gradually heated by placing it in a container of a larger diameter with hot water. As a result, the precipitate will dissolve. If there is something left at the bottom, it is better to pour the solution into a clean bowl.
Step 4. Place the container with the resulting solution in a place with a stable temperature. Immerse the seed crystal on a thread into the solution. From above, the vessel with the solution must be covered with paper.

Step 5. The crystallization process has begun. Further, when the water evaporates, it will be necessary to add a solution of the same salt content to the container as it was at the beginning of the experiment. After a while, it will become noticeable that the original crystal has increased in size. You can grow it as much as you like, as long as the size of the container and patience are enough. The resulting crystal will be quite durable.
How to grow a sugar crystal
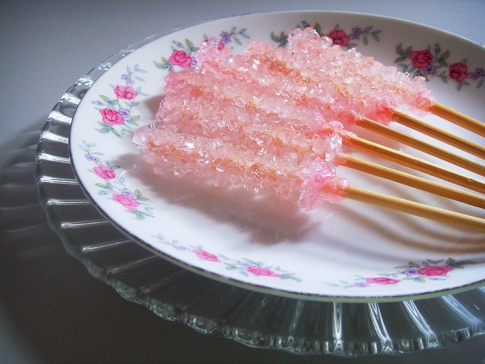
Sugar crystals can be used as table decoration or candy for kids. But they are quite expensive due to the high consumption of sugar. For 2 cups of water, you will need a total of 5 cups of granulated sugar.
 sugar crystals
The process of preparing the solution is similar to how it is done for salt crystals. It is most convenient to grow sugar crystals on toothpicks or wooden skewers. For "seed" it is enough to dip the skewer in syrup and dip in sugar so that it evenly adheres to the surface. You need to wait for the sugar to stick well and dry.
To form colored crystals, it is worth adding food coloring to the syrup ( best option- juices).
It will take 1 week to grow a sugar crystal from the specified amount of ingredients.
Sugar crystals on sticks (Video)
This video shows how to grow edible sugar crystals that are not only beautiful to look at, but also very tasty.
How to grow a copper sulfate crystal
Salt crystals are transparent white, and copper sulfate gives a rich blue tint.

It is no more difficult to grow such a crystal than a hydrochloric one: you will need a saturated solution and a seed crystal on a thread.
 Copper sulphate crystal suspended on a string

The solution in a transparent container must be placed in a shaded place with a stable temperature, the crystal should be suspended in the same way as in the case of salt, and wait, periodically adding the solution instead of the evaporated one.

Do not remove the crystal from the working solution until the procedure for its formation is completed!
Safety
Food utensils cannot be used to grow crystals (an exception is experiments with salt and sugar). Food should not be left nearby: firstly, because the reagents are toxic, and secondly, because of litter and crumbs, which, if they get into the solution, will ruin the experiment.
When handling chemical reagents, absolutely all the rules indicated on the packaging should be observed. After completing work, wash your hands.
Growing a crystal at home is quite simple, interesting and informative. First, it is better to practice on the available substances. If something goes wrong, you need to check that all the conditions necessary for the formation of a crystal are met. Having mastered the simplest crystals, you can start working with other reagents. It never gets boring, because different substances give crystals of different shapes and colors. In addition, no two crystals are exactly the same, and their configuration and size can be adjusted at will.
Tipone- In contact with
- Google Plus
Experiences such as growing your own crystal will make you feel like a jack-of-all-trades—you'll learn how to make beautiful home decorations, sweet candies, and help your kids learn the basics of chemistry.
Use of crystals
Such an idea how to grow a crystal is a great opportunity to study Chemical properties different substances. If you have children at home, be sure to challenge them to grow a crystal at home - not without your help, of course. It will be interesting for the children to observe the progress of work, comprehending chemical science in such an exciting way.
Some experiments will also help you get decorative details to decorate individual compositions - for example, salt crystals can be excellent decorating materials.
However, it must be remembered that many of the materials used are extremely poisonous - they should not be touched by hands or inhaled vapors. Such substances are not suitable for use in Everyday life- They can only be used for experiments.
Growing crystals can be chosen as a hobby, an exciting activity, because in fact the creator never knows what kind of crystal will turn out in the end.
Types of chemicals
At home, you can grow a crystal from a variety of substances. Some of them require special processing: you can work with them only under certain conditions - at a special temperature, lighting, etc. These include the following materials:
- Mohr's salt;
- blood salt;
- various alums;
- nickel sulfate;
- ammonium nitrate.

If you are just starting out with how to grow a crystal at home, it is better to postpone using them.
However, many work mixes, such as table salt, can be found in any home. With them, it is recommended to start work for beginners.
Salt
There is nothing easier than growing salt crystals at home!

To operate this product, you do not need to use any special accessories or equip workplace with supernatural conditions.
blue vitriol
Another easy option. Before growing a crystal from copper sulfate, the substance can be bought at an amateur gardener's store - it is sold as a fertilizer.
From the master classes below, you will understand that working with vitriol is as easy as growing a crystal from salt. The only difference is that the mixture is an active saturated salt substance, so it is undesirable to conduct experiments using running or any other water - only distilled water, which you can find in a pharmacy, is suitable.
Sugar
The only substance that can be eaten after the experience! Experiments with sugar are completely harmless, so you can safely teach your children how to grow a crystal, using his example.

The result should be delicious sugar candies in the form of frosty crystals - an original replacement for cockerels on a stick.
Safety regulations
Despite the fact that novice chemists use mostly familiar solutions, such as salt or sugar, everyone must follow certain precautions - the instructions are presented below.
- Allocate special dishes for experiments, from which you will not eat in the future. Neglect of this point can lead to serious food poisoning.
- Each substance must be stored in a separate, hermetically sealed package with a mandatory signature of the contents on the bottle. Keep substances out of the reach of children and pets, in a cool and dark place.
- Use protective clothing and gloves.
- Work with chemicals that emit vapors into the air should be carried out only near powerful hoods.
- If acid gets on the skin, it is imperative to sprinkle the place with a weak alkali (water diluted with baking soda) and vice versa - alkaline solutions are easy to neutralize with an acid like citric acid.
Such skills are very useful when working with dangerous chemicals. Over time, you will bring the implementation of this instruction to automatism and will not worry when you want to use dangerous mixtures instead of ordinary salt or soda to grow a crystal.
salt crystals at home
After the theoretical advice, you can move on to the part where you will learn how to grow a crystal from salt. Prepare water in unlimited quantities - it is better to use distilled water (purified from any additives) so that the substance does not react with any impurities. However, ordinary running water will do.
In addition, you will need a small saucepan, a glass container (jar, glass), silk thread, a pack of salt.
- Place a saucepan of water over medium heat. Heat the water, but do not bring to a boil.
- In small portions, start pouring salt into the water, stirring constantly. Each time pour a new handful after the previous one is completely dissolved.
- The preparation of the solution ends when the salt has completely ceased to dissolve in water - this means that you have prepared a concentrated mixture.
- Pour the concentrated composition into a transparent glass container and leave to settle for about a day.

- Free time is necessary for all the smallest, undissolved particles to settle to the bottom. In the photo you can see how the salt precipitate is obtained.

- Take a thread or string, tie it around a long thin stick that you can put on the neck of a glass container.

- The length of the lace should be less than the height of the vessel, so cut off the excess.

- Lower the string into the water in a suspended state so that it does not touch the walls of the jar and the sediment at the bottom.
- Leave the experiment in this state for 1-3 weeks.

- After a couple of days, you will notice an increase in small crystals on the thread. Experience in this case is interesting just by observing how much the crystal grows over a certain period of time.

- Instead of an ordinary thread, you can lower a large piece of salt suspended on a thread into a glass. In this case, the substance will grow around it.
You can either grow a crystal of a certain shape, or an arbitrary one. To control appearance substances, apply a thin layer of fat or petroleum jelly on one side of the crystal - you will see that there will be no growth here.
If desired, salt can be replaced with other substances - for example, it is easy to prepare crystals from soda or copper sulphate using the same technology.
How to grow a crystal from sugar?
If you set yourself the goal of learning how to grow a crystal from sugar, you will be pleasantly surprised by the result - beautiful sweet candies that will delight children and pleasantly surprise adults during tea drinking. An interesting option their use is to stir tea with them. So you get both a stir stick and a sugar sweetener.
- Prepare a concentrated sugar solution in the same way as in the experiment with salt - the sugar should completely stop dissolving in warm water. After that, pour the hot syrup into a transparent bowl.
- When the solution is ready, start preparing the base sticks. Tie one stick to the other crosswise so that the first is lowered into the bowl, and the other is held by its neck.

- Dip the stick in the syrup - it should not touch the bottom.
- Leave the structure in a dry and warm place - in a day you will notice how crystals begin to appear in the liquid.

- In about a week, you will have finished sugar skewers. Bon appetit!

If you want your lollipop to be colorful, add a little food coloring to each jar as you pour the hot syrup.
Such sweets can be a nice gift for your loved ones for the holidays - you can add such sweet sticks to a present on New Year or birthday.
To find out how to grow a crystal from blue vitriol, watch the following video.
Take it, tell your friends!
Read also on our website:
show more
Growing crystals is possible not only in a chemical laboratory, but also at home. This is an interesting and exciting activity that will surely cause excitement not only in a child, but also in an adult. Watching the formation and gradual growth of a crystalline mass is very entertaining, especially since this does not require expensive substances or special skills.
In how to grow a crystal at home, ordinary table salt will help. Moreover, we need not "Extra", but a stone one. You should not use an iodized product, since it practically does not crystallize. Sugar, soda or copper sulphate can also be used for this purpose. If you want to get a colored pebble, you should color the product with manganese or any household dye.
An artificial crystal can be used as an interior decoration; for a child, this is a great opportunity to make a beautiful little thing with your own hands. That is why interest in the creation of such elements has recently been increasing more and more.
How to grow a crystal at home
The easiest way is to buy a special kit for growing crystals in the store. It can be sold in a children's supermarket or in a specialized place that sells school supplies and everything you need for the educational process.

Alternatively, the crystal can be obtained from readily available powdered products such as salt and sugar and soda. Everything you need should be prepared in advance in order to simplify the process of artificial origin of the monolith as much as possible. Be patient, because the formation of a full-fledged stone will take at least a month, and sometimes even more. The longer you wait, the more massive and beautiful your creation will turn out.
To grow a crystal, you will need:
- A container (like an incubator) of such a volume that the future stone can accommodate. Its material should not oxidize or stain from contact with various substances. A deep glass dish is best, as it is transparent and allows you to observe the process. If there is none, you can take a ceramic product. Plastic, metal and other materials are not suitable.
- Wooden or glass stick for mixing the solution (like a vessel, it should not oxidize).
- Paper (thick napkins or special filter sheets).
- The basis of the future stone (salt, sugar, soda, or blue vitriol).
If you decide to grow a colored crystal, you can not do without a dye.
Technically, the algorithm for creating artificial stones is almost independent of what they are made of. But it is very important to strictly follow the sequence of actions, otherwise even after a month or two you will not see the desired result.
Step-by-step algorithm for growing a crystal from products

To turn salt or sugar into a single monolith, the following manipulations are needed:
- The product dissolves in boiling water to make a concentrated solution (the stronger it is, the more massive the crystal will be).
- The basis of the future crystal (sugar or salt) is gently washed under running water and then placed in the cooled solution. When washing, it is important not to crumble a piece of the product.
- For a day, the container with substances is tightly closed with a lid.
- A vessel with a crystal base and a solution is opened and left for 4-5 weeks, during which time the stone will reach a sufficient size.
As soon as the top of the crystal begins to peek out above the surface of the liquid, you should remove the pebble from the solution, rinse it and dry it, and then put it in a conspicuous place so that it decorates the room. Alternatively, it can be placed under a glass jar.
If patience is not your strong point, you can use the accelerated method of cultivating a salt crystal. It needs distilled water, salt and gauze. Stir the salty powder into the liquid until it no longer dissolves. Then the mixture is passed through cheesecloth and poured back into the vessel. From what is left in the gauze, the largest piece is selected, a thread is tied to it, then it is lowered into saline. It is advisable to cool everything to speed up crystallization. If a small pebble is enough for you, then it is really possible to get it in this way in a week.

The dye can be added at any stage of crystal growth. But if you want to make a stone of a saturated shade, it is worth dissolving the coloring matter at the same time as salt or sugar.
vitriol crystal

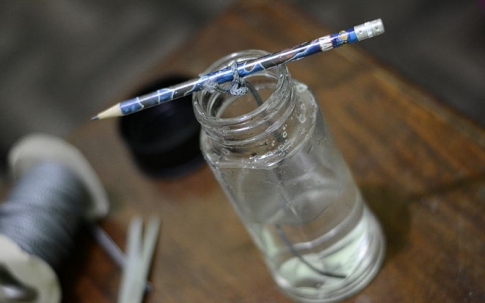
To create a dark blue vitriol crystal, you will need copper sulfate (sold in gardening stores, sometimes found in supermarkets household chemicals) and distilled water. Liquid should be poured into a volumetric container (preferably made of glass or ceramics) and gradually, in portions, vitriol should be dissolved in it. This is done until the substance introduced into the solution ceases to dissolve in it.

Then an ordinary thread is lowered into the vessel. It is necessary that one end hangs outward from the outer edge of the container. After a few hours, small pebbles cling to it. You need to leave the largest one, and carefully clean the rest. After that, the thread with a small crystal returns to the solution, but so that it does not touch the bottom of the container. In a few weeks, the artificial conglomerate will become massive enough to get it out, rinse it in water, dry it and enjoy the man-made beauty. In a month, you will form a stone about 3x4 centimeters in size. To create a more massive product, you will have to wait longer.
You need to understand that copper sulfate is a dangerous chemical, so children can only work with it under the vigilant guidance of adults. The dried pebble should be covered with colorless nail polish on top - this will help keep it in its original state longer.
Artificial crystals are quite fragile, so you need to handle them very carefully. If you accidentally drop such a little thing, most likely, it will break and then you will have to grow the crystal again.
Read also


Today we will learn with you how to grow crystals at home. In general, this is not so difficult to do as it might seem at first glance. Especially in modern world. Literally 10-15 years ago, not every child could grow a crystal at home. But now everyone has this opportunity. This entertaining activity, as a rule, parents do together with their children "from the cradle". After all, crystallization is a very beautiful and interesting process. He likes kids. And for schoolchildren, this phenomenon helps to explain chemical phenomena. But how to grow crystals at home? Let's try to understand this difficult issue with you.
What are crystals
To begin with, it is worth understanding what we will generally be dealing with. That is, any person should know what exactly he wants to grow. Crystallization is a very beautiful phenomenon. But what is a crystal?
This object originally meant frozen water, or ice in a simple way. Now it is a solid body in which the constituents (atoms) are arranged according to a certain pattern, but in a chaotic order. And in the course of such an action, they form the so-called crystal lattice.
And speaking in simple terms, it is just a solid and beautiful stone of some three-dimensional shape, which under a microscope has a special structure. That is, the crystal lattice. Often, particles that shimmer and sparkle in the sun are considered crystals. A precipitate formed during the evaporation of a substance. And now we will try to understand how to grow crystals at home. It's not that hard. The main thing is the correct preparation for the process.
Security measures
Regardless of which crystallization material we will use, there are certain rules of conduct. They must be followed without fail. Especially if copper sulfate is used as a crystallization material. Let's quickly find out what can and cannot be done if you want to figure out how to grow a crystal at home.
Let's start with the fact that we need dishes. And it will not be possible to use it for domestic needs, or rather, for food purposes. Even after disinfection. You can simply get poisoned. In principle, if we are talking about sugar or the most common salt, then you can really rinse the dishes thoroughly after use, and then use them for any purpose. The main thing is not to touch these containers in cases where copper sulphate or something else is used as the material.

Eating during the process is not allowed. This may cause poisoning. And then the game with crystallization will turn into a huge problem. It is better to wait until the action is completed if potentially hazardous substances are used.
It is forbidden to work with substances about which you do not have knowledge. After all, with some materials you will have to follow special rules of conduct. Otherwise, you risk delivering a lot of problems to yourself and your body.
How to grow crystals at home? To do this, you will have to find and allocate a special place for this lesson. One where no one will bother you. And where very small children and pets will not get to the reagents, as well as directly to the crystals. Especially in cases with copper sulfate and any other chemicals. The exceptions are sugar and salt.
Action Basics
How to grow a crystal at home? For this, to be honest, it is important to know the working methodology and the crystallization process. What are these actions based on? In general, if you want to make a homemade crystal, you will have to prepare for the fact that you will need to prepare a special concentrated solution.
It is on this that home "crystal growing" is based. That is, in order to grow such a "thing" at home, in any case, you will need a special concentrated solution with the material of your choice. Sometimes dyes can be added to it in order to get a colored crystal. It's very beautiful and interesting.
In principle, it is already more or less clear how to grow a crystal at home from salt or sugar, for example. We need a concentrated solution. And in fact, a place that will be overgrown with crystals. Let's find out a few options for the development of events that will help crystallize extremely quickly and easily at home.

Evaporation
Perhaps, let's start with you with the simplest and least popular scenario. If you want to grow a crystal at home, then you will need water, as well as a reagent. For example, salt. Plain, culinary. The sea may also be suitable. In other words, any salt for food production.
What needs to be done now? First, warm up the liquid a little. Now add salt to the water. Make sure your solution is concentrated. That is, approximately 2-3 tablespoons of salt are needed for a glass of water. Stir the "brew" until completely dissolved. Now it remains only to leave the concentrated salt water in a warm place for a while. And in a ventilated space. As soon as all the water evaporates, you have a precipitate - salt crystals.
If you want to quickly see the effect, you can start to evaporate the water - boil it. Most importantly, do this process carefully. But it's better to just be patient. So we became aware of how to grow a crystal at home from salt. By the way, from sugar too. This method is not very good. After all, it simply forms a precipitate as crystals. For this reason, there are several other approaches to solving our problem.
Ready set
How to grow a crystal at home? In truth, there are several ways to do this. One, not the most popular, we have already studied. Now let's move on to more interesting methods. Especially among the smallest children.
In order to figure out how to grow a crystal from sugar, salt or any other substance quickly and without problems, just go to any toy store and buy a special play set called "Crystallization" there. Or something like that.

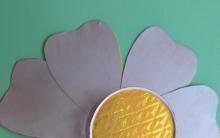
In the box you will find everything you need to carry out the process - and a special container into which liquid is poured, and a reagent, and dyes (if needed), and even special forms on which crystals will be placed. For example, a tree or a flower. Very interesting are the options on which different dyes are applied directly on the molds. That is, as it "grows", you can see multi-colored crystals in various areas of the craft.
What do we have to do? The same as last time - mix water with the reagent, and then lower the mold into it and put it in a warm place. How to grow sugar crystals at home (or salt crystals) using a playset? The most popular option for the development of events is not to directly lower the template into concentrated water, but to pour it over the molds. That is, you will need to collect, for example, a stable Christmas tree template, put it in a special deep form (it is attached) - in something like a flower pot, and then pour a concentrated solution into it and leave everything like this. For a while, of course. Approximately for a day, maximum - for two.
After the specified period of time has passed, look at your craft. It will be covered with various crystals of sugar or salt. Just be careful - such formations break and fall off very easily. After all, they will be small and fragile. Now we know how to grow a crystal at home from sugar or salt, and even describing some form. But there are other ways that will help us in solving this problem. Let's get to know them.
From salt
For example, there is another very interesting approach to solving the problem. How to grow crystals at home from salt? To do this, we need salt (table salt, including pieces), water and special strings. Better take a twine. We will have a crystal on it. Let us now get down to business with you as quickly as possible.
Heat up the water. It is not necessary to bring to a boil. Now start adding salt to it and stir. Continue the procedure until you get a concentrated solution. That is, until the salt begins to settle at the bottom of the dish. During this period, it is best to maintain a warm water temperature without boiling. When you achieve the desired result, simply pour the liquid into another form. Make sure you don't have any sediment at the bottom.
Next, you need to take a string or thread and tie a piece of table salt to one end of it. So that he does not fall and does not slip out. Ready? The second end of the thread should be hung over a glass of concentrated salt water, and then a piece of salt should be lowered into it so that it does not touch the bottom and walls of the dish. It remains just to wait a while. Of course, this process will proceed slowly - it will take about 2-3 days to form a normal crystal. Moreover, the thread that you hung up will also begin to be covered with small crystals in a chaotic manner, forming a beautiful pattern.

That's all the problems are solved. Now we already know how to grow a crystal at home from sugar or table / sea salt. As you can see, nothing difficult. The main thing is to be able to wait. True, this is not all the options for the development of events. Now we will try to grow sugar crystals again with you, and we will also try to figure out how to grow a crystal from vitriol.
sugar dream
Well, in the case of salt, we can have a special material prepared that will help crystallize. In our example, this is a large piece of table salt. But with sugar, such a "number" will not work. We can't chip off a piece of it like salt. Therefore, the process of sugar crystallization will be slightly different. How to grow a sugar crystal at home? Let's figure this out.
To begin with, there are two options for the development of events. The first one is when we will force a ready-made strong crystal to grow, the second one - when some material begins to be covered by these "objects". Let's start with a familiar approach.
How to grow a crystal at home? Photos of this process are now very popular. And the results of cultivation, too. But how is this procedure carried out using sugar? First, lightly (this is important) heat the water, and then mix it with sugar until a concentrated solution is obtained. Now, like last time, pour the "brew" into another container with sediment filtering. Ready? Then tie some kind of crystal (solid, but not salt) on a thread or wire. For example, sodium sulfate. Dip it in sugar water and then just wait for a while. Your crystal will grow and become composed of sugar.
In the second case, you can do without sulfate. That is, simply lower the thread or wire (preferably twine or floss) into the solution and hang it in that position. Leave everything as it is for a few days, and then look at the result. Don't be afraid to lower the rope deep. Now we know how to grow a crystal from sugar at home. Let's get acquainted with another rather interesting way that we have not yet gone through.
vitriol
Of course, now is the time to think about how to grow a crystal at home from blue vitriol. This material is also salt. Only chemically active. And so the growing procedure will change a bit. But not much.

What will we need? For starters, the reagent itself. That is copper sulphate. Both in a "loose" form and a crystal. Be prepared for it to be blue. What luck - a natural colored crystal without the use of dyes! Next - prepare the thread, and then tie a piece of vitriol to one end. Tie the other on some kind of stick that will play the role of a holder. It seems that the process is not much different from working with salt or sugar. But that's just for now. The most interesting is ahead.
What are we talking about? Of course, about water. When working with copper sulphate, you will only have to use distilled water. That is, purified from precipitation, impurities and salts. Only in this case can we hope for the success of the operation. Mix the remaining vitriol with warm distilled water, filter it, and then dip the crystal with the thread into the liquid mold. Wait a while. That's all. Now we know how to grow a crystal in 1 day at home.
True, there are not only rules of conduct regarding the procedure, but also a few tips. They will help you achieve maximum good result. What are we talking about?
For example, do not remove the crystal from the solution unnecessarily. Otherwise, the crystallization process will be interrupted. And, of course, the experience will fail. In order to look at your work, you can use transparent containers - through them you will observe how the crystal grows.
Make sure that no debris or any impurities get into the concentrated solution. If there are, try to carefully remove them. Did not work out? Then leave everything as it is. Just do not "disturb" a suspended crystal or a rope lowered into the solution. This will also harm the process.
For best results, always use distilled water. It has already been cleaned of impurities and salts. And this means that your solution will turn out to be as concentrated and of high quality as possible.
Conclusion
Today we have learned how to grow crystals at home. As you can see, this process is not as difficult as it might seem at the very beginning. The exercise of caution during the procedure is an important element of it. Otherwise, the crystal will not be able to grow.

If you are just getting acquainted with this process, then start with ready-made crystallization game sets. In it you can find a lot of useful things that can teach you how to grow original crystals at home without any difficulty. The main thing is to fantasize and follow the safety rules during the experience. Now you know how to grow a crystal at home from salt, vitriol and other materials.


How to make a bird costume with your own hands Carnival bird costume
Scenario for 25 years girl cool houses
Examples of serious nominations for rewarding employees
The script for the anniversary of the girl (young woman) "A star named ...
Comic nominations for a corporate party