Each person who owns a dacha can receive a double benefit. The fact is that it is not only a place to relax, but also serves to bring to life various kinds activities. Some grow all kinds of crops there, others are engaged in animal husbandry.
One of the popular activities is raising domestic chickens. It is not only the presence of chicken meat, but also daily production chicken eggs. Everyone knows how tasty, versatile and healthy they are. However, before you start doing this, it is important to build a chicken coop on suburban area.
Without it, you can forget about breeding chickens. Ideally, build a solid structure in which the chickens will feel comfortable. From this article you will learn how to make a chicken coop in the country with your own hands.

Choosing a place for construction
In order for you to have a productive and profitable chicken coop, it is important to take care of its correct location. This is necessary, as it affects the building itself and its design. We will consider the main principles that you need to take into account when choosing a place for a chicken coop in the country:

Advice! If the chickens will spend the winter in the chicken coop, then make a vestibule in it. It will serve as an element of insulation, since cold air will not penetrate to the chickens. Tambour also requires free space.

Given all this, we recommend that you build a chicken coop with a margin. After all, who knows how your poultry farming will go. You may want to add more chickens to increase your profitability. Now, knowing everything about placement, we will consider the phased arrangement of the chicken coop. For work, a wooden beam with a section of 100 × 150 mm will be used. The option is budget and simple, not requiring special skills.

Step 1 - laying the foundation of the chicken coop
So, at this stage, you should already know the dimensions of the future chicken coop and its design. Ideally, make drawings on paper in order to navigate the work, know the exact dimensions and quantity the right material. Having the approximate mass of the chicken coop, you can choose the appropriate type of foundation. The foundation of any building is the foundation. Therefore, for its device you need to work hard.
You have two optimal options for building a foundation for a chicken coop:
- Strip foundation.
- Pillar foundation.
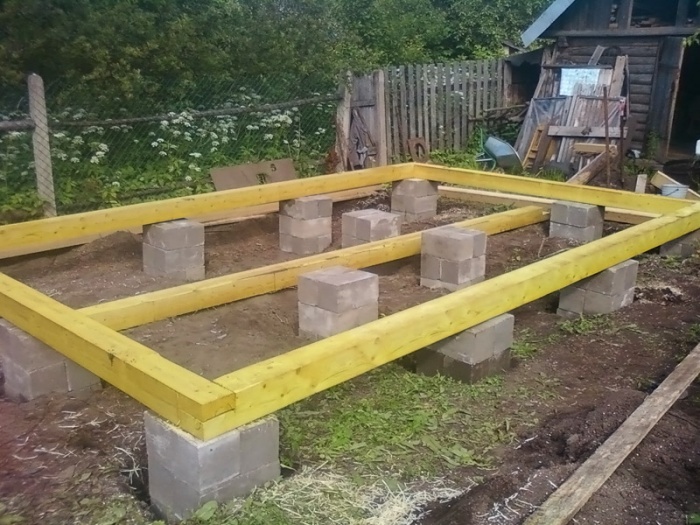
The first option is more reliable and is chosen if the structure is made of brick and has a large mass. But, on the device of this type of foundation, you will spend quite a lot of money, time and effort. It is much more profitable to make a columnar foundation for a chicken coop. If your chicken coop is made of wood, then this is ideal. The columnar foundation will not only cost you less, but you will spend less time and effort on its construction. In addition, rats and other pests will not be able to enter the chicken coop so easily. Brick is used as pillars, not necessarily new.
The process of building the foundation is as follows:

Note! The space between the posts and the ground must be filled with rubble. The same goes for the surface inside the chicken coop.
Step 2 - build the walls of the chicken coop
The arrangement of the chicken coop is still in the process, but you have already done a lot. If you look at the photo, you will see the finished foundation with laid lags.
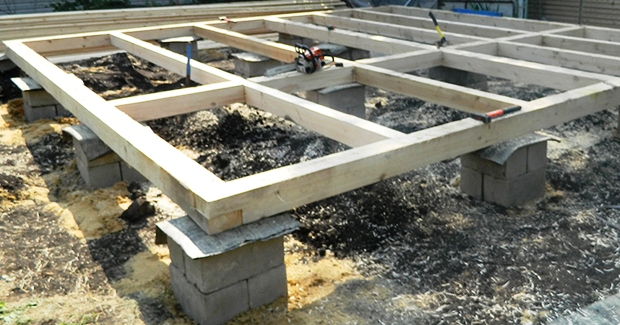
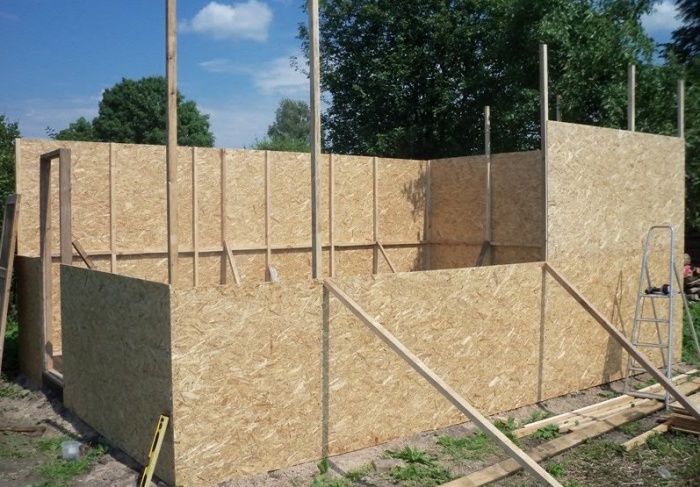
Now the work is to make the binding of the foundation for the chicken coop and build its walls. So, the strapping is made of timber. To protect it from the influence of water, lay several layers of roofing material on each column. Now you can install the first crowns on the finished posts. The ends of the bars are connected by the half-tree method. At this stage, you can make the floor of the chicken coop. Using a 100 x 150 mm beam as a lag, lay it on edge. The recommended distance is about 50 cm. You can make the floor itself from OSB panels or edged boards.

As for the walls, you have several options for their construction. You can further lay the second, third and subsequent rows of bars around the perimeter, connecting their spike into the groove, as they build.
Another option is to make walls from OSB boards. How exactly to build walls is up to you. When building walls, remember that at the end you need to install the top trim, strengthen the ceiling beams in order to build the roof of your chicken coop in the country.
Step 3 - Roofing the chicken coop
Many people think that it is much better to build a shed or flat roof for a chicken coop in the country. But, this decision is short-sighted. It is better to sweat a little, but to make a gable roof, which will be much better in operation. You can store in the attic necessary inventory and chicken feed. It is convenient and practical.

The device of the roof is quite a difficult task. You need to make rafters, fix them and strengthen them. After that, the crate is made, and the roof itself is sheathed with a suitable material. To begin with, the ceiling beams are strengthened. The next step is the installation of the ceiling. You can make it from planks. The ceiling must be strong and strong. Ideally, insulate it using expanded clay or coal slag, pouring it on the floor. To hide the insulation, sew it up with the same boards or OSB boards.
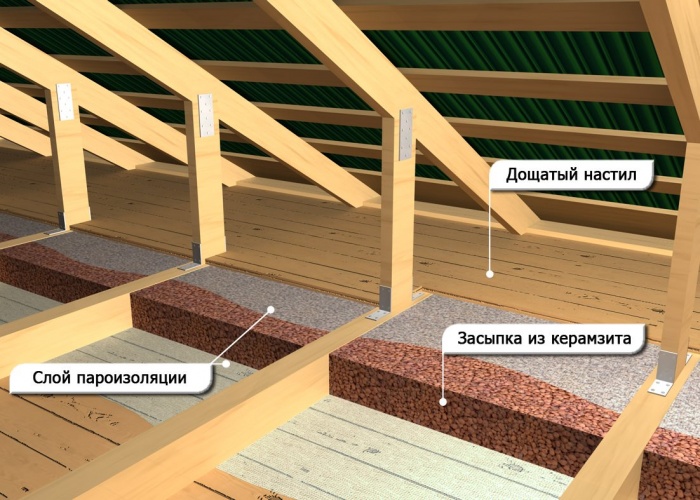
Note! Ventilation in the chicken coop is simply irreplaceable. You can make natural ventilation. To do this, you need to make two holes in the ceiling, in opposite places. Pipes will be inserted into them.
- slate;
- ondulin;
- corrugated board;
- ruberoid.

You can see more about how to make a truss system from this video.
Step 4 - warming the floor of the chicken coop
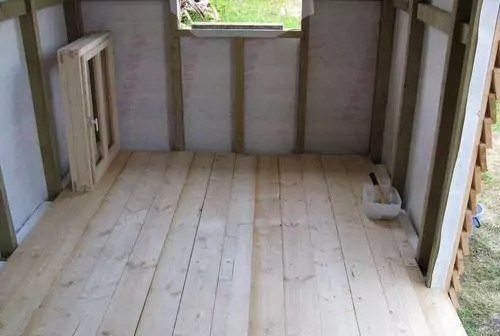
A single floor for a chicken coop is not recommended. At the stage of building walls, you have already done the flooring, but this is not enough. It was a subfloor. It is important that you use dry boards. Further, a layer of waterproofing is laid on them, and bars with a section of 100 × 100 mm are placed on it. In this case, the step of the bars depends on the width of your insulation.

When the bars are fixed, lay a layer of insulation in the space between them. It can be mineral wool or glass wool, polystyrene foam and other materials. We sheathe everything with a layer of vapor barrier, after which we equip the finished floor. It can be from edged boards or from OSB boards.

Advice! Make air ducts in the floor of the chicken coop for ventilation. In winter, they must be completely closed, and in summer, install a grate on them.
Summing up

That's all, now you know how to make a chicken coop in your country house. The design is quite simple and you can make it yourself. It remains to complete the arrangement of the chicken coop by installing poles, making a perch, feeders, etc. Now you can safely start breeding chickens in the country.
Many owners breed poultry. The best option is chickens. They are undemanding to the conditions of detention, but it is necessary to build nice chicken coop. For a small family, it is enough to have 10 laying hens. To do this, you need to make a chicken coop with your own hands for 10 chickens. Drawings and detailed instructions will help to build a quality building.
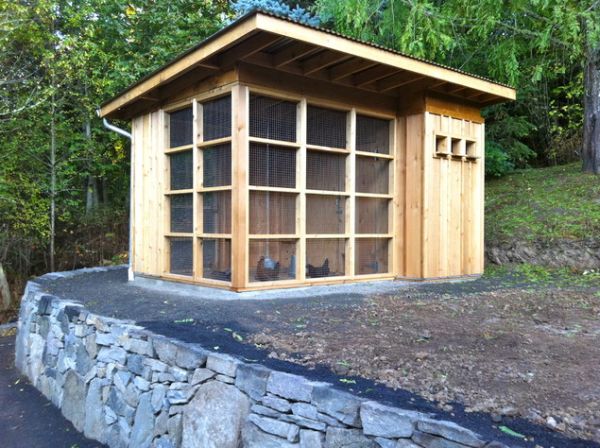
You can make a beautiful and roomy chicken coop yourself
Read in the article
How to make a do-it-yourself chicken coop for 10 chickens: drawings and requirements
To get started construction work, you should familiarize yourself with the basic requirements for such a structure:
- building placement. A rectangular chicken coop should be placed from east to west. Chickens lay better if there is enough daylight, so the windows should face south;
- when creating a warm chicken coop with your own hands, it is worth remembering that it should not be hot in the room, since at a temperature value above 25 degrees, chickens will not rush. But even in winter it is necessary to create heat. In frosts, a building will also be needed. The temperature must be at least 12 degrees;
- the building is better located away from noisy places;
- high humidity can provoke bird diseases, so ventilation is necessary;
- the dimensions of the room are selected taking into account the fact that two chickens are placed per square meter. In cramped conditions, chickens rush worse.
Useful advice! When designing a poultry house, it must be taken into account that over time the number of individuals may increase and more space will be required.

When arranging the premises, it is worth equipping windows with shutters from, and for walking, provide for a plot under a tree or under.
chicken coop cage
Features of designing a chicken coop
Drawings and photos will help to draw up a competent project for a chicken coop with your own hands. It is important to choose the right size of the building, which depends on the planned number of birds. The type of construction depends on how many birds will live in it and on the types of materials.

When designing, it is worth planning to open the door inward, and the floor is arranged with a slope towards the entrance. This will make the cleaning process easier. It is worth considering the interior design of the room. There should be a sufficient number of drinkers and perches. For such a structure, it is worth considering heating, lighting and.
Features of installing the simplest chicken coop in the country with your own hands: stages of construction and photos
When deciding how to make a chicken coop with your own hands, you should familiarize yourself with the main stages of installation.
The table shows the main steps in the construction of a simple poultry house.
| Image | Stages |
 | Erection (only for structures with a large livestock) |
 | |
 | Selection and installation of flooring |
 | |
 |
You can build a chicken coop from improvised materials. In order to save money, you can use a room without erection or use a base on posts, for which leftovers or cobblestones will do. The floor can be made of adobe or earth, and the roof is made of durable plastic, tin or slate residues.

The nuances of creating a foundation
For a do-it-yourself chicken coop for 20 chickens, a photo of which can be seen in this review, you will need a more durable one. Depending on its type: or columnar - you will need a concrete mixture, a composition of or.

The foundation is built in accordance with certain rules:
- the site is cleared and the top layer of the earth is removed, about 25-55 cm;
- sand and gravel are used as a pillow;
- the formwork is made of boards, its width is 25 cm;
- rods are used for;
- concrete grade M300 is used.

The construction of the building can begin after the concrete mass has solidified. It should be borne in mind that the size of the site should be equal to the dimensions of the future chicken coop.
To create a columnar base, markings are required, which is done using metal rods and rope. Then, cabinets are mounted around the perimeter, which are placed at a distance of a meter. In this case, the supports should protrude from the ground by 25-30 cm. They are reinforced with cement mortar bricks.
chicken coop walls
When building a chicken coop with your own hands for 10 chickens, you need to prepare drawings of the walls. Wood is in demand as a raw material for walls. Used for wall cladding. In this case, the joints must be thermally insulated. In addition to boards, you can use plywood or lining. A good material is adobe brick. The combination of straw and clay allows you to keep warm.

Stacked by standard scheme. As insulation for separating the foundation and beams, roofing material is used, which is laid in two layers. Logs for the floor are also made of timber, which is placed edgewise. At the same time, voids and cracks are sealed with the remains of the timber and flax jute fiber.

Roof, ceiling and floor of the building
To create a do-it-yourself winter chicken coop for 10-20 chickens, high-quality floors and roofing are of great importance.
The arrangement has some features:
- it is better to use a gable type roof, which will protect against the accumulation of moisture and snow;
- coating material: roofing material or slate;
- thermal insulation is carried out using mineral wool or.
In a gable roof, you can build a small attic where you can put chicken bedding and food. After installing the ceiling beams, the ceiling covering is covered. In this case, boards are used, and expanded clay and coal slag are used for insulation.

When building a chicken coop, you need to do well. If they freeze, the room will be cold. It is recommended to use thick boards for the floor. First, the raw boards are laid, then a layer of vapor barrier material, and the processed boards are placed on top.
Note! When arranging a shed roof, it must be ensured that the slope does not look towards the bird area.

How to make chicken coop ventilation for 20 chickens with your own hands: drawings
Particular attention should be paid to the chicken coop with your own hands. The ventilation device is responsible for supplying fresh air. This is especially important during the cold season, as the birds are rarely outdoors. A budget and simple option is natural ventilation, which consists in airing the building. In this case, the exhaust window should be small and located on the ceiling or above the door. Such a scheme has many disadvantages, since heat will also leave the room along with the air masses. At the same time, a large amount of resources will be required for heating.

A more reliable option is an exhaust system. It makes sense to install it if more than 20 chickens live in the chicken coop. This design can be built with your own hands:
- in two holes are made for pipes, the entrance for the passage of air should be placed away from the perches;
- instead of a pipe, you can make special wooden boxes, but they need to be painted and;
- fresh air pipes are located at a distance of 35-40 cm from the roof, and the exhaust pipe rises 1.5 meters above the roof;
- to protect against precipitation, the upper ends of the pipes are equipped with small umbrellas.
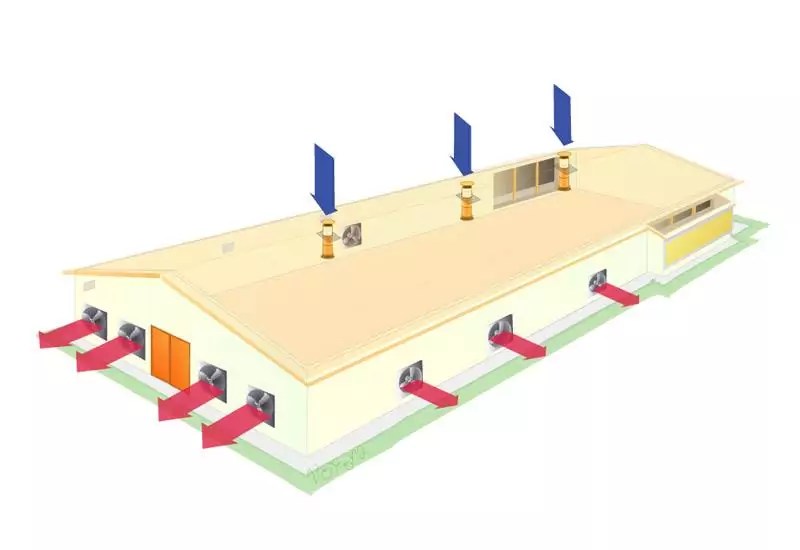
For uniform circulation, it is better to place the pipes on opposite sides of the room. In this case, it is used, which is mounted in the window. You need to turn on such a system manually. There are also special sensors that allow you to control the humidity in the room.

How to equip a chicken coop inside?
After the completion of the main work, the arrangement of the interior of the premises is carried out. The arrangement of comfortable perches is of great importance. In this case, the length of perches and their number are calculated. These elements are best done from. The perches are turned to a rounded shape so that the chickens do not get injured. Perches should be installed at a height of 65-75 cm, and 55-65 cm should remain between the perches. It is recommended to place special pallets or trays under the perches. This will make the cleaning process easier. It is better to make perches removable so that it is convenient to perform sanitization.

In the form of boxes, it is worth equipping nests that should be darkened. They are installed in a separate place, and the boxes are covered from above. Recommended by a separate entrance for changing bedding and collecting eggs.

Feeders are another important element. They can be made of wood and installed on a small hill. Bedding is made of peat, straw or sawdust. They are of different depths. Deeper litter is dug up when contaminated. In addition, bedding is optional for the chicken coop in the winter.

Lighting features
Good allows you to ensure the growth and physiological development of birds. You can create a well-equipped and illuminated chicken coop with your own hands for 10 chickens: drawings, detailed diagrams and photos will help you do this. High-quality lighting affects the following parameters:
- number, size, density and weight of eggs;
- chick development;
- digestibility of the consumed feed;
- periods of laying eggs and their duration.

When planning a lighting system, you need to know some features. Chickens do not see well in the dark, so in the evening, you should not turn off all the lamps at once. When all the birds are settled on perches, you need to turn off the remaining lamps.
For hatched chicks, lighting with a brightness of 35-45 lux is required. Then, as the bird grows, the light intensity gradually decreases to 6-8 lux. An adult bird will need a light of 10 lux.
A device for soft turning on the light is recommended, as if the light is suddenly turned off, the bird may be frightened. This is especially true for breeds that are bred to produce eggs. Chickens should also be taught to darkness from the third day of life, so that in the event of a power outage, the birds do not trample each other.
Useful advice! If the birds behave aggressively and pluck each other's feathers, then reduced light intensity can solve this problem.

Heating
Before choosing, you need to take care of the insulation of the fences. There should be no drafts in the house, so if the walls and roof are blown, it will not help.

It is worth insulating doors and windows, since most of the heat escapes through these openings. It is also worth building a deep litter. This design consists of a layer of slaked lime and 10 cm of shavings, sawdust and straw. Natural heat-insulating materials are also used: peat, foliage and even manure. Natural composting allows heat to be released.

If you approach the construction of the chicken coop responsibly, then this building can be made cozy and reliable. Using inexpensive materials, you can create a high-quality and well-equipped bird house.
Keeping laying hens in household popular due to the simple care of them. However, in order for the chickens to please their owners with good growth and productivity, the owners will have to invest effort and money in providing them with decent care. One of the main conditions is a well-built chicken coop in which the bird will feel comfortable, and feeding and cleaning operations will not require much effort.
The number of poultry population determines the required size of the chicken coop, and the period of detention (summer or year-round) determines the type of premises.

For indoor keeping of chickens, a small house with a perch and nests will be enough, however, to obtain best result the chicken coop should consist of two parts - a house and a walking fenced area (aviary). For a small number of birds, a portable house made of boards is perfect, the convenience of which lies in the fact that, if necessary, it can always be rearranged to a new place.


There are no strict restrictive rules in the construction of a chicken coop, each owner can show his imagination and independence.
Site selection and drawings
A dry area with good lighting, located at a sufficient distance from the living quarters, is ideal for building a building. Both a flat area and a small southern slope will do, which will provide optimal light conditions.

Depending on the specific conditions, we build drawings of the future chicken coop. This will help to calculate the required amount of materials and not make mistakes in the process. Here, the future poultry farmer is given a lot of room for imagination - even an outbuilding can become an original decoration of the site with a creative approach.

And in order not to invent anything from scratch, it will be very useful to get acquainted with photographs and detailed drawings of chicken coops that have already been tested by time. Magazines and newspapers, videos and photos on the Internet, catalogs of companies offering ready-made models are a real storehouse of valuable and useful information.

Special literature and advice from those who already keep chickens will help you make the right decision. Below are the main points that you should pay attention to when developing your project.

The interior layout of the house
Perch. Wooden bars are nailed between the walls of the building at a low height. From the floor to the bar, the optimal distance is half a meter, although in practice perches are often made at different heights. It is not recommended to raise it too high above the floor - this can lead to injury to the bird. From the wall to the bar, you need to leave at least 25-30 cm, and if you nail several bars at the same height, then make the distance between them about 35-40 cm.


Nests for laying eggs. The size of the nest should be at least 30 x 30 cm, and the height of the walls should be about 40 cm. Wicker baskets or wooden boxes with straw or wood shavings can be used as nests. You can place the nests right on the floor, in a secluded corner, but it is better to raise them to a small height and arrange a ladder-descent in the form of a wide board with transverse bars stuffed on it. The number of nests is selected at the rate of one nest for 3-4 hens.

In small chicken coops, it is convenient to attach a special design to the wall. From the inside of the room, it looks like a niche in which the nests are located, and from the outside - a ledge in the form of a hinged box with a door. The door provides convenient access for a person to the nest and facilitates the collection of eggs.

In a large chicken coop, it is better to place the nests on the wall or in the corners of the room, but so that it is easy to get to them - pick up the eggs or change the litter.
feeder. To ensure that the procedure for feeding the bird does not become a burden, try to arrange the feeders with maximum convenience. A great option is a retractable tray that is easy to empty and fill with food without even entering the bird house.

Windows and doors
The correct arrangement of windows and doors is the key to comfortable use. Windows should provide the necessary illumination, often one small window is enough. It is better to place the door on the east side, its size depends on your height. Too small a door will create inconvenience, focus primarily on this parameter.

Ventilation
Ventilation windows are made on two opposite sides, with one of them located at the bottom, closer to the floor, and the second - just below the ceiling.

Design features
In order to save space, many owners build chicken coops in such a way that the space under the house can be used for walking poultry. This solution is especially relevant in the construction of summer chicken coops. However, this possibility should not be neglected when constructing insulated winter options.

Do you need a foundation for a chicken coop?
As a rule, poultry buildings are built from boards and are relatively light in weight. This circumstance allows you to save on the construction of the foundation. However, it is not advisable to put the chicken coop directly on the ground, not only for reasons of safety of the building, but also for the purpose of ensuring safety. In the absence of a floor raised above the ground, the risk of animals entering the chicken coop is much higher. If you do not want to lose your courtyard, provide maximum protection against the entry of unwanted guests.
As a foundation, you can use concrete or iron poles, a larch beam, or a standard strip foundation.

Construction materials
Most often, the material is chosen inexpensive, or one that is available. Some owners adapt dugouts for the chicken coop - in winter they perfectly retain heat, and in summer they create comfortable coolness. The disadvantage is that it is difficult to protect the room from rodents, for which the wooden crate is only a temporary obstacle. Concrete, stone and brick will do this much better, but they will not protect against dampness and cold.
For stationary heated chicken coops, you can use any materials, including brick or concrete. Solid buildings will require large investments, but in the future they will pay off.

Inexpensive options for winter chicken coops are frame rooms. Timber or log buildings are the most optimal, it is easiest to provide the necessary temperature conditions in them, and they will last a long time.

Video - Winter frame chicken coop
The best material for an aviary is metal or plastic mesh. If there is a trade in your area predator birds, then it is better to close the aviary with a net and from above to protect the chickens from attack.
Video - Aviary in the chicken coop
For the roof of the house, slate or roofing felt, as well as boards, are suitable.
Video - How to build a chicken coop
Any construction option has the right to exist, the main thing is to choose one that does not require special skills, is not too costly in terms of construction time and financial investment. Our portal offers a description of several models for self-construction of chicken coops.
Summer house for chickens
The simplest and most economical option is a wooden house and an aviary made of chain-link mesh. The area of the house is calculated from the number of birds. For 5 chickens, a shed 1.5 m by 1.5 m will be enough, for 10 - 1.5 m by 3 m or 2 x 2 m. The aviary is attached to the chicken coop, the configuration and size depend on the possibilities of the territory. An exemplary schematic solution is shown in the figure below.

Beautiful summer chicken coop, the layout of which allows rational use of the area, is shown in the following figure. The aviary and the chicken coop itself are under the same roof, and the area under the house is also used for walking. Its dimensions can be adjusted, and the model is comfortable and beautiful appearance.

Below is another version from the same series. The difference from the previous model is that the aviary is closed with a mesh from above. This makes it possible to receive more sunlight, which is important for egg production and bird health.
And how do you like such an original mobile chicken coop made on a wheel frame? Made on the principle of an arched greenhouse. Everything is compact, beautiful, convenient. Most importantly, you can always take it with you when you move.

Summer chicken coops are easy to build. A stationary poultry house for year-round keeping of chickens differs from summer options in the need for wall insulation, ideally it requires heating.
When building a winter version, you should take into account the climatic conditions of the area where you live and choose insulation for the walls. If these are glass wool slabs, then it will need to be hidden under a reliable sheathing, however, like polystyrene or other types of thermal insulation. Chickens love to peck at anything that comes across, and if you save on sheathing, you can lose both the bird and the chicken coop.

For stone outbuildings best solution will connect them to the heating system of a residential building. So it will be possible to reduce heating costs and not worry about the safety of the poultry population. If the hens are kept at normal temperatures, then in winter they will lay eggs well.
Below in the photographs are winter chicken coops inside and out.

Insulation of the winter chicken coop from the outside
A do-it-yourself chicken coop is just the first step on the path to home poultry farming. To succeed, you will need to study many nuances of the rules of maintenance and care, but construction is the very first and important stage. Make every effort to reap the fruits of your labor in the future.
Video - How to make a chicken coop - some practical tips
For those who live in the country from early spring to late autumn, it makes sense to have laying hens and enjoy homemade eggs. In summer conditions, it is quite possible to make a simple but comfortable chicken coop.


Design features
You can order a chicken coop to a carpenter, buy it ready-made or make it yourself. There are many types of structures, from a small portable version to a large-scale structure. When designing a chicken coop, you should choose a warm, but not hot place. The house with nests and perches needs to be raised above the ground, this will help protect the birds from the night cold and dampness.
Mini chicken coops, for several birds, are easily transferred to another place. They can be made in the form of a stretcher, put on wheels or simply moved in parts. Large plots of land can afford voluminous chicken coops with a spacious range. Sometimes bird houses are built on several floors.


Free range chickens are more fun. But whoever dares to release them into the garden will be left without a harvest. The poultry owners found a way out, how to walk up a bird and save vegetables. They build long corridors from the net, in which the birds can leave the chicken coop and enter it from the other side.


With the summer option in the summer cottage, you can not complicate your life at all, make the simplest chicken coop, in the form of a triangle of several sheets of slate, and a small paddock, covered with a net. Those who love complexity can build a beautiful poultry house with a string of houses, windows and flower beds. Or a mini-house for broilers, similar to a real rural hut.


How to build with your own hands
Before you start building a chicken coop, you need to know how many birds will live in it, the size of the future building depends on this. It is quite possible to make a poultry house in the country with your own hands, you just need to follow the step-by-step instructions.

Preparatory work
In any construction, time is needed for preparatory work. This includes: the choice of location, project, materials, preparation of drawings and calculations.
Location selection
The health and quality of the eggs will depend on the comfortable state of the bird. A correctly chosen place can further affect the egg production of chickens. On a hot summer day, laying hens will be uncomfortable in the sun. It is better to place them under a shady tree. In the morning, the slanting rays of the sun should warm and dry the chicken coop that has cooled overnight, and for this it should be placed on the southeast side of the trees.


It is better to choose a place for the bird away from the garden and vegetable garden in order to eliminate the risks of getting into the room chemical substances during processing horticultural crops. Sewers, cesspools and compost pits should also not be near the chicken coop and range to avoid infection. If you attach a chicken coop to the cottage building, it is easier to heat it and it is easier to look after the bird. It is impossible to carry out construction in a lowland, since precipitation from the land will drain to the chicken coop.
It is better to plant a hedge around the walking area of the birds to protect them from wind and drafts. The bird can equally suffer from heat, cold and wind, so all these factors should be excluded. To make it easier to control the birds and close them in time for the night, the chicken coop should be visible from the most inhabited places in the country. When the chickens come to rest, you just need to close the door behind them.

Project
Construction should begin with the preparation of drawings and calculations. By this time, the place of construction must be determined, the sketch of the chicken coop is drawn up with reference to the area and cardinal points. It is necessary to indicate nearby buildings and trees, consider the level of shading, the wind rose, and exclude the presence of drafts. You can draw up a drawing of the building yourself, taking into account the characteristics of your site, or borrow it on the Internet.
The building plan should include a place for perches, drinkers, feeders and walking birds. Ventilation and lighting are thought out and designated. If planned winter chicken coop heating system must be taken into account. The dimensions of the building are determined on the basis of: two chickens per square meter plus 30% of the additional area for nests. But in practice, birds are settled in a larger number than required by the regulations.


Construction process
During the construction process, all work is carried out in stages, focusing on drawings and calculations. At the initial stage, the terrain is marked and the foundation is laid.


Foundation
For several layers, you can build a small portable chicken coop, it does not need a foundation. A larger project will need a foundation.
They are of three types.
- Columnar. It involves the installation of pillars and the construction of a structure using frame technology.
- Pile. Piles are used as pillars, which are driven in unstable soils or on sloping terrain.
- Tape. The most reliable foundation, it is poured with concrete around the perimeter of the entire building.
Simple country options most often use a columnar type of base, it is cheaper and easier to perform.


Along the contour of the future chicken coop, holes should be dug to the depth of freezing. Make recesses with a step frequency of two meters. The support volume will be about 20 cm and rise 40 cm above the ground surface. The formwork can be built from a rough board, 60-80 cm high. Next, reinforce with reinforcement, insert supports and pour concrete. You can start work from any corner of the future building. Cover the poured foundation with polyethylene and leave for a week to dry.


Floor
When the foundation is strong, the basement is tied. To do this, four beams 20 cm thick are laid on the roofing material, creating a box. With the help of metal corners, the bars are fastened together.
Boards placed on edge (logs) are attached to the harness with nails. The areas between them are filled with expanded clay. Then, in order to protect the bird from rodents, the surface is covered with a fine mesh with a half-meter overlap, which will later rise to the walls. A rough board is laid on top.
When constructing the floor, it is better to make a slight slope towards the door to make it easier to care for the chicken coop in the future. When working with wood, it should be remembered that all wooden elements must be treated with antifungal and anti-fire agents. Insulate the floor when the walls are already there.


Walling
The erection of walls should begin with the installation of side racks. In order to make a shed roof in the future, the difference between the front and rear pillars should be about half a meter. It is important to remember that the roof slope should not be in the direction of the birds.
Then, with the help of boards, an upper trim is made, they are attached to the racks with nails. Before mounting the crate, you should find out the dimensions of the insulation. Layers of thermal insulation are laid in the gap between the supports.
In the area of \u200b\u200bthe door, window, opening for the exit of birds, transverse guides are installed. When the frame is ready, the floor and ceiling are sewn up with an edged board.


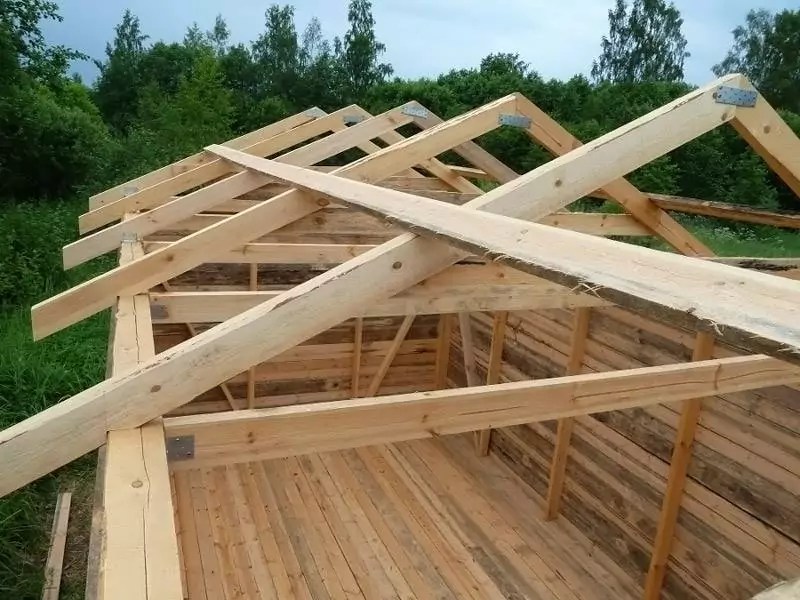
Roof
To cover the roof, you need to prepare the rafters. To calculate their size, measure the distance between the front and rear pillars, add another thirty centimeters to the roof overhang.
The rafters, set on edge, are mounted to the upper trim of the building. The distances between the rafters are equal to the width of the thermal insulation. The rafters are covered with polyethylene, they make a crate and mount the roofing.
To insulate the roof, thermal insulation plates are laid between the rafters. In the northern regions, several layers of insulation can be used. A few centimeters of space should be left between the hemming material and the thermal insulation for free air circulation.


wall cladding
The walls are sheathed after roofing. To the outside of the frame, bars are mounted to which boards, plywood, OSB sheets are attached, what it was planned to sew up the chicken coop with. Insulation is laid between the racks.
Then the chicken coop is sheathed from the inside. The location of the ventilation holes should be left uncovered.


The device and decoration of the chicken coop
The floor should be made of warm materials, and cement, ceramic tiles, bricks are not suitable for it. Chickens are prone to rheumatism, if the floor is cold, damp, they sit on their paws and stop walking. Wood is the most suitable material for a chicken coop. In order not to spoil the wood covering with chicken manure, the floor is covered with a thick layer of sand and sawdust.
The roof should not be built from materials that get very hot in the sun or make noise from rain and wind. Chickens rush equally badly both from fright and from overheating.


Ventilation
For solid chicken coops, you can arrange a ventilation duct under the roof. Small birdhouses can get by with two shuttered openings on opposite walls.
The best option would be a hood equipped with a fan. To install such a system, two square holes should be made on opposite walls. One of them should be forty centimeters lower than the other. A special fan is inserted into the hole.


Lighting
Chickens do not see well in the dark if they freeze, or get scared, start to hide in a corner and crush each other. In such conditions, it is convenient to have adjustable lighting with a soft switch-off.
Perches and nests
It is more convenient to make perches removable, so it is easier to take care of them, and place them at different heights. A wooden ladder should be brought to the perch; it is a wide board with transverse bars.
It is better to cover the nests with straw and change it periodically. Hay is less suitable, as it rots quickly. Nests should be darkened, hens do not like to rush in bright light.


In the chicken coop, you need to install several wooden perches at a distance of 30-50 cm from each other.

Someone wants to keep chickens on the site or in the country for the soul, and someone for savings. It doesn't matter. It is important that they need a room - a chicken coop. And then a lot of questions immediately arise: what size, from what, how to make, what should be inside. After all, when building a chicken coop in the country, you must immediately take all this into account. Then it will be easier for you to serve it and the chickens will delight you with weight gain and a large number of eggs.
As a rule, they start a bird in the spring and put the first chicken coop in the summer. If you are not going to keep the bird in cages, then it is wiser to build it right away with a paddock - a fenced area where they will walk during daylight hours.
Such a chicken coop is convenient in the country, in a private courtyard, it is built easily and quickly. Make a common wooden frame, divided into two unequal parts. The larger one - the corral - is sewn up with a net, the second - the smaller one - is taken away actually under the chicken coop and sheathed with some material from the outside, equipped inside with perches. The construction method is the same as
Do-it-yourself summer chicken coop in the country in a couple of days
Such a summer chicken coop in the country is ideal for 5-20 chickens. You can build on 50, and on 100, just the larger the livestock, the larger the dimensions will be required, and the sequence of actions itself will remain the same.

One of the options for "multi-apartment" summer walking
If we talk about a shed for chickens, then for 5-6 chickens you will need 3 squares, for 10 chickens - 5 squares, for 20 chickens - 10 squares. It is desirable to take more places for walking, but it all depends on your realities. The approach is this: laying hens, if they get fat, rush worse, so it is advisable for them to allocate more space. For broilers, the picture is the opposite: they should move little. Therefore, they are given less space.
Building step by step
First of all, a frame is made from a bar. It is more convenient to collect it right on the site, which was planned as a summer home for the bird. It is more convenient to clean it if the height in the middle allows you to climb into full height. Everyone's height is different, but you can focus on 2 meters.
If you are building for 5-20 chickens, you can take a beam of 50 * 50 cm. It will go to the vertical racks and to the slopes that form the roof. The rest can be assembled from a 100 * 40 mm edged board. You can see the frame in the photo.
It is divided into two unequal parts - paddock and chicken coop. In this case, the length is 1.5 m + 4.5 m. If the paddock is large, additional racks may be needed to prevent the bars from bending. In principle, they already need to be installed here (every 2-3 meters), but the significant thickness of the board (40 mm) and the light material on the roof (film) made it possible not to do this. As soon as the frame was made, consider that the country chicken coop was built by 1/3.

Next comes the arrangement of a shed for chickens. Another transverse beam is laid between two intermediate posts, which mark the border of the walking area and the chicken coop. It is laid between two vertical posts, fastened with nails. To be sure, you can strengthen the corners. Then the logs are laid, the floor is laid on them. On the flooring, you can use an inch edged board (25 mm), you can use moisture-proof plywood or.

A floor in even a summer residence is highly desirable. Firstly, it is warmer, and secondly, no one will undermine. Well, it's easier to clean it up. Chips were poured on the floor: chickens dig well in it, and it absorbs moisture well. Then they swept away everything, took it out.
Inside this option country chicken coop divided into two halves - for different breeds of chickens (layers do not get along with broilers), therefore there are two doors. They are made on both sides of the middle pillars. The walls are upholstered with edged boards. Pieces of the board are nailed to the racks of the frame. The boards were taken from pallets - the length was just enough. They didn’t worry especially about the cracks; they were then sheathed with packing cardboard inside from drafts (the boxes were taken from the store). It was fastened with a stapler and staples.
A small metal mesh was also nailed between the boarding and cardboard: from rodents and other small creatures.

These are the doors to the chicken coop (right and left half) and the chicken shed from the inside - before padding with cardboard
After the walls and floor are ready, we started arranging the roof. They stuffed longitudinal strips (thin), covered with a reinforced film. It is much more reliable than ordinary polyethylene. Better, of course, polycarbonate, at least over the chicken coop, but it is more expensive, although much more durable.
They didn’t make a “dark” roof deliberately: then you need to make windows, and this is an additional hassle. But if you wish, you can make a roof and windows.

To avoid windage, several rails were nailed on top. With this design, the film can be removed for the winter: reinforced can serve for several years.

Half of the paddock is covered with cardboard: so that on hot days there is somewhere to hide. The cardboard was laid on the slats, and the film was already on top. The paddock is also divided by a grid; for this, another board was nailed. A fine metal mesh was attached to the three guides received with a stapler and staples.

View from the paddock to the chicken coop: the two halves are like twin brothers
The sides were covered with a plastic mesh. On the bottom they overlaid with a stone: and the bird will not dig in and other living creatures will not fit in from the outside.

To build such a chicken coop in the country is a matter of one, maximum, two days. And the main one - all summer can stand open - dry, ventilate. In the onset of cold weather, the bird is transferred to winter apartments.
What to put inside
The internal arrangement of the chicken coop in the country is the same as in the winter apartment. Drinkers and feeders are placed in the corral. It is better not to put feeders with handles in the middle - chickens sit on them, the litter ends up in the feed, you have to throw it away. The best option- vessels with low sides for young animals and higher ones for adult birds. Then they stand side by side and calmly peck.

Fix ordinary thick branches - here's a perch for chickens. More than enough for a chicken coop in the country
Inside the chicken coop you need to make a perch. One meter goes to 5-6 chickens of small breeds, and 4-3 large ones. They make it at a height of about 50 cm. Thick branches can be adapted to the chicken coop in the country. Just fasten them well.
You will also need nests. Old boxes in which dry hay is placed will do. You can knock them down from the remains of boards, scraps of plywood, and other similar materials.
An approximate calculation is one nest for 2-3 chickens. They will generally rush to two or three nests, periodically changing them, but some hens will choose empty ones for spending the night.

They put them on the floor, if there is not enough space, they hang some on the wall, making a ladder to them. Ladder - an inclined board with thin strips nailed across - so that the paws have something to cling to. This is enough for summer apartments.
Photos of beautiful chicken coops

 Such a chicken coop is built super-quickly: boards are knocked down around the perimeter, plastic pipes are fixed, partitions are cut out of OSB. The mini-chicken coop for 5 chickens is almost ready - it remains to fix the film over the corral and something denser over the shed. This is what happened to those who made such a chicken coop to give


How to disable ads on Android: remove pop-up ads
The Russian received a term and a million fine for "piracy Negative consequences of the law
Identification of key factors
The criteria for classifying organizations and individual entrepreneurs as small and medium-sized businesses have changed
See what "Royalty" is in other dictionaries Pitfalls of legislation