Every housewife in the kitchen must have such an indispensable item as a cutting board.
Recently, handmade household items have become very popular, they are not only beautiful, but also functional. Handcrafted wood cutting boards with intricate patterns will be a worthy addition to any kitchen.
Wood carving is one of the ancient types of arts and crafts of many peoples.
In the 15th century, carving became widespread and was called carving.
It is unlikely that many everyday things made of wood could attract our attention if the hand of the master had not touched them.
Currently, there are many directions and styles of woodcarving.
There are still two main groups, and each has its own characteristics, styles and techniques.
relief carving
slotted
contour
Geometric
bracketed
Abramtsevo-Kudrinskaya
Tatyanka
Volumetric thread
Brownie
Church
Bogorodskaya
sculptural
To decorate household items, folk craftsmen most often used geometric carving: trihedral-notched. For such a thread, the only tool used is a knife with a sharpened end.
The best material for trihedral-notched carving is soft hardwood - linden, alder and aspen. The wood of these trees is homogeneous and perfectly cut in all directions. After drying, it becomes durable and does not warp.
A curious world offers you a selection of carved cutting boards, look and be inspired!


- Material selection
- Made from solid material: saw cut wood, wide board or plywood sheet
- Step 1: Design
- Step 2: Preparing the Tools
- Step 3: woodworking
- Step 4: details
- Step 5: Protection
- How to make a board from fragments
- More ideas
The cutting board should be clean and sturdy. It can perform 2 functions: to be a decorative accessory, to serve as a cooking appliance.
Creating a kitchen board is a creative process that does not have a clear algorithm.
What can be a cutting board
The technical composition must be free of toxic impurities.
The groups are fastened with clamps, aligned with slats in the upper and lower planes (see photo).
When the glue dries, the group blanks are ground and planed to give evenness.

Dividing a large board into narrow fragments allows you to process workpieces on machines. They are guided by the width of the working areas of the planing equipment.
The processed group blanks are leveled in thickness, glued, lubricating the side ends with glue, and the structure is fixed with clamps.

Step 5: trimming and final sanding
When the glue dries, the board is cut to the desired size, the surface is sanded again. Corners can be rounded with a router.
A small groove is cut around the perimeter of the board. There will accumulate juice formed when cutting products.

Step 6: oil treatment
The finished product is treated with oil.

In a similar way, a board is made from fragments of any shape.


More ideas
For boards, you can use snags, unusual fragments of wood. Sometimes clear forms are avoided, they manage with grinding and impregnation of the product with protective oil.

In the finished board, you can cut a hole to remove scraps, grind the cut, attach legs to the board, and so on.

Care
Wooden boards absorb odors and accumulate bacteria. To prevent this from happening, it is necessary to carry out grinding, impregnate the product with oil at least 3 times a year. The service life of the board will increase.
Wood carving is an exciting hobby and an opportunity for additional income. For example, a 3d end cutting board can cost $500. If you are new to this area of art, then you need to carefully study all the difficulties which you will encounter in the future. After all, this is only in a fairy tale - he said the magic word, and everything happened by itself - and boards, and tabletops, and carved architraves with oversights. AT real life occupation is painstaking, cutting requires keen eye and a faithful hand, but the result is worth it.
Products from real, natural wood, hand-made by the master, have been valued since ancient times.
Real wood products
Home interior decoration with carved wood brings a lot of possibilities. Graceful, beautiful carved caskets, unusual picture frames and carved edging for mirrors. Environmentally friendly toys, platbands and furniture, carved cutting boards, decorations and board games - the range of everything that you can make from wood is endless. The larger the size of the product, the more time-consuming it is in the course of execution and, accordingly, the more expensive its price will be, but the less likely it is to quickly find a buyer. However, it is also very difficult to carve small, miniature works from wood.
To organize the work on the manufacture of wood products, some investments are needed. First of all, you need to purchase special tools:

Let's try to make out the composition of the carver's tool: how the tools are called and what they serve.
Cutters come in a variety of sizes and shapes with 35 degree angles. Finding a good cutter is a very difficult task, but it is the main tool with which the master performs most of the work and creates fine patterns and graceful forms of carved boards.
Joints are knives, they are used in the technique of flat-relief carving for cutting straight long lines, for rounding the contour. The cutting angle of the jamb is 60 degrees.
Chisels are straight and flat, semicircular, steep, sloping and medium, large and small. Each tool has its own purpose.
Rivets, they come in a variety of sizes and shapes of sharpening. Stick cutters are a group of tools, they have two bends of 125 degrees.
Geismuses have a bend angle of 45–50 degrees, and stichels have a bend angle of 20 degrees. The handles of these tools are made in the form of a fungus.
 There are also spoon knives, they are used to remove a large amount of material in the manufacture of dishes. These knives are used for relief carving. For carving, there are a huge number of tools, and each has its own purpose.
You can save a lot of money by learning how to sharpen your own tools. Knives dull quickly when working with wood. If the master gives his tools for sharpening, this procedure takes about a week. But if you learn how to sharpen your tool yourself, you can save a lot, especially since it is not difficult.
To work with wood, you need a separate workshop. It can be any room, the main thing is that it well ventilated and heated. You will need a table with a wooden top, a cutting table for straightening, finishing tools, a couple of stools, a cabinet and shelves for materials, tools, sketches and paper templates. Sufficiently diffused, bright lighting and a directional lamp are needed for very small works - painting, carving, etc. Boards different types wood. And now the wood carving workshop is ready for you.
Depending on what product you are planning to make, you will need different kinds and pieces of wood. Beginners are usually advised to start with basswood, aspen, or alder. This wood is soft, well cut in any direction of the fibers. From linden and birch they make children's toys, figurines, cutting boards. This is a soft material, simple and uniform in processing, but fragile and splintery. In the technique of geometric woodcarving, cedar wood is suitable; it is malleable in work, with a homogeneous structure. But, in the southern regions of our country, it will not be easy to find cedar. For other types of carving (ship, house, or openwork, flat-relief sculptural, etc.), more common types of wood are suitable.
 Finished crafts cover:
- gouache;
- stains;
- acrylic paints;
- tempera paints.
and then open with a safe oil varnish, but it is better to protect your hands with gloves
Unable to master carving technique without constant practice. It is better to work in the production of wooden products to master practices. There are schools of woodcarving, but they accept from 10-12 years old, as strength in the hands and accuracy and safety when using sharp tools are needed.
In order to start working on the production of natural wood, a considerable amount will be required. With this money you need to buy necessary tools, raw materials and consumables. The hottest product these are cutting boards. This money will pay off in about a month if you work hard.
Gallery: DIY cutting boards (25 photos)


Plywood products
 And you can also make crafts from plywood using a manual jigsaw, electric jigsaw. Cutting out plywood seems to be just a hobby that is carried away in childhood. But with the help of a jigsaw, a craftsman can create a unique masterpiece.
The natural appeal and easy processing of natural wood allows it to be used to create beautiful wooden decorations for the interior and home. Created by nature, this eco-friendly material has been tested for centuries and continues to be used. in great demand in construction and life.
Original carved wooden box
Increasingly, even wealthy citizens prefer more expensive brick buildings or logs. And this is not only a tribute to fashion, wood is a unique material with live energy. Wood perfectly retains heat and creates a favorable microclimate in the room. Together with wooden houses gradually returns and interest in.
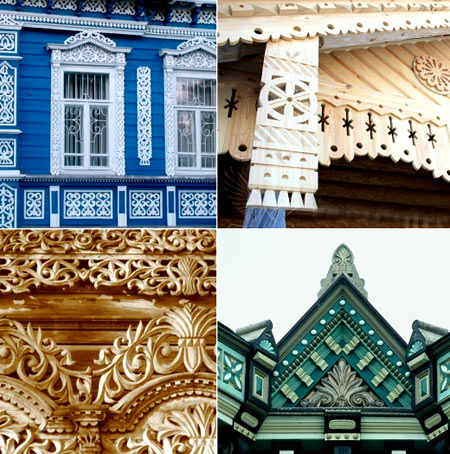
In the old days, houses were decorated with carved elements not only for the sake of aesthetics - each pattern and ornament had its own meaning and served to protect the home and family from troubles, evil spirits and bad people.
The carving was applied to the elements of the facade of the house: cornices, shutters, platbands, towels, poles and supports. Today, few people think about the symbolism of carved decorations for houses.
 Various carved decorations on the facades of houses
 However, the beautiful patterns invented by ancient masters continue to live, acquiring new details. New technologies and high-precision equipment come to the aid of modern wood carvers, thanks to which it is possible to create complex and original wood products.
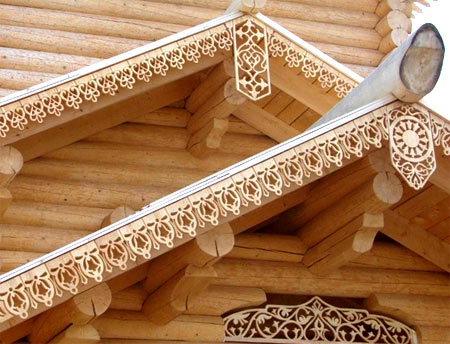
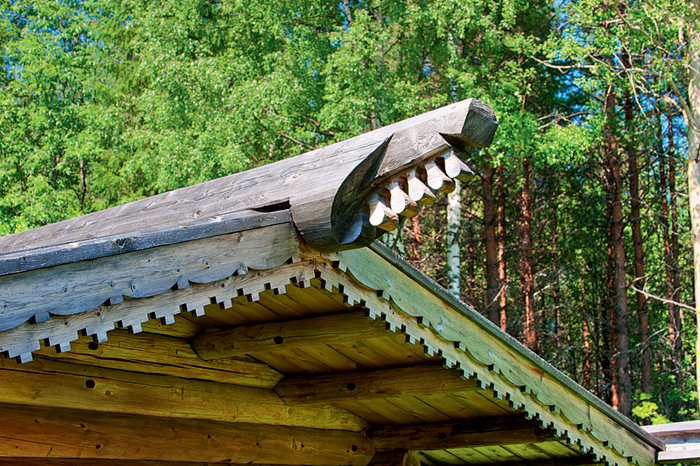
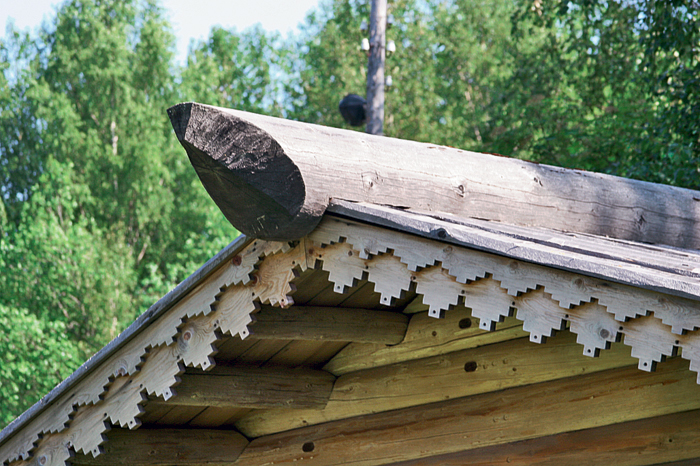
Carved roof decor
The upper triangular part of the roof (pediment) in the old days was called the ochelie. It was he who was decorated decorative carving especially rich:
carving on windows
An equally important element of decorating houses are considered. With the help of not only a decorative effect is achieved, but also the gap between the window frame and the wall is closed, and the house is better protected from noise and drafts.
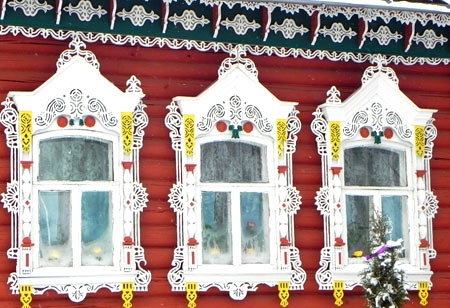 An example of the original carving on the windows
 The carved decoration of windows in the old days also had a great protective value, because it was through windows and doors devilry you can enter the house. Carved amulets eventually turned into beautiful ornaments that have come down to us.
A carved platband could have a fairly simple design and consist of three, less often four boards, on which a simple repeating pattern or ornament was applied. More elaborate and decorative window framing included various elements, multilayer carved overlays and details:
House carving technique
The styles and techniques of house carving combine many schools, trends and methods of application. Wooden decorations of houses can be made in the following ways:
What wood to use for house carving
The most common, and in the northwestern regions the best, is pine. Strong enough and easy to handle, it is well suited for making carved decorations for the facade of the house.
 Decoration with carved elements of the facade of the house
 Unpainted pine eventually becomes a light yellow, almost honey. Aspen has been valued as a good ornamental material since ancient times. It has a soft pliable structure, slightly dries out, and is resistant to cracking. With age, aspen wood jewelry acquires a gray steel sheen that can be mistaken for metal.
Plastic, soft and very convenient for carving linden. The smooth, light linden wood is homogeneous and well suited for relief carving. However, the softness and porosity of the fibers make linden short-lived and demanding to care for.
Oak is a very strong and durable material, but it is very expensive and difficult to process because of the hard and dense wood. Larch is also a durable and hard type of wood, but rarely used for making carved jewelry, since linden easily splits. 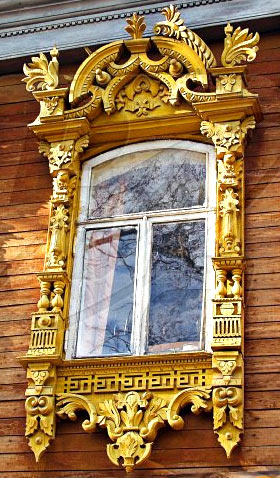
Today, more and more people are inclined to build country houses and summer cottages from wood. And despite the fact that these buildings bear little resemblance to their progenitor - a hut, many owners, as in the old days, decorate them with carvings, making the buildings unique.
Each of us has heard more than once about the churches built without a single nail, which are now in the Museums of Wooden Architecture, for example, in Kizhi or Small Karelians. These objects are rightly called masterpieces of wooden architecture. However, few people thought that the well-known Russian hut deserves such an epithet. Yes, don't be surprised. The most ordinary hut is the same architectural marvel as the mentioned monuments, only smaller. To understand why this is so, let's take a closer look at its design.
Without a single nail
Cutting down a hut is not an easy task. After all, these are not just four walls covered with a roof, but an ingenious and very functional wooden structure, assembled from the basement to the ridge without a single nail. So not everyone was able to put up a hut - only a good, experienced carpenter. And he needed only three tools for this: an ax, a scraper and a chisel. The craftsmen did not use the saw, because it cuts the fibers of the tree, and does not crush them like an ax, which reduces the absorption of moisture by the wood.
 1 1
|
 2 2
|
 3 3
|
 4 4
|
1-4. The tradition of decorating the front, and often the rear end of the roof ridge with sculptural carvings in the form of the head of a horse, a bird, and even a deer with real horns, did not die with the disappearance of the hood. True, now a carved wooden figure is attached not to the cladding, but to the rafters or a special comb on the roof.
 5 5
|
 6 6
|
 7 7
|
5-7. According to the tradition of Russian wooden architecture, wind boards in a modern cottage are carved and consist of several boards arranged one above the other, like a layer cake. But almost no one observes the rule to cover the junction of two prichelins with an elegant lace towel. More often it is attached under the berths - it's easier that way.
The basis of the building was a cage assembled from crowns - squares of four logs, at the ends of which so-called cups were cut - connecting nodes that firmly hold the logs in a given position without any additional fasteners: brackets, nails, wooden pins, etc. Having cut down the first crown, they laid the second on it, on the second - the third, etc., until the log house reached a certain height. At the same time, a longitudinal groove was made in the lower part of each crown so that the vertical connection of the logs was denser, and it was filled with moss. Further, triangular log pediments were assembled above the end walls of the log house - tongs, into which longitudinal horizontal logs were cut every two crowns - slabs, securely fastening the pediments to each other. Kokors, or chickens, were attached to the legs across them, either uprooted or twisted in the form of a hook, young spruces. A long log with a hollowed out groove was laid into the curvature or on the parts of the kokor bent upwards - a stream that served as a drain and at the same time a support for the lower ends of the roofing gorges. Then, boards were laid tightly to each other on the roof - not sawn, but boards hewn with an ax, with a shallow longitudinal groove on the upper layer. To prevent such a roofing from leaking, it was made two-layer, but the tesins were laid in such a way that the gap between the two gorges of the upper layer was exactly above the groove of the gorge of the lower layer located under them.

1. Porch porch - a porch resting on one (one-pillar) or two (two-pillar) wooden pillars.
2. Valance - a carved board located horizontally under the eaves of the porch roof.
3. Potok (vodochnik) - a beam with a hollowed out longitudinal groove for a drain; the lower ends of the tesa covering the roof rest against it.
4. Portage window - a small window that was closed ("clouded") from the inside with a sliding board.
5. Chimney - a wooden pipe for the exit of smoke in a chicken hut, usually carved.
6. Chicken (kokora) - a curved spruce trunk or a trunk cut down together with one of the rhizomes growing perpendicular to the trunk. It is attached to the slabs of the male roof and carries a water flow.
7. Crown - a horizontal row of logs in a log house, connected at the corners of the cage they form with the help of cuttings.
8. Sleg - a horizontal log embedded in the pediment.
9. Brush - an openwork end part of a prichelina or towel.
10. Okhlupen (ohlop, with a helmet) - a hollowed out log covering the ridge of the roof.
11. Magpie - a dowel that fastens the horse's slug and okhlupen.
12. Prichelina - a board covering the ends of the bed.
13. Horse leg - upper leg lying under the ridge.
14. Towel - a carved board covering the junction of the berths.
15. Ridge - the upper joint of the roof slopes, covered with okhlupny, as well as a figure that adorns the end of the okhlupny.
16. Male (tongue) - self-supporting triangular pediment. The upper part of this pediment was called the forehead (ochelie).
17. Help (fall) - gradually lengthening the release of the upper rims, allowing you to increase the removal of the roof.
18. Earring - a carved board covering the ends of the felling logs.
19. Portal - the main doorway.
20. Baluster - a small voluminous or flat column that supports the railing of the fence.
21. Corner cutting - a method of connecting logs or beams in the corners of a log house without the use of auxiliary elements.
22. End board - an ornamental board covering the ends of the releases of the logs of the log house.
23. Window oblique - a window, the jambs of which hold the ends of the crowns emerging into the opening.
24. Frontal board (red board, scarf) - a carved frieze on the main facade, placed above the windows. With the frame structure of the pediment, it closed the transition from the logs of the wall to its plank sheathing.
25. Platband - framing a window or door opening, closing the gap between the wall and the window or door frame. Visually highlighted and emphasized the opening.
26. Balcony - a platform protruding from the wall and fenced with a balustrade (parapet) on cantilevered beams.
27. Balustrade - fencing of balconies, stairs, consisting of a number of balusters connected from above by a handrail.
28. Shutters - single or double carved shutters for oblique windows.
29. Chairs - wooden or stone supports of the log house, which are the prototype of the modern foundation.
The junction of two slopes on the roof was covered with a hollowed-out heavy log - a clasp (another name is a shell), which was attached to the upper (horse) slab with special wooden dowels - they were inserted from above, through the clasp and slab, and fixed from below with wooden wedges.
It should be noted that in order to protect the log house and gables from rain moisture, they tried to move the edges of the roof beyond the wall line by a meter, or even two, thus obtaining something like a canopy. They supported the removal of the roof with help - the release of the upper logs of the longitudinal walls.
So, the hut is assembled. It remained to cut windows in the log house, which were divided into portage and oblique ones. The first ones were low and were cut in two adjacent crowns, provided that no more than half of each of them was sampled. They got their name because they were closed with a latch-drag - a wooden shield mounted from the inside of the house. Skewed windows were much larger than portage windows - they were cut down in several adjacent crowns of the log house and, in order not to violate the strength of the wall, the ends of the logs going into the opening, cut into a wedge, were fastened with massive jambs (hence the name - skewed). These windows belonged to the main façade and were therefore also called red windows. And now think about how simply and wisely all its parts are connected in the design of the hut! Isn't this an architectural marvel? And what names - colorful, ancient: streams, kokors, helmets ... Not names - a song.
Protect and decorate
Despite the fact that the described design of the hut, as they say now, was 100% maintainable (it could be disassembled and any of the elements replaced), both the builders and the owners of the house tried to push back the repair time as much as possible, for which they protected the critical parts of the building, exposed to rain and sun, special parts, each of which has its own name. And over time, these seemingly purely functional details turned into elements of decoration, or rather, carved decoration of the hut. Let's start with the roof.
11-13. Modern and reliable gutters and pipes have not been able to completely displace the gutter-water drain, along with the poles holding it, the ends of which are decorated with the heads of skates or chickens. The gutter has turned into a kind of flower pot and now, along with chickens, decorates the perimeter of the veranda.
The far protruding outer ends of the helmets were decorated with carved figures. Most often it was the head of a horse. True, for the manufacture of such a helmet, it was necessary to use a thick log with a part of the butt, on which the carving was performed. If the log was without a butt, then the heads of birds - a goose, a swan, a duck, symbolizing a good beginning, were carved right on its end. It should be noted that the figurine on the skate was the subject of special pride of the owners of the house and the creative competition of builders: whoever has it more beautiful has a better hut, and the master is more skillful. The dowels connecting the okhlop with the ridge slab, which were often called magpies, also turned into decorations. Why? From a distance, the outer ends of the dowels, rhythmically arranged on the helmet, really resemble magpies sitting on the roof - these cautious birds never sit in one dense row, like swallows.
carved tassels


This openwork element, which once adorned the ends of carved porches and towels, is now practically not found in the design of facades. Which is quite understandable - the thin wooden lace of the tassels is destroyed first of all under the influence of rain, wind and ultraviolet radiation. Well, those who do use brushes often turn them into an easily replaceable part that is simply fixed to the ends of the boards.
The ends of the kokor - hooks that hold the water drains also gave an elegant look to the roof. In the most simple version they were decorated with a chicken head, which could also be carved on a rather thin rhizome (hence the second name kokor - chicken). If the owners could afford to purchase more massive cocoons, then instead of a chicken head they depicted a horse's head.
Intricate carvings began to decorate another prominent attribute of the roof - a wooden chimney, or chimney. With a helmet and magpies, he crowned the structure, bringing the finishing touch to its silhouette, and these three elements together looked extraordinarily beautiful against the sky.
Well, now let's move on to the really protective elements. So, the ends of the under-roofing sheets were covered on the facades with inclined boards - chasses, the ends of which protruded beyond the drains and ended with openwork tassels. The gap at the junction of two berths under the ridge was covered with a vertical board - a towel, its lower edge was decorated either with a brush or a carved round rosette - a symbolic image of the sun. Decorative and protective towels were also nailed to the ends of the logs of the help (poval), supporting the release of the roof.
Earrings and end boards

If earrings, designed to protect the ends of the supports (tumbles) that support the roof from the weather, can still be found in the decoration of modern cottages, although occasionally, but still can be found, then the carved end boards that protected the ends of the logs of the log house have practically disappeared from use. And it's understandable why. After all, the end board is a fairly large element. And if on a one-story house it had a height of about 3 m, thanks to which it looked organically on the facade, then on a modern two-story building it should reach 5-6 m.
Often, with the help of carved vertical boards, the ends of the outlets of the crowns forming the frame were also protected from atmospheric action. Such elements were also often called prichelins, although, perhaps, it would be more correct to call them end boards.
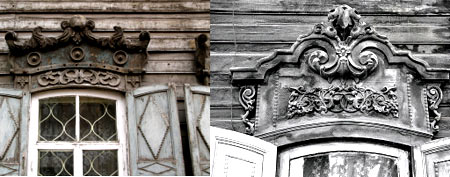
Another carved board - a frontal one - was attached above the facade windows. While the roof structure was male, this element served only aesthetic purposes, but after the transition from a nailless roof to a rafter, the frontal board began to perform a very important function. She visually smoothed the transition from the log wall to the plank sheathing of the pediment and protected the gap between them from rain (often the frontal board was covered with a low tide). And one more little secret - why the frontal board was needed. Together with the chapels, it formed a triangular composition, reminiscent of a pediment in classical urban architecture.
The visors were also decorated with carvings, protecting the slanting windows from rain and snow. From below, such a visor was usually supported by two side carved brackets. Later, visors and brackets were replaced by overhead trims with rich lace tops - an ochelie. And at the same time, the shutters protecting the windows also acquired openwork patterns. Gradually, it was the platbands that became one of the main elements of the decorative decoration of the facade.
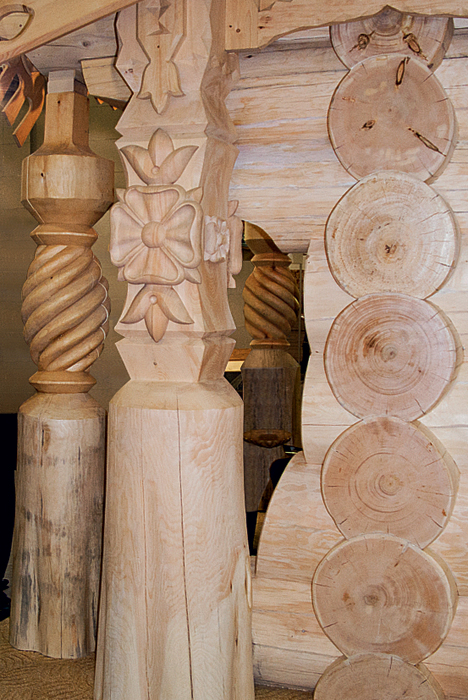
The second most important decoration of the house was the porch. For example, in the north it was usually made big and tall and placed on one or two massive pillars covered with intricate carvings. Carved columns also supported the roof of the porch. The beams connecting these columns were necessarily supplemented with light openwork gaps.
This is how usefulness and beauty were harmoniously combined in a traditional Russian hut - structural elements with protective and decorative ones. It is not for nothing that the external decoration of the log walls of the hut from time immemorial was called not somehow, but an outfit.
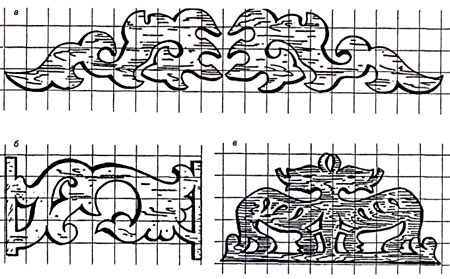
Thread types
According to historians, the tradition of decorating dwellings with carvings arose in Russia long before its baptism. True, the first attempts to do this were rather primitive - notches were placed on the window and door jambs, which served as amulets that protected the house from all sorts of troubles, hardships and evil spirits. The notches formed into simple patterns-signs: crosses, triangles, stars, and over time they united into more complex shapes. Gradually, the laws of their location were formed, not only on the facade, but also in the interior. True, later the symbolic meaning of the signs was lost and they turned into nothing more than decoration.
17-19. Modern carved platbands are not only in no way inferior to their progenitors, but in terms of beauty and originality of design, they often significantly surpass them. Designers achieve such an artistic effect mainly due to a somewhat non-standard arrangement of overhead elements.
According to the nature and technique of execution, all house carving can be conditionally divided into the following subspecies: three-dimensional (sculptural), deaf embossed, slotted (cut) and invoice. Moreover, in different regions of Russia, preference was given to any one species. They also developed their own ornaments there. But still, it was rare to find a house where only one type of carving would be used in the design - blind patterns certainly coexisted with slotted ones, and at the same time decor plots were necessarily combined and even intertwined. Both craftsmen and the owners of the house were engaged in the manufacture of jewelry in their free from worries about the harvest. winter months, which confirms, for example, the expression “to sharpen balusters” (balusters), and still means doing something that you can spend time on, if only there is nothing else to do.
 a a |
 b b |
 in in |
a. Volumetric, or sculptural. Characterized by the fact that the object is depicted in volume. It was this type of carving that was used to decorate the ends of okhlupneys, dowels-forty, kokor and supporting pillars of the porch of a wooden house.
b. Deaf embossed (ship). It has a high relief of the pattern and a solid, deaf background. Can depict geometric ornaments, plants, animals, as well as fairy tale characters. Decorated doors, shutters, and often platbands.
in. Slotted, or sawn. The drawing is cut with a jigsaw or saw. It was this technique that was used in most cases, since it is much cheaper than blind threads and gives more interesting game light and shadow.
 G G |
 d d |
d. Multilayer welt. It imitates blind carving by stacking boards with a slotted pattern on top of each other. The number of connected carved boards is from two to four, and the pattern on each of them can be different.
e. Invoice. The elements of the pattern, made with a slotted carving, are fixed with nails (glue) on a solid or carved board. It imitates a blind thread, but it is much easier and faster to manufacture, and the image is clearer.
Modern Jewelry
Lost traditions today artistic carving on wood are recreated almost anew, bit by bit. Each of the masters works mainly in any one technique, and only a few take on several types of carving at once. Wooden lace is usually made to order and at contract prices. At the same time, as in the old good times, single craftsmen most often offer products with sawn threads, made from boards with a thickness of 15 to 30 mm in the old fashioned way - with a jigsaw.
But do not think that progress has not touched the process of creating carved decorations. In addition to individual craftsmen, there are also small firms on the market that manufacture board products using computer programs and a laser. And this is not bad at all - the laser beam, “cutting through” the pattern in the tree, simultaneously burns the cut, as a result of which the product lasts much longer. Ornament or drawing can be made in any of the traditional styles or made according to the sketches of the customer.
 20 20
|
 21 21
|
 22 22
|
 23 23
|
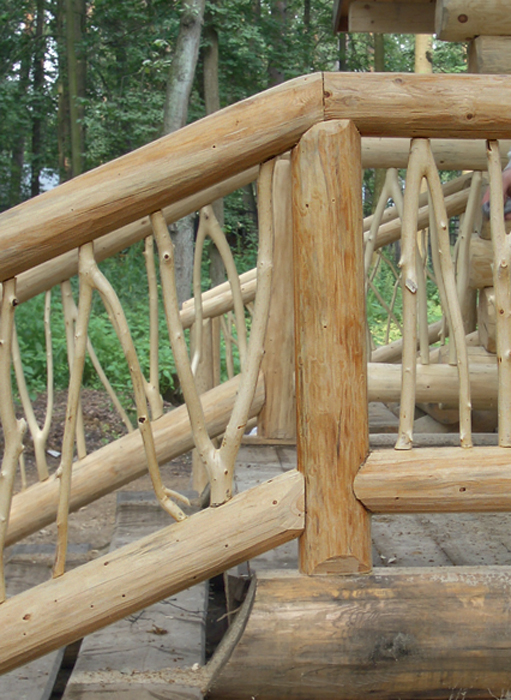
20-23. Carved balusters, as before, are able to turn the railings of stairs, balconies and terraces that seem to have a purely functional purpose into decoration of the facade. Recently, designers are increasingly using a rather original technique - thick tree branches are used instead of balusters.
 24 24
|
 25 25
|
 26 26
|
 27 27
|
 28 28
|
 29 29
|
24-29. A one- or two-pillar porch is not able to fit into the architecture of every wooden house. And so this element is almost forgotten. But such a structure as a “hanging” porch, based on the logs of a log house, and even decorated with type-setting or carved columns that support the roof, still does not give up its positions.
Among these technologically advanced firms, there are those that have gone even further, starting to produce high-precision carvings with intricate patterns from the most different materials. We give three specific examples.
waterproof plywood. Design Bureau Switch has developed a technology for making carved products from moisture-resistant plywood. This multilayer material, according to the company's specialists, is much more resistant to external factors(moisture, sun, frost, etc.) and durable than wood, provided, of course, that the finished product is treated with an antiseptic and covered with modern varnishes or paints. In addition, plywood allows you to make patterns of high complexity - with a large number of tiny through elements. Using this technology, it is possible to make not only wind boards, towels and architraves, but also decorative linings, skirting boards, screens for radiators, screens, interior partitions, inserts, panels, ceiling sockets, etc. The proposed method has some technological limitations. So, the maximum length and width of products is set by the size of a plywood sheet - 2x3 m, so long elements have to be assembled from short ones, fastening them end-to-end, but due to the high accuracy of manufacturing parts, these joints are almost invisible. The area of the processed surface does not exceed 1.5x1.5 m, and the thickness of the material is 10 cm. In addition, there are restrictions on the minimum size of elements that can be fixed on the equipment. The cost of a complete set of products can be found out only during a comprehensive and detailed discussion of the order.
Wood composite. According to the method developed by the Art Gorodets company, all elements are cut from boards made from wood shavings by hot pressing. The binder is a substance of natural origin - lignin. Finished products are treated with eucalyptus resin and coated acrylic paint. As a result, the material retains all the properties of natural wood, but surpasses it in moisture and frost resistance, as well as resistance to microorganisms. The cutting of plates is carried out on machines with numerical control, which ensures high quality processing and pattern reproduction accuracy. Under the order, products can be painted in a color selected according to a special table. It is proposed to select the necessary decorative elements and the style of their design from an extensive catalog, which presents hundreds of details and dozens of design options (created on the basis of surviving historical carving patterns). The volume and variety of decor can be provided both by performing layer-by-layer milling, and by laying blanks on top of each other in several layers (each of them is pre-treated and painted). So, to reproduce patterns typical, for example, of the Kalyazin style, up to five carved layers are sequentially combined, and three are enough to obtain even the most ornate pattern of the Tver style. The price of products depends on the complexity of the carving - the more openwork option you choose, the higher the cost. Let's say, a standard-size casing in the style of "Red Hill" will cost 27 thousand rubles, and a similar "Assumption" style - 18 thousand rubles. Accordingly, samples in which several carved layers are used will cost more than single-layer ones.
The term of execution of the order, depending on its complexity, is from 3 to 8 weeks from the moment the drawings are approved and payment is made. Products are delivered completely ready for installation, the assembly diagram is attached, but branded installation can also be ordered.
The original design of the house

Progress has affected not only the technologies for making carved ornaments and the materials used for this, but also the options for arranging decors on the facade of the house. For example, windboards made of Plexiglas and equipped with LED backlighting are proposed to be fixed under multi-layered carved porches made of waterproof plywood. In this case, during daylight hours, only the "wooden" part of the decoration will be clearly visible, and the transparent plexiglass will remain almost invisible. At night, on the contrary, the luminous carved contour of plexiglass will come to the fore.
Plexiglas. Enough original proposal from the already mentioned design bureau Switch: a carved windboard is made of 1 cm thick plexiglass and is equipped with end LED lighting. The color of the glow can be static (blue, red, orange, white, green) or change according to a given program (using RGB LEDs controlled by the controller). The light sensor is responsible for turning on the backlight. Energy consumption is minimal - approximately 50 watts. The backlight does not require professional maintenance (it is enough to wash the plexiglass elements once a season or as they become dirty) and can work without replacing light sources for up to 30 years (50 thousand hours), provided that the supply voltage is stable. Guarantee period- 5-7 years. The cost of a luminous decoration is about 3 thousand rubles. for 1 running m., of which 1.5 thousand rubles. for 1 running m. will cost the plexiglass product itself, the rest - the cost of waterproof LED lines and their control equipment.
Observe the measure
Unlike Europe, with its inherent sophistication and minimalism in design, in many parts of Russia there is a clearly visible craving for decorating houses with wooden lace. And this is wonderful, because a truly modern home should be comfortable in every sense - not only be practical and meet the requirements for energy saving, but also be distinguished by high aesthetics, characteristic of such well-established architectural styles as Russian, Art Nouveau, Empire, etc.
32-34. The use of carved wood composite elements will not only transform the building, but even visually change its proportions. And you can use them to place or shift accents and thereby make the facade of the house more attractive. But in both cases, a professional design project should be guided.
But no matter what style of carving the owners of the house choose, it is very important that they do not change their sense of proportion in the process of implementing their plans. After all, the abundance of decorative details is extremely tiring for perception, and the use of complex and intricate carved patterns is far from always justified. So, very thin lace, which admires the elaboration of the pattern from a distance, can merge into a continuous, indistinct mass from a distance. In turn, too large decor will dominate other architectural details of the building. You should not overload the facade with excesses, because any annoying embellishment irritates the eye. And most importantly - the dimensions of the wind boards, valances and platbands must be correctly correlated with the proportions of the wooden house as a whole and the dimensions of the structural elements of the porch, windows, balconies, cornices, overhangs, etc. And then even the simplest pattern will look elegant and stylish.
Responsibly, you need to approach the choice of color in which wooden lace will be painted. It must be in harmony with the tone of the log walls of the house. At the same time, light patterns will look spectacular against the background of logs painted in dark colors, while dark ones, on the contrary, will benefit from a combination with light wood.


How to disable ads on Android: remove pop-up ads
The Russian received a term and a million fine for "piracy Negative consequences of the law
Identification of key factors
The criteria for classifying organizations and individual entrepreneurs as small and medium-sized businesses have changed
See what "Royalty" is in other dictionaries Pitfalls of legislation