At times Soviet Union Woodburning was in the nature of mass interest. Almost every family had a special device powered by an ordinary electrical outlet and a burning board. And for those who did not have special artistic abilities, or just for novice pyrographers, special stencils were offered in abundance, including those made of metal, allowing you to create unique works of art for both adults and children!
With the advent of certain changes, with the appearance of new entertainments, with the development of advanced modern technologies former passions for burning, albeit on a stencil, gradually faded away. However, lately this type of individual creativity again becomes quite widespread - the pictures created with the help of a burner are used to decorate the interiors of not only residential buildings, but also cafes or baths. Moreover, more and more new devices for burning out appear, allowing you to turn absolutely any wood product into a real exclusive “hand-made” class item, the uniqueness of which even a child can provide!
 Burning pictures on wood with a special portable device is a very exciting and exciting activity. People who are passionate about pyrography (as burning is called) can safely be called real artists. Some of them are able to create real works of art, which are complex compositions with intricate patterns and even whole paintings, varnished- fish and birds, images of outlandish butterflies and flowers, New Year's panels, etc. Some jobs cost a lot of money. So wood burning, in addition to the aesthetic component, when crafts long time pleases the eyes of its owner, can be a source of good income!
But in order to create even relatively simple ornament on sanded wooden board, most often you first need to create a sketch of the drawing, and then transfer it to the workpiece. Not every person has the talent of an artist. Therefore, many solve this problem by using black and white stencils for wood burning or special templates. There are a huge number of them. You can get a stencil in a variety of ways:
- create yourself;
- buy in the store;
- download from internet and print on printer.
A wood burning stencil can be an inscription, a pattern, a flower, some kind of graphic image, a copy of famous works of art, a photograph, and so on.
Getting a stencil
 In the case of self-creation of a stencil, everything is quite simple. A pattern, image or inscription is simply applied with a pencil on unfolded paper, which easily allows you to correct mistakes and inaccuracies.
Purchased stencil or template, printed on the printer, is completely ready for use. Today, in stores, and especially on the Internet, there is an almost limitless variety of different patterns, from the simplest ones that both a beginner and a child are able to handle, ending with very complex patterns or graphic compositions. How to transfer the sketch to the tree will be discussed below.
A very fashionable trend nowadays is the transfer of various photographic images to a wooden board. These can be photos of relatives and friends, animals, historical and architectural sights. To create a photo stencil you will need:
- digital copy of the photo;
- computer photo editor;
- peripheral printing device (printer).
The photo is uploading to graphics editor in order to remove colors to black and white and slightly lower the image quality. When the photo loses color contrast, it is printed on a printer.
Using a stencil
 In order to transfer the sketch to a wooden board or other blank, you must perform the following steps:
- place carbon paper on the workpiece with the working surface down;
- put a finished stencil, template or sketch on top;
- fix the structure with adhesive tape or in another way;
- carefully draw all the lines and elements that the inscription, pattern or image contains with a pencil or engraver.
After the sketch and carbon paper are removed from the workpiece, it is necessary to carefully examine the resulting drawing and, if necessary, correct poorly translated lines and details with a pencil, “play” with their thickness and make some other additional edits.
Everything, now you can start burning future work of art!
Using pyrography, you can create a wide variety of decorative items or things that are simply necessary in the household. Cutting boards, wooden dining sets, snuff boxes, toys and other household items are decorated with burning.
Wood burning requires creativity, patience and perseverance, as well as enough time to process any item. But in return, a person receives an indescribable aesthetic pleasure and a beautiful individual thing that will delight a person throughout his life.
And what pleasure children get from the process of burning out - it is simply impossible to describe it in words! It is not without reason that both on the Internet and in stores there is such a wide variety of stencils for burning, designed specifically for children. They contain various motives, plots and levels of complexity. We must not forget that pyrography develops artistic taste in a child, develops his horizons, instills in him the skills of self-discipline, ability to work, patience and perseverance.
Many of us love to create something with our own hands, including home decoration. In order to diversify the situation, to bring new details into the comfort of your apartment, you can knit a carpet, sew a fashionable bedspread or decorative pillowcases, draw a landscape. And you can resort to such a type of creativity as pyrography, or simply wood burning. If you are not good at painting, this option is just right for you, because you can find many stencils for wood burning on the Internet. You just need to download them to your computer, print, cut and translate into wood.
Everyone can handle this simple way to draw a picture on a tree, it is suitable for both children and adults. Sketches, however, can be invented independently, but this is within the power of people with a rich imagination or experience. Therefore, we suggest that you use templates.
Working process
It is best to use soft and light woods for burning, such as poplar, birch, chestnut. The surface must be sanded with sandpaper, go over with furniture varnish and repeat the sanding. This way you will avoid unwanted splinters getting into your fingers or your child's fingers.
You will also need a pyrograph. This is an electric burner, it can be purchased at hobby and needlework stores. In such stores, special wood burning kits are also sold, they usually already include a pyrograph, a wooden block, and the drawing itself, which you will use as a stencil. For beginners, it is better to choose just such a set to try your hand at a new business, especially since it includes everything you need.
Make sure the board is dry and that your hand will have something to lean on as you work. Support is very important, as one awkward move can ruin the whole drawing, or worse, the hot tip of the pyrograph can burn you. The hand must be firm.
Then draw the drawing with a pencil. If you are using a stencil, simply trace the outlines of the cut out pattern. If the picture you have chosen is multi-layered, that is, it includes additional details (for example, hair, eyes, facial features or muzzles), then it is better to use carbon paper or tracing paper.
Tip for beginners: choose fairly simple and easy plots for paintings until you get your hands on it. It is better to make it simpler, but more effective than to take on an impossible task.
It's not quite right to row all stencils one size fits all, so we break ready-made templates into different categories.
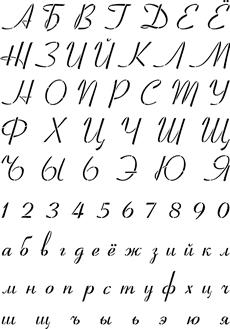
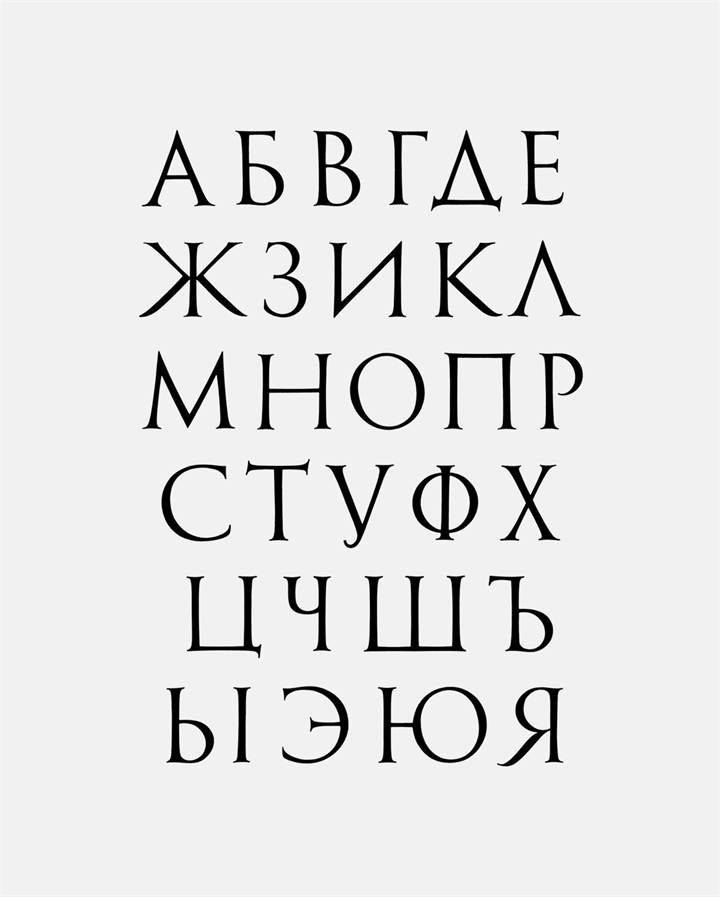
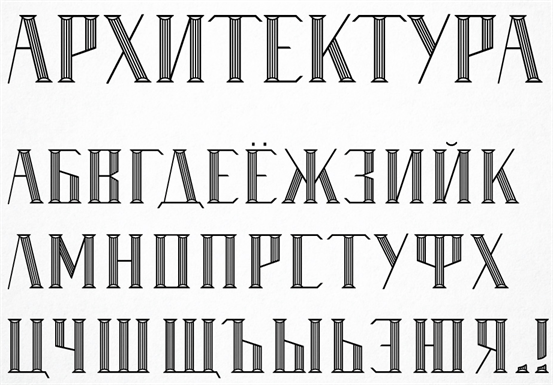
Create letters
Letter stencils are perfect for wood lettering. For example, on cutting boards or any other wooden panels with congratulations.
Beginning pyrographists can fill their hand by burning letters first, then whole words and sentences. You can download a whole set of different fonts for every taste.


bright flowers
Flowers are a well-known antidepressant, whether live or painted. Now there are even special anti-stress coloring pages depicting various floral patterns any complexity. You can use this coloring, or you can download the desired picture on the Internet. Beautiful flowers will always cheer you up!
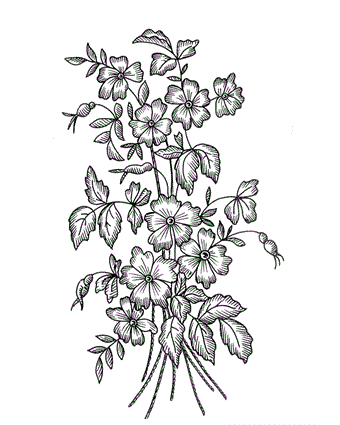


Such works can be painted with acrylics or watercolors and then waxed to preserve the colors.
contour animals
The animals depicted on the tree will perfectly complement the houses in which pets live, because you can transfer the contour image from the photo of your pet to the tree and burn it out. It can also be a stylish gift for animal lovers, hunters or professional breeders.


holiday drawings
It can be any holiday motives: on New Year- Santa Claus with reindeer, gifts, Christmas tree, snowflakes and so on. For Easter - Easter eggs, various Easter patterns on wooden eggs will look especially great. By Defender of the Fatherland Day, you can burn out military equipment or shoulder straps, and by March 8 - bouquets of flowers.


Burning for children is an opportunity to prove themselves as a real artist and master in woodworking. Of course, it is impossible to call this type of creativity simple and easy. Nevertheless, young needleworkers are increasingly attracted to burning out.
Burning for children is an opportunity to prove themselves as a real artist and master in woodworking
There are a huge number of schemes that allow you to create real paintings on a tree; they can be found and downloaded on the Internet. At the same time, it is not enough just to decide on their choice. It is also necessary to think about what will be produced as a result. After all, simply transferring the image to the material is not enough. After all, as a rule, we burn a picture for something specific.
The burning technique can be used:
- Paintings. They are used most often to create them. Such crafts will become the most unusual and original gift for any holiday. Any room, thanks to them, becomes more comfortable. Nature can serve as a motive for creating such paintings - forest landscapes and mountain landscapes will look great as images in the pyrography technique.
- Furniture. All kinds of interior items are decorated with this technique. It can be both stools and chests of drawers, tables and even beds. These products can be classified as elite. You can also make cool panels for the bath.
- Kitchenware. Even a primitive cutting board, decorated with an ornament or pattern, becomes a true work of art. Spoons and dishes, pots and bread boxes become the main decoration in the kitchen.
- Vases. They can be desktop and floor, used to store candy or cosmetics. Thanks to the scorched pattern, such products look presentable and unusual.
- Caskets. A child can easily decorate even a wooden box, and then present such a perfect present to his mother or grandmother. And for dad, you can decorate a handmade backgammon case.
- Decorations. In this technique, exclusive jewelry is made, which is in harmony with absolutely any style. It can be not only pendants and brooches, but also earrings, beads, original hairpins.
Wood burning: a simple drawing (video)
Burn-out for children: suitable landscapes
Even a child can transfer to a tree and burn out an unusual landscape. At the same time, the workflow for boys will be incredibly interesting and exciting. At the same time, a masterpiece created with your own hands will please the eye for many more years and will become one of the most important achievements. It turns out it is incredibly beautiful and unusual.

Even a child can transfer to a tree and burn out such an unusual landscape
What is necessary:
- burner;
- board;
- insulating tape;
- scissors;
- pen.
Working process:
- Print the drawing and attach it to the board with electrical tape.
- Transfer the image with a pen, carefully pointing each line.
- Remove tape and paper from the workpiece.
- Burn out all the details along the contour, using a thin nozzle.
Cover the finished craft with varnish.
Simple schemes for burning
For children's creativity, a variety of schemes are suitable. Any of them can be supplemented and improved. Depending on the subject, images may be as follows:
Congratulatory. As a gift for March 8 or the New Year, a self-scorched postcard is perfect. Children's coloring pages are also suitable for the template, because complex ornaments are useless here - but flowers and butterflies, or New Year's snowflakes are very useful.


Animals. For most children animal world seems a little magical and fabulous. Accordingly, by creating such paintings, they temporarily move into a fairy tale, and the creative process brings maximum pleasure.


Cartoon characters. Transferring such pictures to a tree using a diagram is the easiest way. They turn out to be especially colorful, despite the fact that paints are not used in the process of work.


Military equipment. As a gift to your beloved father or grandfather, scorched images of tanks and aircraft are perfect. Yes, and just it will be the original decoration of the children's room.

Rules and features of wood burning
In order for the work to bring pleasure, and its result pleasantly pleased, it is necessary to follow a number of rules.
The main masters distinguish the following:
- you need to work only with dry wood;
- after transferring the image to the material, you must first make points, which are then connected with lines;
- if the line must be very thin, the burner is moved as quickly as possible;
- after the line is completed, the pen is torn off the canvas, without stopping for a moment in one place;
- start work from the outer edge and slowly move to the center;
- by adjusting the intensity of the glow and the slope, it is possible to make the lines more saturated or barely noticeable;
- the tip of the burner is cooled in a vertical position;
- in order to avoid intermediate burns, work begins in one area and after a short time they move to another. Before applying a new stroke, be sure to give the neighboring one time to cool;
- after completion of the work, the craft is carefully processed with sandpaper;
- additionally, the picture can be painted with paints;
- in order for the picture to acquire a matte sheen, it is treated with wax.

In order for the work to bring pleasure, and its result pleasantly pleased, it is necessary to follow a number of rules
Preparing wood for burning
Birch, chestnut, alder, linden and poplar are best suited for work. In some cases, the use of ordinary plywood itself is also allowed. In order for the pattern on the wood to be displayed perfectly, it is not enough just to responsibly approach the choice of wood. It still needs to be prepared.
This process boils down to the following actions:
- Check the material for knots and dryness.
- Leveling the surface using a scraper or any other tool.
- Cleaning the canvas with fine sandpaper.
- Sanding with a mixture of water and chalk.
- Covering the workpiece with varnish.
- Re-coating with varnish after the first layer has dried in order to remove the remaining irregularities and villi.

Birch, chestnut, alder, linden and poplar are best suited for work.
Wood burning: choice of device
There are only two categories of devices designed for burning. They are divided into professional and amateur. Naturally, beginners in this craft should opt for those tools that are intended for inexperienced needlewomen. Their peculiarity is that they are equipped with a considerable number of figured nozzles and a special tip made of refractory metal.
When buying a device for a child, it is recommended to pay special attention to whether it is equipped with special elements that protect against burns. Important details of such structures are also a handle-stand and a protective coating for the working area.
Often, sketches are also sold with sets, which can also be used in the process of work. Due to the fact that such devices are intended for novice creators, they are accompanied by extremely simple and understandable schemes.
If you are interested in wood burning, you will probably be interested in the article about patterns for wood burning. Such patterns are applied with a special device - a pyrograph - on a wooden surface. This is not at all a difficult activity, which is suitable for both adults and children.
Burning wood is very exciting, because in this way you can get very beautiful handmade products, which in the future can be presented as gifts for all kinds of holidays, from New Year to Mother's Day. Sketches for wood burning are easy to find on the Internet, and you can also find many different master classes there, both for beginners and experienced pyrographists.
Before you start burning, read a few important tips about this interesting activity.
- For beginners, it is best to choose light and soft woods for the first work. They are easy to burn out due to their softness and do not require strong pressure on the burner pen due to their lordship. Such species include poplar, chestnut, birch. Also, for the first experiments with a pyrograph, ordinary plywood is suitable.
- If you want to burn patterns or ornaments on a cutting board, you should choose it for the same reasons as in the first paragraph. It will be easier for you to work with a soft and light board, and the drawings will turn out to be more expressive and interesting.
- For children, you can buy special kits for pyrography (wood burning), which are sold in hobby hypermarkets or needlework stores. These sets are not too expensive and will be a great holiday gift for your child.
- Before work, it is necessary to clean the board from excess knots and burrs. This will help sandpaper. Walk it over the entire area of the board, then cover the board with furniture varnish, and then sand it again with sandpaper. Thus, you will protect yourself and your child from unwanted splinters in the fingers.
- Make sure that the tip of the pyrograph pen does not touch your skin. It is hot and can damage the skin, you need to work with it very carefully. It is very important that your hand, in which you hold the tool, rest on a hard surface when you apply the drawing. If the pen bounces, it may ruin the drawing or burn you.
Related article: We knit a crochet basket "Owl"
What can you burn
If you want to give someone a gift in the form of kitchen utensils, and even decorated with your own hands, items such as rolling pins, wooden spoons and plates, cutting boards can come in handy here.
They can be burned with simple and complex ornaments, various natural motifs, flowers, animals, gift inscriptions enclosed in frames, and so on. There are many options, and some of them are presented in the photo below.


Most likely, the recipient of the gift will not use it in everyday life, but the most prominent place for your work is provided!
When burning on rolling pins, it will be a little difficult to work, because the rolling pin is a voluminous object. Therefore, for convenience, put a few pieces of plywood under your hand with a pyrograph, and with your other hand, hold the rolling pin by the handle and scroll when the drawing requires it.

If you want to burn text and enclose it in a frame so that the frame is even, you can use duct tape: stick it on the tree, giving it the shape you want to give to the bottom edge of the frame, and then burn along the line of the tape as if it were a contour.
Burning on wooden spoons is also quite problematic, so it is best to secure the spoon. Patterns for burning on spoons can be different: flowers, landscapes, ornaments, and congratulations. To hang such a spoon on the wall, you need to drill a hole on top of it and insert a cord. It will look beautiful with a wooden spoon twine.


Usually wooden spoons are easy to find, and they are quite cheap, so the whole value of such a gift is that you had a hand in creating a masterpiece.
You can also easily deal with burning on a cutting board. It can be used in everyday life, or it can decorate the owner's kitchen. Beech boards are not the best choice for those who want to burn out a drawing with fine details, they are best for burning words, names and so on. For small details, it is best to choose a board made of elm or linden, they are quite simple and pleasant to handle.
Wood burning is a very interesting and exciting process of creating a real work of art, for which there are many sketches. Back in the days of Ancient Russia, this work had unimaginable popularity, and in our times its distribution is increasing, attracting more and more craftsmen and craftswomen every year, of different ages, with different ideas, thoughts and styles of burning.
We study wood burning with sketches: where to start
Create for yourself convenient and pleasant for you workplace. Arrange everything so that everything you need is always at hand, but nothing interferes with the creative process.
For the first training work, soft woods such as pine, ash, birch, linden or maple are great. Soft woods on the market are much cheaper than hard ones, and they are also lighter, which will make it possible to create different shades and halftones when applying a drawing, and novice pyrographers will better see the result of each stroke they have applied.
You should always start with templates that will be easy and enjoyable to perform. Simple pictures with straight lines will allow you to work out the force of pressing the pyrograph and choose a comfortable temperature for the burner. Such pictures are suitable for children, or for beginners:

Also, beginners will benefit from experience with patterns of varying complexity, which will look beautiful, bordering frames or cutting boards:

The most frequent for burning have always been and remain the motives of nature. Pictures with scorched flowers or animals fit perfectly into almost any interior.
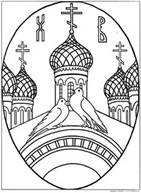
And, of course, such an ancient art as wood burning could not do without the presence of the Orthodox Russian faith. Since the time of baptism, icons have been burned in Russia, and in many houses and churches to this day you can find the results of the work of truly skilled craftsmen, or you can try to repeat them yourself:

Burnout drawings are not limited to outline sketches. More experienced craftsmen, while applying an image to a tree, using patterns or pressure and temperature of the burner, can create various shadows and effects. Having mastered this technique, you can create real masterpieces not just using templates, but translate your own photos into paintings:

Skill in any business comes with time, and therefore the main thing is not to quit what you have started, train and improve your own skills, do not despair if something does not work out. And then, at the end, you will come to such great achievements that you cannot even think of at the moment.
Video on the topic of the article


Summer corporate parties: new ideas for outdoor leisure
What is franchising and franchise: understand the intricacies, get to know the giants What is the name of the franchise seller
How to make life easier. Book: Carnegie D. “How to make your life easy and interesting. Do what you really really like
How to resist the tricks of sellers and buy only the things you need
How can a worker, a peasant and an intellectual make money for bread and butter?