Text editor MS Word allows you not only to view and design office documents.
With built-in templates or regular toolbar elements, you can create unique business cards for yourself or an entire company.
The program contains the necessary set of parameters with which you can creatively approach the task.
After mastering all the tricks and methods, you no longer have to use special programs or contact professional agencies to create business cards.
All the steps presented in the article were performed in MS Word 2016 and 2007. All instructions are universal and suitable for editor versions 2007, 2010, 2013 and 2016.
Rules for choosing backgrounds and textures
The greatest amount of time when creating your own postcards, business cards, cards takes design development.
As a rule, textures, background images and additional elements are selected for a long time. All of them should be harmoniously combined and complement each other.
Choosing the right background color is not about adding your favorite shade from the palette. When choosing a color, be guided by the general rules:
- the meaning of the shade and its psychological perception by a person;
- audience for which business cards are made;
- the color should match the proposed product or activity.
Since the business card is small, don't use a lot of different textures, colors, and text.
Information should be presented in a concise manner and clearly reflect the name of the organization, the name of the person, the position held, the company logo, address and contact information.
Text layout and font selection
When choosing a text for a business card, rely on the following recommendations:
- Don't use more than two different fonts on the same business card. The inscriptions must be in the same style in order to attract the attention of a person;
- Use font families to intelligently match different character forms;
- The font color should contrast well with the background tint or image;
- The size of the letters must be legible. Characters should be no larger than 10–14 typographic points (tp).
Using standard Word templates
Each version of Word has a fairly large number of ready-made templates for creating business cards, invitations, postcards, title pages, advertising brochures and other elements.
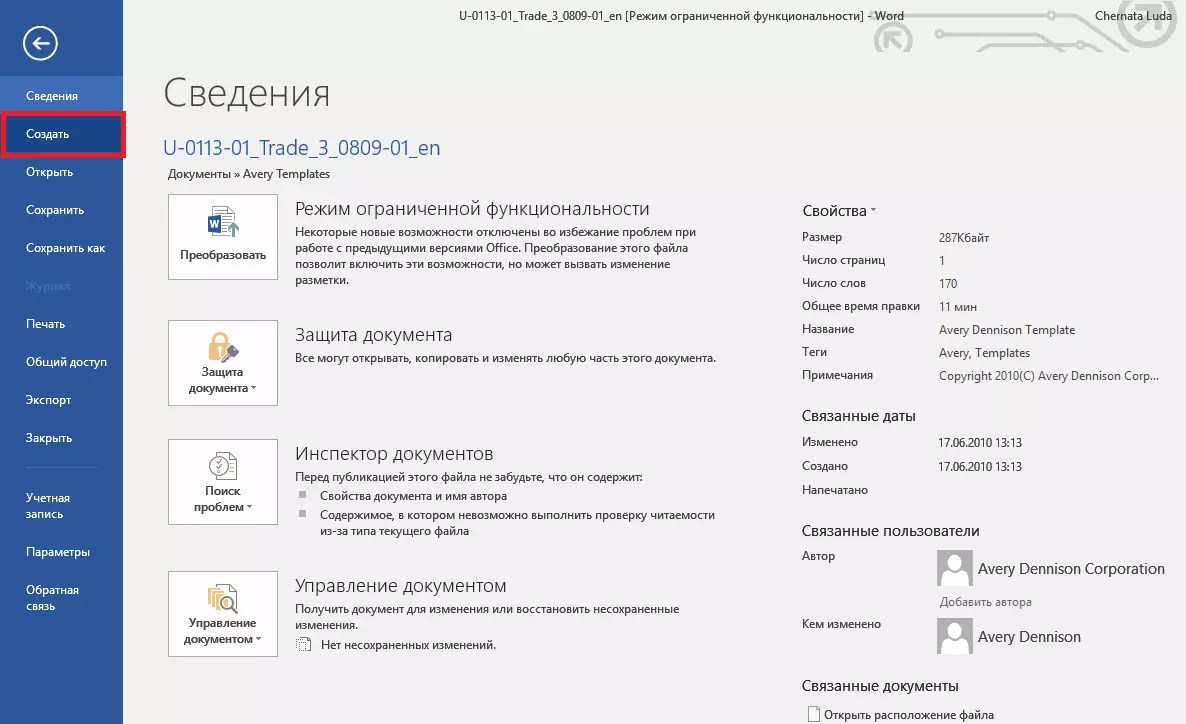
Let's take a closer look at how to make a business card in Word using built-in templates. Open a word processor and click on the File tab. Then select "Create".

As a rule, business card designs are located all over the sheet (8-10 copies each). This allows you to quickly edit all cards and save paper during printing.

Loading and using ready-made templates
You can download additional Word templates that are not in the main word processor set on the official Microsoft website.
Templates suitable for business cards can be found in the "Cards" section.

To download ready-made business card templates, you can also use the databases of ready-made designs on the vertex42 and avery websites.
Also, users of licensed versions of MS Word can instantly access the online database of templates.
To do this, go to the program and at the stage of creating a document, select the "Cards" tab (figure below):

An Internet connection is required to perform this action. Wait a few seconds for the required designs of the selected category to load.
Now select the desired design from the list, click on it and click on the "Create" button.


To use already finished design from the Internet, download the template you are interested in. The downloaded file must be in the .doc or .docx format and open in any version of Word.
Open the document containing the template and make any necessary edits to the information contained on the business card:
- The name of the company;
- the address;
- Your full name;
- position held;
- contact number;
- email address;
- business address;
- schedule.

After editing, the document page is ready for printing.
Advice: during the printing of a document, some page settings may be violated (margins, hyphenation, headers and footers, etc.).
So that printed business cards are completely identical electronic version, resave the final Word document as a PDF (File ⇒ Save As ⇒ PDF Document).
The main advantage of working with templates is their versatility. They are suitable for absolutely all versions of MS Word.
Depending on the fonts installed on your computer, only some of the inscriptions may look different.
Using tables to create business cards
If you want to create a business card in Word yourself from scratch, you can use tables or create elements in Canvas mode.
Let's take a closer look at how to work with the first method in all versions of MS Word.
Instructions for Word 2010, 2013, 2016
First you need to set the appropriate document markup. To do this, click on the "Layout" tab. Select margin options. In the drop-down list, click on the "Narrow" item.
This type is best suited for creating business cards and postcards.

Now create a table (2 columns and 5 rows). To do this, on the main toolbar, go to the Insert tab and click on the Table icon.
Set the required dimension:

The created table will be the basis and outline for our business cards.
Stretch it to fit the entire page so it looks like this:

In the plate properties (Row and Column tabs), enter the width (9 cm) and height (5 cm).

Now we need to remove the indents that are set automatically when the table is created. Their removal is necessary so that the inscriptions are uniform in each cell.
Go to table properties. Select "Options". Set all margins to "0 cm". Save your changes.

To make the margins easier to trim after printing, lighten them slightly. To do this, switch to table design mode.
In the Table Styles box, select a lighter shade of the outline.

Now let's move on to creating the text of business cards.
First of all, you need to align the characters with a ruler.

For text, you can use any tools that are in the Word (different fonts, styles, spacing between characters, etc.).
To create a background, right-click on an empty space in a cell. Open the fill creation window and select the background color you like:

To add a logo, picture, or other element to your business card, use the Insert tab and then select Shapes or Pictures.

To copy the created design to other cells, select the contents of a table row using the keyboard shortcut Ctrl + C and paste it into other rows using the keys Ctrl + P .
Logos must be transferred separately for each cell. To fill the entire table at the same time, select all its columns and create a single fill.

Instructions for Word 2007
To mark up the desired page for placing 8-10 business cards in the 2007 version of Word, click on the "Page Layout" tab. Select the "Fields" icon.
In the drop-down list, click on "Narrow field".

Now create a table in such a way that there are 2 columns and 5 rows on one sheet.
Go to the Insert tab and create a table as shown in the image below:

Make an alignment. To do this, go to the table properties:


Remove the indents inside the table cells, as shown earlier in Figure 14.
To change the color of the borders of our table, you need to select the "Work with tables" tab. Next, click on the "Borders" icon and set the size - 0.25 pt.
In the Pen Color window, you can change the hue of the margins.

The basis for business cards is ready. Now you can start designing the layout.
Type the desired text inside the first cell and align it with a ruler (Figure 16). Select a color for the business card background (Figure 17).
Copy the created design to the rest of the plate cells.
If you indicated the site on the business card and a hyperlink was created, be sure to delete it (highlight the line and press the right mouse button):

Designing business cards in Canvas mode
In Word, you can create a canvas for working with additional shapes.
To create it, click on Insert ⇒ Artwork ⇒ Shapes ⇒ Create Canvas (for Word 2010, 2013, 2016) or Insert ⇒ Shapes ⇒ New Canvas (for Word 2007).

Add a rectangle to the canvas and remove the fill from the shape:

Inside the rectangle, you can enter text, add other shapes, logos or pictures (similar to how business cards were created in a table).
Move the pointer to the area of the shape shown in the figure below and copy the resulting design.

After printing sheets with business cards, they should be cut. To do this as neatly as possible, do not use scissors.
It is better to take stationery scissors or a guillotine for cutting. Also, please note that the standard size of business cards (horizontal position) is 9x5 cm.
Thematic video:
Creating your own business cards often requires specialized software, which allows you to create business cards of any complexity. But what if there is no such program, but there is a need for such a card? In this case, you can use a tool that is not standard for these purposes - the MS Word text editor.
First of all, MS Word is a word processor, that is, a program that provides a convenient way to work with text.
However, having shown some ingenuity and knowledge of the capabilities of this very processor, you can create business cards in it no worse than in special programs.
If you don't have MS Office installed yet, now is the time to install it.
Depending on which office you use, the installation process may differ.

If you subscribed to a cloud office, then installation will require three simple steps from you:
- Download office installer
- Run Installer
- Wait for the installation to finish
Note. The installation time in this case will depend on the speed of your Internet connection.
Installing offline versions of MS Office on the example of MS Office 2010
To install MS Office 2010 you will need to insert the disc into the drive and run the installer.
Creating a business card in MS Word
Next, we will look at how to make business cards in Word ourselves using the MS Office 365 Home office suite as an example. However, since the interface of the 2007, 2010 and 365 packages is similar, this instruction can be used for other versions of office as well.
Despite the fact that there are no special tools in MS Word, creating a business card in Word is quite simple.
Preparing a blank layout
First of all, we need to decide on the size of our card.
Any standard business card has dimensions of 50x90 mm (5x9 cm), and we will take them as a base for ours.
Now let's choose a tool for creating a layout. Here you can use both a table and a Rectangle object.
The option with a table is convenient in that we can immediately create several cells, which will be business cards. However, there may be a problem with the placement of design elements.

Therefore, we will use the Rectangle object. To do this, go to the "Insert" tab and select from the list of shapes.
Now let's draw an arbitrary rectangle on the sheet. After that, the “Format” tab will become available to us, where we indicate the dimensions of our future business card.

Here we set the background. To do this, you can use the standard tools that are available in the Shape Styles group. Here you can choose how ready-made version fills or textures, and set your own.
So, the dimensions of the business card are set, the background is selected, which means that our layout is ready.
Adding design elements and contact information
Now we need to decide what will be placed on our card.
Since business cards are needed so that we can provide in a convenient form potential client contact information, the first step is to decide what kind of information we want to place and where to place it.
For a more visual representation of their activities or their company, business cards place any thematic picture or company logo.
For our business card, we will choose the following scheme for placing data - in the upper part we will place the last name, first name and patronymic. The picture will be on the left, and on the right Contact Information- telephone, mail and address.
To make the business card look beautiful, we will use the WordArt object to display the last name, first name and patronymic.

Go back to the "Insert" tab and click on the WordArt button. Here we choose suitable style registration and enter your last name, first name and patronymic.
Next, on the "Home" tab, reduce the font size, and also change the size of the inscription itself. To do this, use the "Format" tab, where we set the desired dimensions. It would be logical to specify the length of the inscription equal to the length of the business card itself.
Also on the tabs "Home" and "Format" you can make additional settings for the font and display of the inscription.
Adding a logo

To add an image to a business card, go back to the "Insert" tab and click the "Picture" button there. Next, select the desired image and add it to the form.

By default, the image has text wrapping set to “in text”, which will cause our card to overlap the image. Therefore, we change the wrapping to any other, for example, “top and bottom”.
Now you can drag the picture to the right place on the business card form, as well as resize the picture.
And finally, it remains for us to place contact information.

To do this, it is easier to use the "Inscription" object, which is located on the "Insert" tab, in the "Shapes" list. Having placed the inscription in the right place, fill in the data about yourself.
In order to remove the borders and background, go to the "Format" tab and remove the shape outline and fill.
When all the design elements and all the information is ready, we select all the objects that make up the business card. To do this, press the Shift key and left-click on all objects. Next, press the right mouse button and group the selected objects.
Such an operation is necessary so that our business card does not “fall apart” when we open it on another computer. It is also more convenient to copy a grouped object
Now it remains only to print business cards in Word.
Easily. Create a simple business card in Word possible in minutes. Certainly more quality option can be obtained using graphic editors, such as Photoshop. But not everyone has it installed, and not everyone can use it. Therefore, creating a business card in Word will be the most relevant, fast and convenient.
Create a Microsoft Word document and open it.
Go directly to the " Page layout" and select "Size".

Lower your gaze to the very bottom and select " Other size".

Specify on the tab "Paper size»Approximately 10 by 5 cm.

On the first tab, set the indentation of all fields to half a centimeter. Now you can click "OK".

Here is the size of our business card:

Here we can specify the necessary data, such as phone number, address, full name, company name, and so on.
Let's fill our business card with some color. Select the Page Color tool on the Design tab and specify the color itself.

We enter it with the help of the tools on the tab " Home». This is how it happened:

If you download some picture on the Internet, or take a picture yourself, then you can drag it from your computer and place it on a business card.
This is how you can create a business card in Word minimal complexity.
In addition, you can, and use some unusual one, well, this is already to your taste.
Business cards in Word - how to create and print a business cardAlmost every modern person needs a business card. It is convenient to give the interlocutor a small, neat piece of paper so that your name and patronymic are in front of his eyes during the conversation and remain as a reminder after it. You can entrust the creation and printing of business cards to a company or a printing house, but you can create a business card yourself in Word.
Business card in Word Usually, CorelDraw vector editor is used to create a business card template - it really allows you to better prepare a business card template. But, firstly, this program costs a lot of money, and secondly, not every user knows how to work with it. The usual Word from the MS Office office suite will come to the rescue - it is installed on each computer and any user can work with it.
How to create a business card in Word
You will need a blank Word document. Through the menu File | Page Setup… reduce the margins to 1cm or less.
Now you will need a table, in each cell of which there will be one business card. Select menu Table | Paste | Table. In the Insert Table window that appears, set the number of columns to 2 and the number of rows to 5. Click OK to insert the table into your document. She doesn't look very nice yet.
Now you need to set the width and height for the business card. The standard business card size is 9x5 cm. Of course, there are no strict laws - you are free to make a business card of any size, but think about your interlocutors. All business card holders are designed for this standard business card size and a larger business card may simply not fit into a business card holder. A smaller business card will be unusual to hold in your hands. So do not get out - specify the standard size of business cards. Select the table via the menu Table | Select | Table. Select menu Table | Table properties…. On the Row tab, check the Height checkbox, enter 5 cm. On the Column tab, check the Width checkbox, enter 9 cm. Click OK to save changes.
Select the menu again Table | Table properties…. On the "Table" tab, click the "Options" button, specify all cell fields by default 0 cm.
Now it remains to get rid of the black borders, otherwise sloppy borders will remain on the finished business card. But even without borders it is impossible - ready-made business cards will have to be cut out somehow. Let's make the borders of a light color - then they will be visible when cutting out, but will be less visible on the finished business card. Select menu Format | Borders and Shading..., on the Border tab, select the type "all", the color "light yellow" or any other light (other line colors), select the width 0.25 cm. Advanced users can use the "Table" toolbar.
Everything, the basis for business cards is ready.
Now type in the desired text. Usually on a business card there is the name of the company, last name, first name and patronymic of the owner, position and methods of communication - mailing address, cell and work phone, fax, mail, icq, skype. All text must be easy to read. Name must be large. Do not use pretentious handwriting - pity the person who will have difficulty reading this text. It is not necessary to spend a lot of time on design - a simple and neat business card is no worse than a heap of design delights.
Leave indents - do not type text close to the borders.
We typed the text in one cell, now we need to multiply it throughout the table. You can, of course, copy and paste text, but you can do it faster. Select the entire cell. To do this, you can click 3 times on the last line of text in the cell. Now press and hold the Ctrl key (it is located on the keyboard at the bottom left), do not let go, grab the selected text and drag it to the adjacent cell. Now you can select and drag already 2 cells. After that, 4 and so on until the entire table is filled.
Now your business card in Word is ready to be printed. Take thick paper, print a business card as usual.
Carefully cut out the business card along the borders. That's it, your free business cards are ready.
I hope you understand that business cards made in this way often look artisanal and can only be used in emergency cases when there is no time or money to order normal business cards from a printer.
And in order not to bother with the Word, use the Business Card Master program to create business cards and badges. To prepare a high-quality business card, you just need to enter your contact details, select a template and print the required amount.
Including not quite trivial ones, as for a regular text editor. In Word, you can not only work with documents, write scientific papers, articles or reports, but also, for example, create your own business card. Although in our time they are not used as often as before, but still it is convenient and has not completely outlived its usefulness. There are more advanced graphic editor, which allow you to draw a card much better, but such programs are not cheap, and to work in them you need to have special knowledge. In Word, you can make a pretty decent business card in a few minutes. In this article, we will take a closer look at how to make a business card in Word. Let's figure it out. Go!
You can do many things in a text editor
You need to start by setting the page parameters. To do this, go to the "Layout" tab and set the margins to 1 cm or a little less. Next, you need to create a table. Open the "Insert" tab and create a 2x5 table, that is, 2 columns and 5 lines. The next step is to set the height and width parameters for the card. The standard values are 9 cm in width and 5 cm in height. You can skip this by making the card the size you want. Just keep in mind that all business card holders and special compartments in other accessories are designed specifically for this format. Let's set the required values. Select the table and open its properties. Going to the “String” tab, check the “Height” checkbox and enter the height value (in our case it is 5 cm). Then, in the "Column" tab, check the "Width" box and enter the appropriate number (for example, 9 cm). Do not forget to confirm the entered parameters.


After that, in the same table properties window, click on the "Parameters" button. There you need to set the margins of all cells by default to 0 cm. Next, remove unnecessary dividing lines, leaving only those along which you will cut business cards. You can make the borders light so that they are visible when you cut out the cards, but will be much less noticeable on the already made business card. To do this, select "Borders and Shading" in the "Format" section and select "All" in the "Type" section. Set any color, light colors. Set the width to a quarter centimeter.

Now that the base is done, let's move on to the text. Enter the full name, company name, position and contacts that you consider necessary to indicate. Text should be legible, so fancy fonts that can make letters difficult to recognize should not be used. Also, don't forget to indent so that all the information is not located right next to the borders.

After you have entered the text in the cell, you must fill in all the rest. This problem is solved by simple copying. To speed up the process, triple click on the cell with text, placing the cursor on the last line, and hold down Ctrl while holding the key, you can drag the selected text into the cell, then select two, four, six, and so on. This approach will greatly speed up the process if you are going to print a large number of cards. Please note that thick paper should be used for printing. It should be understood that creating a really beautiful and serious business card in Word will not work, and in this case it is better to contact the printing house.
This is how you can easily and quickly make your own business card in Word. Write in the comments if this article helped you and ask any questions you have on the topic discussed.


Flower party: a bouquet of positive emotions
Words of teachers in a congratulatory scene for parents
Who's Who by Relationship Her mother-in-law calls her mother-in-law mom
Your mother is my mother-in-law Riddle mother-in-law calls my mother-in-law
How to make a scene for a wedding “Three girls under the window Comic scene three girls