If you are using an inkjet or laser printer, you may need to clean the cartridge. At home, devices are often used irregularly, but despite this, they need proper care. Timely cleaning contributes to obtaining high quality printouts allows you to extend the life of the equipment. Do-it-yourself cleaning can be carried out in hot and cold ways. In order to carry it out in time, you should know the first signs of problems associated with cartridges.
The fact that there is a need to inspect inkjet cartridges is evidenced by a number of print defects, the main ones being:
- on proof printouts, patterns contain jagged or fuzzy lines;
- during operation of the device, ink blots appear on the sheets;
- one or more colors are missing when printing a test pattern;
- When photographs and other color images are taken, horizontal streaks form on the paper.
Poor print quality
The considered defects are typical for different models devices such as Epson, HP, Samsung, Canon. When the reboot does not help get rid of the unpleasant phenomenon, then you will need to clean the device cartridges. There are several reasons why you need to do this regularly:
- during downtime, it may happen that the paint in the nozzles has dried up, and it will need to be removed to remove blockages;
- dust from the air settles inside the printer, especially on the nodes covered with ink - the print head, cartridges.

For laser devices, cleaning is carried out when replacing the toner. At the same time, old paint and other contaminants are removed from the cartridge. The work is carried out with the help of napkins, cloth or brush without lint. An important point is to keep the electrical contacts clean. Works are performed according to certain algorithms and do not require special skills.
Cleaning algorithm
Many jets are equipped with built-in automatic cleaning programs. To carry it out, proceed as follows:
- open the control panel;
- go to the settings of the printing equipment;
- there they select the required section - “Tools and cleaning the cartridge”;
- make a test printout of a blank sheet.


The operation can be repeated several times. Built-in tools allow you to get rid of minor contaminants.
If the function is missing, then you can download the program from a disk or the Internet and install it. Then, in the print settings, select the “Printer Maintenance” section, then you need to open the print settings, start cleaning. In this case, follow the instructions of the program. Most often, the procedure needs to be performed repeatedly.

When the software method did not help, then there are several other ways to get rid of the problem. For different models of inkjet technology, the algorithms are the same, only the way to access the cartridges is different. To do this, you may need a set of screwdrivers with different nozzles.
The scheme of work, regardless of the chosen cleaning method, is as follows:
- removing the cartridge;
- soaking;
- washing;
- drying;
- refueling;
- installation in the printer;
- control printout.
It is necessary to work carefully so as not to smear the surrounding objects, clothes with ink.
cold way
To implement the cold method, you will need to stock up on such available tools and materials:
- rubber gloves (medical);
- syringe;
- napkins (cloth) made of paper or cotton;
- clean water;
- pipette;
- special glass cleaner, which includes isopropyl alcohol or ethylene glycol.

An example of a suitable detergent is "Mr. Muscle", "Mr. Shine".
The whole process takes place in the following sequence:
- remove the cartridge from the printer;

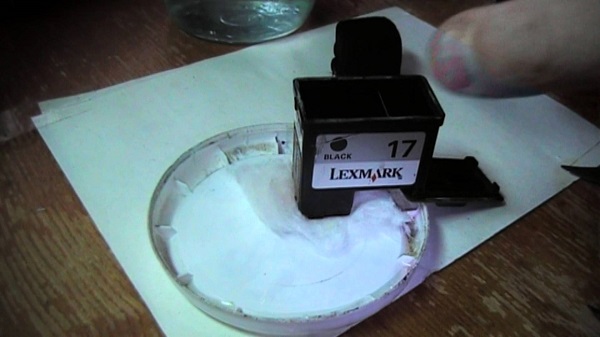
- place it with nozzles up (on a specially laid fabric);
- a few drops of cleaning liquid are applied to them using a pipette;
- wait about 10 minutes;
- then wet the nozzles with a napkin, wipe them dry with a cotton cloth.

You may need a screwdriver to remove it, depending on the model of the device you are using.
The manipulations discussed above are not always enough. If the nozzles remain clogged, then the operation is continued:
- take a small container;
- fill it with cleaning liquid, pouring approximately a layer of 3 mm;
- immersed in the composition of the nozzle;

- keep them in liquid for 3 hours;
- take out and wipe dry.
After wiping the nozzles of the cartridge located in the working position with a cloth, it should stay ink trail, which is a characteristic result of complete cleaning. As a container for a detergent composition, an ordinary plastic lid from a can is suitable.

If the above actions did not lead to the desired result, then proceed as follows:
- prepare a silicone or rubber plug designed to close the air intake hole located on the top cover of the cartridge;
- pulling the piston, fill the syringe with the contents of the atmosphere;
- put a cut-out plug on the needle;
- insert it into the air intake;
- pressing on the syringe plunger, squeeze out air.

The dried dye is then squeezed out of the nozzles by the formed high blood pressure. After the cartridge to be cleaned is wiped, refilled and inserted into place inside the device. A printout of the template checks the quality of the cleaning.
hot method
If the cartridge is dry, then you can also use the hot method, when preliminary wiping with napkins did not give the desired result. In this case, the algorithm of actions is as follows:
- the bottom of a small container is covered with hot water;
- immerse nozzles in it;
- change the water without waiting for it to cool;
- the procedure is repeated until the staining stops;
- then, the detergent used is poured into the dishes used, mixed with water, based on a ratio of 1 to 1;

- the bottom of the cartridge is left for a couple of hours in solution;
- after the cartridges are washed using hot water for this, then dried;
- check the permeability of the ink by wiping the nozzles located in the position for work with a napkin;

- when the result is unsatisfactory, then all the manipulations are repeated again.
You can also purge with a syringe the way described above.
There are special liquids for removing dried ink on the market. They are divided even by types of cartridges, but the scheme of working with them is the same.

When cleaning the cartridge, no complicated manipulations are required, but the procedure itself is quite laborious. The easiest option during independent work is the use of special built-in programs. If none of the considered methods leads to the desired result, then it is necessary to remove contamination from the equipment units involved in printing. When this does not help, you should contact the service center specialists. They will accurately determine the cause of the problem, advise options for its elimination.
It is important for a specialist repairing copying equipment, and simply using it, to know that it is strictly forbidden to clean an organic photoreceptor with any substances that are not specially designed for this. Alcohol, and even more so acetone, even in small quantities on the coating of the drum unit, can irreversibly damage it, leaving permanent spots that will appear on copies as completely white areas or areas of reduced image contrast. Sometimes such damage can be repaired by polishing the photoconductor, but in many cases the drum will need to be replaced with a new one.
Users are generally prohibited from touching the surface of the photoconductor or attempting to clean it. Professionals are advised to remove light soiling with a soft, dry cloth, completely clean or dusted with new, unused toner. In this case, the rag should move in a direction perpendicular to the direction of rotation of the drum, only slightly pressing on its surface.
To remove more serious dirt, as well as small scratches on the photoreceptor layer, you can use special pastes for polishing organic drums. It is advisable to use only those pastes, on the packaging of which it is directly indicated that they are suitable for drums. specific copier models. In second place are pastes produced for the equipment of certain manufacturers: if it is written on a tube of paste that it can be used with Sharp equipment, then most likely everything, the paste will fit almostfor all devices this firm.
Photoreceptors of many models are absolutely identical in their chemical and physical properties and, as a rule, there are no special problems with compatibility. For example, a polishing slurry sold under the Pride, Quality, Consistence trademark (the logo is six multi-colored triangles) is suitable for many copiers and is intended for laser printers EPL/HP Illsi.
Meanwhile, it should be remembered that some exotic photoconductors either require a special composition of polishing cream, or do not tolerate any polishing and cleaning agents at all. In this case, any attempt to apply other compounds may lead to the final loss of their working properties. Usually this is not very scary, since polishing the photoconductor is resorted to as a last resort, designed to at least slightly extend the life of a part that has already worked out its resource.
Polishing should be done as follows:
1. Prepare some clean rags from a soft cloth that will not lose fibers during wiping, and a tube of polishing cream.
2. Remove the drum cartridge from the copier.
3. Remove the photoconductor from the cartridge.
4. Wipe the drum to remove possible toner residues, paper fibers, dust and adhering dirt. To do this, you can moisten one of the rags in warm water and then wipe the drum dry.
5. Apply polishing cream to a cloth and spread evenly, in a thin layer over the surface of the drum. Lightly rub the paste into the photoreceptor and leave to dry for two to three minutes.
6. Set the drum vertically, firmly pressing it with the end surface against the table. Take the same
cloth and carefully, pressing hard, rub the paste into the surface of the drum.
7. Continue doing this until the cream is absorbed into the photoreceptor and the surface is shiny.
If too much cream has been applied, its residues on the surface cannot be completely
get rid of. In this case, remove the excess with a damp cloth, and then wipe
dry drum.
The polished surface should shine a lot. If the gloss is not sufficient, or spots or minor scratches remain on the surface, then steps 5-7 of this procedure should be repeated. Next, you need to install the photoconductor in the cartridge and return the cartridge to the machine. Check copy quality. If it is still low, a decision must be made whether to repeat the procedure or consider the damage to the photoreceptor too significant to be repaired by polishing.
The most important step in refilling and restoring laser printer cartridges is cleaning laser printer cartridges from old toner and various other contaminants.
The print quality of a refilled remanufactured cartridge largely depends on how carefully and with the observance of technology the cleaning procedure was carried out. A lot depends on the tool used during the work, auxiliary equipment and materials.
Today, there are hundreds of different cleaning products that promise to improve efficiency when remanufacturing and refilling laser printer cartridges, extend the life of the components they are designed to clean, but in practice, the best results are achieved by using only dry, ionized, filtered compressed air, which can be considered the main cleaning agent. The less you actively work on the components of the cartridges, the better, because in this case they beneficial features are not subject to any undesirable changes. The cartridge is a complex system interconnected components, so it is very important to maintain the original balance of the entire system and the properties of its individual components, as long as possible. Rude and incorrect cleaning the laser printer cartridge usually has the opposite effect and adversely affects the quality of the functioning of the entire system. Effective cleaning should prevent breakdowns and maintain the optimal balance of the entire system. Cleaning with dry ionized filtered compressed air is recommended for all types of cartridges, as it does not have any chemical or mechanical effect on the components of the cartridge, if, of course, the cleaning is carried out correctly. Cleaning agents can accumulate or leave a residue, which is also harmful to the cartridge and its components (for example, the use of various types of solvents for cleaning doctor blades: chemical substances can leave a film on the squeegee, which can later get on both the photoreceptor and the primary charge roller). Therefore, the use of various cleaning, impregnating and covering agents in this kind of work is prohibited. Alcohol-based cleaners damage the surface of the photoconductor, magnetic roller, cleaning and dispensing blades, and the surface of some types of primary charge rollers. The components of the cartridge, having a direct relationship with the overall process of imaging, can affect the quality of the print. Thus, a change in the properties of the surfaces of individual components due to chemical or mechanical action, as a rule, significantly degrades the quality of subsequent printing.
Methods for cleaning laser printer cartridges
Compressed air- the most efficient and effective method cleaning all components of the cartridge. Due to the fact that you cover a larger area with a cleaning nozzle than when cleaning with a vacuum cleaner (when vacuum cleaning), it requires a minimum of time to complete the cleaning process (in addition, it is possible to direct air into narrow holes, which is impossible with vacuum cleaning). The fragile parts and materials used in cartridges, such as foam and felt, are difficult to clean without harming them. There are special requirements for the compressed air used: the oil and water contained in the air streams can be transferred to the parts of the cartridge, which can significantly increase the likelihood of printing problems. Static electricity can cause dust and toner to stick to the surface of the cartridge, from where they can be transferred from one part to another, contaminate the entire cartridge, and it will be extremely difficult to remove this toner and dust. But using dry, ionized compressed air, coupled with a suitable dust removal system, can significantly improve the efficiency and quality of the cleaning process (with the right nozzles and protective equipment).
Isopropyl alcohol when cleaning cartridges can be both useful and harmful. Harmless alcohol can be considered for electrical contacts and the saddle contact of the primary charge shaft - PCR. But the following can be damaged by alcohol: the magnetic roller, the drum unit, the PCR roller, polyurethane and silicone, from which the dosing and cleaning squeegee is made. For achievement best results, only 91-99% isopropyl alcohol should be used. Alcohol with a high water content takes much longer to spray and leaves the surface wet for a long time. Every time you use alcohol, you need to make sure that the surface of the parts of the cartridge is dry, and this must be done before pouring the toner and assembling the cartridge.
A vacuum cleaner is an alternative to dry ionized compressed air. It is necessary to use special brush nozzles and special nozzles for cleaning narrow gaps when cleaning. During cleaning, avoid touching the surfaces of the drum, magnetic roller, and PCR with the nozzles. But the vacuum cleaner has a significant drawback - when using it, it is easy to damage the fragile and sensitive components of the cartridge, various seals and gaskets, the return squeegee film, you can tear off and push out pieces of felt seals. In addition, the electrical contacts of the cartridge can be damaged. Applying too much pressure to the nozzle of the vacuum cleaner while cleaning the toner hopper through the hopper can easily bend the toner sensor rod or the axis of the toner mixing paddles. If the toner sensor rod (antenna) is bent away from the magnetic shaft, this will cause the toner low message to appear prematurely.
Lint-free cloths and brushes, lint-free soft cloths, and cotton lint-free brushes great for cleaning cartridge components. So-called toner wipes are impregnated with mineral oil, which can contaminate cartridge components and should not be used to clean the inside of the cartridge. To prevent chemical cleaners, oil and cotton fibers from soaking into the cartridge components, use only a dry, cotton-free cloth (toner wipes are only used to clean the outer surfaces of a fully assembled cartridge). Lint-free materials are very good for cleaning with alcohol or applying a conductive lubricant, but should not be reused afterwards.
Lubricating powders like "KYNAR"(domestic experts call them "photodrum talc") are produced by various manufacturers, but one of the most famous is the KYNAR lubricating powder (this is a fluorinated polymer). By dusting (sprinkling) the new drum unit and the new cleaning squeegee with lubricating powder before inserting them into the cartridge, you reduce the friction between them during the first rotations. Under no circumstances should lubricating powder be allowed to come into contact with the PCR. this may cause defects in the printed image. Even a small dot of lubricating powder on the surface of the PCR will cause the "repetitive black dots" defect.
When refilling the cartridge, make sure that all electrical contacts are free of dirt and toner. Dirt on the cartridge contacts can cause the magnetic roller and photoconductor to charge poorly. Contact cleaning is best done with 91-99% isopropyl alcohol and a lint-free cloth. Then a thin layer of conductive grease must be applied to the places where it was originally applied by the manufacturer.
Conductive grease used in most cartridges to reduce friction at electrical contact points. Lubricant application for each cartridge is different. For detailed information on the use of conductive grease, refer to cartridge refilling instructions, which are sometimes issued by manufacturers of compatible Supplies. When refilling a cartridge, you must remove the old lubricant brush or cloth that does not contain cotton fibers. Only then should a new lubricant be applied to the same surface. It must be applied very carefully. Lubrication should be applied in a thin layer, the thickness of which is comparable to the thickness of a notebook sheet.
|
Cartridge component |
Alternative cleaning method |
||
|
OPC drum |
Dry ionized compressed filtered air |
Toner wipes, topcoats, impregnators, polishes, alcohol, solvents of any type |
|
|
Primary charge shaft PCR |
Compressed air |
Toner wipes, topcoats, impregnators, polishes, alcohol, solvents of any type (including water-based) |
|
|
Magnetic shaft |
Compressed air |
Toner wipes, topcoats, impregnators, alcohol, solvents of any type |
|
|
Cleaning squeegee (Wiper Blade) |
Compressed air |
A lint-free cloth soaked in water and well wrung out |
|
|
Dosing squeegee (Doctor Blade) |
Compressed air |
A lint-free cloth soaked in water and well wrung out |
Toner wipes, pastes, alcohol-based top coats, alcohol, solvents of any type |
|
Electrical contacts |
Did the printer stop printing well? The primary cause is a clogged cartridge. Let's see how to clean the printer cartridge. First you need to define the printers themselves. Printing documents, photographs and other graphics is done using printers. They are of several types:
- jet;
- laser;
- matrix.
They differ in printing methods, speed and scope.
Inkjet printers use dot-matrix heads for printing. Distinctive feature is an expensive printer maintenance. Since inkjet printers have a fairly high consumption of ink, they are mainly used for home printing in small volumes. However, species inkjet printers- a great many. They are divided by type of ink and purpose. Here is some of them:
- office;
- interior - used for printing interior design;
- wide-format - used for printing advertising banners and other advertising inventory;
- marking - for application symbols for products, details;
- photo printers;
- souvenir - are used for printing on various kinds of souvenirs.
Laser printers
Without going into technological details, we can say that when printing, a photodrum is used that displays a dotted image. In terms of basic parameters, an inkjet printer is inferior to a laser printer.

At the laser printer high quality printing on any paper, lower maintenance costs, high print speed. Of the minuses, only a higher cost can be distinguished. But given that the maintenance of a laser printer is much cheaper, then this minus is compensated.
print cartridge
This special ink-filling device is used as a carrier for supplying ink to the printer's printing device. The print quality of the image directly depends on it.

If the cartridge is clogged, color reproduction and overall quality printing, individual colors may not be printed.
The difference between inkjet and laser printer cartridges
The cartridge of a laser printer is filled with toner - a powder consisting of a coloring matter and wax or similar elements.

Under the action of high temperatures, the heated powder is applied to the surface of the paper. An inkjet printer uses liquid ink to print.
How to clean the cartridge
The main thing - remember that when cleaning the cartridge yourself from contamination, other components of the printer may become unusable. This will greatly increase the time and cost of restoring the cartridge in a service center. Cleaning a cartridge is not the easiest and safest procedure for both you and the printer. If possible, it is better to purchase a new cartridge.

How to clean a laser printer cartridge? The powder that is refilled in the printer cartridge is hazardous to health. It has been proven that getting into the respiratory tract, the toner can cause about a dozen different diseases. Therefore, when cleaning the cartridge yourself, do not open windows or doors to prevent the toner from being scattered. Use respiratory protective equipment. First of all, it is worth trying to use the software utility of the printer itself. It provides the ability to clean the printer cartridge. If this does not help, then there are several ways to clean it up.

Chemical soak. If you decide to do the cleaning yourself, then first remove the cartridge from the printer. Then take a container with a lid, pour 1 cm of glass cleaner into it and lower the cartridge into the liquid. Assuming it hasn't been used. for a long time, dilute the liquid with water in a ratio of one to one. Close the container tightly with a lid and leave for 12 hours. The cleaning indicator will be a darkened liquid inside the container. After the cleaning period, remove the cartridge from the container and check. Attach the printing part of the cartridge to the paper: if a clear, without blurring, black print (for a black cartridge) and blue, red, yellow prints (for a multi-colored cartridge) are printed, then the cartridge is clean.
Hot evaporation. Perhaps the easiest method to clean the cartridge. When using this method, special equipment and a long period of time are not required. Take out the cartridge. Boil water until steam appears. The cartridge must be held over hot steam for about 5 seconds. Then, as with chemical soaking, the cartridge is checked by the print side on the paper. If poor-quality prints are obtained on paper, the procedure must be repeated. Although the method is simple, it can have negative consequences. If the cartridge is overexposed to steam, then there is a high risk of parts peeling.
Washing with a special clip. The most effective cleaning method, but also the most expensive, since you need to purchase a special cleaning clip. First, the cartridge is filled with window cleaner and water in a one-to-one ratio. Then the mixture of water, glass cleaner and ink is sucked out of the cartridge with a special clip. After sucking out the remaining ink, you should check the print quality in the same way as in other methods.

How to clean the cartridge "Samsung ML-1520". It is necessary to unscrew 5 screws, unfasten the latch with a screwdriver or other flat object and disassemble the cartridge. Next, you need to unscrew the three screws on both sides and remove the fasteners. After - unscrew the two screws holding the photoconductor and remove it. Removed image drum should be immediately removed to a dark place. Next, you need to remove the magnetic shaft and clean the inside of the cartridge. Cleaning is over, now we assemble everything in the reverse order, refill with toner and make a test print.
How to clean an inkjet printer cartridge
How to clean HP inkjet cartridge and Canon inkjet cartridge. There are several ways to clean the inkjet cartridge. We will consider only the most effective of them.
Burial. The cartridge is removed from the printer and placed with the nozzle up. A small amount of cleaning agent should be applied to the nozzles. It could be special remedy cartridge cleaner or regular window cleaner. In this position, the cartridge should stand for about 20 minutes. Then the surface of the cartridge is wiped with a dry cloth and checked during printing.

Air cleaning. For such cleaning, you will need a syringe with a needle. We draw air into the syringe, insert the needle into the filling hole, and then press the piston. The ink should come out of the cartridge nozzle under air pressure.
Maceration. The cartridge is removed from the printer and immersed in distilled water or a special liquid for cleaning the cartridge. It is put into the water in the same position as it was in the printer. It is necessary to leave the cartridge in the liquid for a period of a couple of hours to a couple of days.

How to clean a dried HP cartridge and a dried Canon cartridge. When drying a cartridge that has been left unused for a long time, special methods are used that are suitable only for a dried cartridge. They are mainly associated with the influence of high temperatures. Evaporation is one such method.

Evaporation. We prepare a shallow container and boiling water. Pour boiling water into a container by 1 cm. Without waiting for the water to cool, dip the cartridge into boiling water in the position in which it stands in the printer. We dip for 30 seconds, no more. We repeat the procedure 3 times. In this case, the cartridge must be refilled. Then we take the cartridge out of the liquid, dry it with napkins, immediately place it in the printer and make several test prints at the highest quality.
How to clean the printer drum
Another cause of poor print quality can be a clogged photoconductor. Power off the printer, unplug all cables, remove the cartridge, and remove the photoconductor from the printer. Place a bad print sample in front of the photoconductor to determine the exact location of the bad print. Having found a place, clean it with a dry cleaner: cotton, napkin, cloth. After cleaning, reassemble the cartridge and insert it into the printer.

Important! When cleaning the drum unit, do not touch it with fingers or sharp objects. The surface of the photoconductor is sensitive to damage.
How to refill a cartridge
After any cleaning of the cartridge, you need to refill the cartridge. The easiest solution would be to take the cartridge for refilling. If you want to refill the cartridge yourself, do not forget that this is not an easy procedure. By the way, the manufacturers of cartridges themselves do not produce funds for their refilling. Inkjet and laser cartridges are refilled in different ways.

How to refill an ink cartridge. First of all, get high-quality paint. Poor-quality ink entails drying of the cartridge and repeated cleaning procedure. Take an ordinary syringe and fill it with paint. There is a small hole on the surface of the cartridge, often covered with a sticker. Peel it off without breaking the integrity, and fill the contents of the syringe into the cartridge. Then stick the sticker in place - if you do not close the hole, the paint will simply pour out.

How to refill a laser printer cartridge. It is worth recalling that the powder used by laser printers is hazardous to health, and you should refill the laser printer cartridge in an unventilated area using respiratory protection.
- If you are not sure of your capabilities, then it is better to take the cartridge to a special service center.
- First of all, purchase a special powder used as a paint. Then cover the surface on which you will fill the cartridge with film or paper to prevent powder from getting on the table or carpet.
- There are models of cartridges with a special cover behind the side mount. Under this cover, you need to fill in the powder, and the filling is finished. In the absence of a cover, a complete disassembly of the cartridge is necessary.
Although in words cleaning and refilling the cartridge are simple procedures, their implementation requires a long time, and in some cases special equipment. Therefore, the most correct and safest decision would be to take the cartridge to a service center for refilling. To prevent the ink inside the cartridge from drying out, frequent printing and timely refilling is necessary. Some cartridges may simply not be cleanable due to complete drying. In this case, it is much easier to purchase a new cartridge than to torture the old one.
Any technique needs care and maintenance, and the one that uses dyes - especially. Printing devices should be cleaned at least once a month, and sometimes more often. Cleaning the printer is not as difficult as it might seem at first glance. Any owner can handle this. We will now describe how this is done.
Printer types
Printing devices that are used at home and in the office are of three types:
- matrix;
- jet;
- laser.
Matrix
Dot matrix printers appeared earlier than others. They printed slowly and noisily, The image on paper was obtained from individual dots.
The head consisted of individual needles, and when washing, every little thing had to be manually processed.
Important! Such printers have practically gone out of use, they were replaced by more advanced devices - inkjet and laser.

Inkjet
An inkjet printer is similar to a matrix printer, the image is also created from dots, but instead of needles, a matrix is \u200b\u200bused that prints with liquid ink. Such a device prints rather slowly (although faster than its predecessor), but very high quality. Ink jets are also not the same, respectively - cleaning the printer will be somewhat different, although in general the algorithm is the same.
They use different technologies:
- continuous ink supply;
- filing on demand;
- piezoelectric;
- thermal.
The differences here are as follows:
- In the first case, the dye is supplied to the paper constantly and under pressure, the flow breaks at the exit.
- Filing on demand is the most common technology. Ink is supplied only during printing.
- In the piezoelectric method, a piezoelectric crystal with a diaphragm is located above the nozzle.
- When a current is applied, the crystal bends, tightens the diaphragm - as a result, a drop is obtained, which is pushed onto the sheet.
- Finally, with the thermal method, a mini-heating element is located in the nozzle. Under the influence of current, it instantly heats up to a very high temperature (500 ° C), as a result, bubbles form in the ink, which push the drops onto the sheet.
Important! The main disadvantage of inkjet printers is that prints are afraid of water, which must be taken into account when cleaning this type of printer is planned.

Laser
The laser printer is the fastest. Many printers give a fairly high quality print. Such a printer is in many ways akin to a copier. Printing occurs due to photo exposure: a laser beam illuminates photosensitive elements. How the laser printer cartridge is cleaned, we will consider a little lower in the text.
As for ink transfer methods, there are three of them:
- two-component;
- two-component mixed;
- one-component.
Important! In a two-component system, the dust particles of toner that should fall on the paper stick to the particles of the developer - a special magnetic powder. This happens in the development unit. The developer particles are charged by rubbing against each other. In a two-component mixed system the toner and developer are already mixed. With a single-component supply, dyes are used, the dust particles of which already have magnetic properties.
When should you clean your printer?
It is necessary to wipe the case regularly so that dust does not accumulate on it. As for cartridges, then:
- In inkjet printers, they are cleaned if the ink is dry.
- The laser printer should be serviced at least once a month, and if you have to print a lot, then more often. It also depends on the device model.
Important! Inept cleaning of the printer often leads to breakdowns. So, if you are not very sure that you figured out how this is done, it is better to contact the service center. Unfortunately, not all manufacturers complete their products with clear instructions, in which the entire procedure would be described to the smallest detail.

General security measures
Before you start servicing a laser printer, remember what you absolutely cannot do:
- use chemical and organic solvents to clean internal cavities and external elements;
- apply acids;
- intensive use of liquid detergents;
- unscrew the parts screwed with screws;
- service the device included in the network, as well as not having time to cool down;
- subject the printer to mechanical stress, such as shock and vibration;
- print immediately after cleaning.
Important! Before cleaning, leave the device alone for twenty minutes to cool it down. After cleaning, wait about an hour before you start typing.

We clean the body
The body of the device must be kept clean. In order to put it in order, you will need a damp cloth. It is better to buy special wipes for printers, but if suddenly they are not at hand, you can use the usual hygienic:
- Wipe the body.
- Process the paper tray.
- Clear the controls.
- Wipe out the output tray.
- Wipe all surfaces with a dry cloth.
Important! If there are no wipes, you can clean the case with a damp cloth, but one that does not leave lint. Microfiber is very suitable.
How to remove stains?
Important! Do not use abrasive products!

Cleaning the laser printer cartridge
The cartridge is the most important part, and at the same time, the most vulnerable. This part of the printer naturally needs to be cleaned the most. There are several ways to clean up a cartridge:
- with the help of special programs;
- with special liquids.
Cleaning software
When you bought a new printer, you probably noticed that a disc was included with it. It contains a manual, instructions, drivers, as well as an installation program. This is what you need right now:
- Run the program on your computer.
- Find the "Toolbar" tab in the menu.
- Locate the "Clean Cartridges" tab.
- Then the device will do everything without you.

Cleaning with liquids
Even if you keep an eye on your device and programmatically clean your laser printer cartridges, there comes a time when it's best to wash them. You need:
- plastic container with a flat bottom;
- fabric that absorbs water well;
- printer cleaning kit
Important! You can take any container, which you can then safely throw away - a one-time plate, for example, or a one-time food container. An ordinary bandage is suitable as a rag. As for the cleaning kit, you can buy it at any computer store. They are of two types:
- standard;
- aggressive.
If the heads are relatively clean, a standard set will do; if they are very dirty, an aggressive one.

Cleaning the laser printer cartridge is carried out using these tools in the following way:
- Pour the liquid cleaner into a container.
- Wet a cloth with plain water.
- Wipe the bottom of the head.
- Moisten another flap with service fluid.
- Wipe the entire head along the contour of the nozzles.
- Use dry gauze to remove the seal from the ink tank.
- Rinse it with running water.
- Put the seal in place.
Important! Try not to touch the nozzles with a rag - the printing elements on the head. Nozzles must not be contaminated with liquid.

We clean the head from the inside and the nozzle
Cleaning the outside is not even half the battle. The most important thing is still ahead of you. Let's start cleaning the inside of the head:
- Place gauze folded in several layers under the head.
- Heat up the service fluid to approximately 55°C.
- Take the syringe from the kit and draw liquid into it.
- Apply a few drops to the intake fittings.
- Continue rinsing until traces of ink remain on the gauze (the gauze must be changed periodically).
- When the marks on the gauze stop appearing, the flushing will end.

Cleaning the printer drum
The photoconductor, also known as a photoreceptor or just a drum, is the main part of the cartridge. If, God forbid, scratches or stripes appear on its surface, you will have to say goodbye to the dream of high-quality printing. Before you start putting in order this most important detail, which is called the “heart” of the cartridge for a reason, you need to figure out how it works.
The drum is a selenium coated roller. It is usually blue or light green in color. The principle of its work looks something like this:
- An image is projected onto the selenium coating.
- Toner gets into the exposed area.
- The drum transfers the toner onto the paper.
- The toner melts and sticks.
Important! Up to 12,000 pages can be printed on one drum unit - this is a fairly solid resource. However, quite often the roller fails much earlier. Service life is affected by:
- toner type;
- type and quality of paper;
- humidity;
- compliance with the temperature regime in the room.
If the printer is new, the drum does not need to be cleaned. It will do it for you special device- squeegee. This is a blade that wears out over time and stops removing ink.
Of course, foreign objects should not fall into the drum - most often these are paper clips. The roller must be cleaned periodically, and if dots and dashes appear on the paper, the process must be carried out immediately. This element should be put in order immediately after the cartridge is refilled.
Important! Use ink from the same brand as the drum unit.

We start cleaning
The photoconductor is serviced only manually - there is no software way:
- Turn off the printer.
- Open the front cover (there is a special button on the case).
- Lower the blocker, which is located on the left.
- Take out the cartridge. Find out how it goes.
- Move the curtain.
- Take the drum by the ends.
- Gently turn without touching the selenium surface with your hands.
- Put the roller on Blank sheet paper.
- Wipe the surface with a lint-free swab or wet wipe.
- If you used a napkin, wipe the part dry.
- Replace the drum by pressing it until it clicks.
Important! Do not clean the drum unit in bright light, as this may cause serious damage to the photocells. And do not use detergents containing alcohol or ammonia.
Daily maintenance
The printer needs more than just general cleaning. It needs to be serviced constantly.
- Once a week, wipe the case with a damp cloth, especially if there is a lot of dust in the room.
- Periodically clean the printer cartridges programmatically.

Cleaning the inside of the printer
Prepare everything you need to get started. It is very important to ensure that the material with which you will wipe the parts is free of lint.
You will need:
- special swabs for the printer;
- large format paper (you can take newspapers);
- respirator;
- latex gloves;
- special napkins;
- a vacuum cleaner;
- soft brush;
- isopropyl alcohol.
Important! You can also use regular lint-free tampons, but special tampons are more convenient because their holders are longer.
Safety
Cleaning is a dirty process when particles of various substances appear in the air that a person inhales. The risk of such particles entering the lungs should be reduced by:
- Take out the rest of the paper.
- Turn off the printer and let it cool down.
- Close doors and windows in the room to prevent air circulation.
- If you are using an air conditioner or fan, turn off appliances.
- Put on a respirator and gloves.

Sequencing
Work must be carried out on a flat surface. If you are doing this on a table, it is better to cover it with something - newspapers, pieces of wallpaper, etc.
- Put the device on the newspaper.
- Open the printer and take out the cartridge.
- Start stretching the paper towel designed to clean the printer.
- Wipe the cartridge.
- Lay it down on a clean rag.
- Clean the inside of the printer with a vacuum cleaner or wipe with a swab moistened with isopropyl alcohol.
- Use a soft brush to clean any loose parts.
- After everything is cleaned, put the cartridge back in place.
- Close the lid.
- Connect a printer.
- After a while, run a test print.
Important! The vacuum cleaner must be powerful, you need to keep the nozzle at some distance so that it collects toner particles well, but does not touch the printer fragments. But it is better to use a toner-vacuum.

You can just wipe
If you are afraid to use a vacuum cleaner, clean the inside of the printer with a cotton swab soaked in isopropyl alcohol. This is a gentle, albeit more laborious, option. But there is a guarantee that you will not damage the numerous fragile wiring that your unit is downright stuffed with.
Important! It is necessary to carry out a tampon carefully, without any pressure.
Cleaning an inkjet printer cartridge
The inkjet cartridge is usually cleaned when the printer has been idle for a very long time. Sometimes you have to buy a new one, and for some models cleaning the cartridges is not possible at all. But in most cases it makes sense to try.
Make sure the electrical contacts are free of dirt and ink first. Prepare necessary materials and tools:
- glass cleaner “Master Shine”;
- distilled water;
- vise;
- pliers;
- napkins.
Important! As a result of untimely refueling or prolonged downtime of equipment, the cartridge may dry out. On our website useful tips we have prepared a separate review, where we collected better ways.

During operation, the cartridge must be stationary. Therefore, it is necessary to carry out cleaning in the following sequence:
- Secure the print head in a vise.
- Remove the cover with pliers.
- Dilute glass cleaner with water in a 1:1 ratio.
- Refill the cartridge.
- Drain the liquid.
- Rinse the cartridge with hot water.
- Repeat rinsing until the water runs clear.
- Blow out the hull.
- Rinse the cartridge with distilled water.
- Blow again.
- Put on a sponge.
- Refill the cartridge.
- Remove excess toner with a syringe.
- Close and secure the lid.


How to disable ads on Android: remove pop-up ads
The Russian received a term and a million fine for "piracy Negative consequences of the law
Identification of key factors
The criteria for classifying organizations and individual entrepreneurs as small and medium-sized businesses have changed
See what "Royalty" is in other dictionaries Pitfalls of legislation