Multi-colored ice balls can serve as an excellent material for any art object. You can simply scatter them in the garden or in the yard, around the territory kindergarten, or build or decorate some kind of structure, make snowmen (especially if you freeze water in rubber gloves), etc. We settled on the construction of a colorful pyramid of 400 ice balls.
This is my second and I hope not my last post in this community. In autumn, with the volunteers of the city of Glazov (Udmurtia), we added bright colors to the gray everyday life of the city, and now we have taken on winter street art.
We chose a city park as the location for our winter art object. Firstly, there are more children here, and secondly, there is the House of Sports nearby where you can get water for balls. We talked with the heads of organizations - they gladly agreed to help us.
Where did the idea come from? Surely, many have come across a guide to making ice balls with the addition of food coloring more than once. 
According to the "recipe" everything turns out easily and simply. In reality, it turned out to be much more difficult. But as always. Firstly, nowhere is it indicated how long the ball freezes? How much water should be poured, the better to tint? It turned out, no matter how ridiculous and trite it may sound, but the ball is filled with water only under pressure - it will not work to go outside with a funnel and a "one and a half". All that remains is a faucet or a hose with water. Well, a number of subtleties that we encountered in the process.
For example, the size - it is impossible to freeze a ball of large volume (3-4 liters). At t -20, only a layer of 5-6 centimeters freezes overnight. Inside is water. She also begins to freeze, but later, and bursts the ice "shell" - the ball cracks. It was also a mistake to bury the ball under the snow - in such a "house" it hardly freezes.
Here is an example of a 3-liter ball that spent the whole night under the snow. In principle, very "working" hemispheres turned out - you can use it as a vase for Christmas tree branches, or turn it upside down, and place a lamp under it - it will be beautiful.
Through trial and error, we decided to settle on balls measuring 10 * 10 - 15 * 15 centimeters. They froze overnight in the freezer.
So, we share our method of making ice balls.
1. First of all, we prepared a gouache concentrate - 1 can per 1.5 liters.
2. Through the funnel, pour the concentrate into the ball "to the brim". You can use food coloring, in case there's a good chance someone decides to taste the giant lollipops. We took ordinary balls. You can freeze balls in the shape of Mickey Mouse, various animals, or rubber gloves (I personally froze a glove from a package of hair dye - it turned out a funny hand that can be attached to a snowman in wet snow).
3. Then we put it on the tap and "inflate". The two are more convenient: one clamps the ball to the tap, the second turns the water on / off. They tied the ball without ropes and other things - with a loop from the neck itself (or whatever it is called there)
4. At first we wanted to fill the balloons right on the street by connecting to the tap of the Sports House and bringing the hose out into the street - but the hose was frozen, we steamed it for an hour and a half, then we decided to fill it right in the toilet and drive it to the place with a wheelbarrow. So it is more economical in terms of water consumption, and more comfortable in the heat than in the cold at -25.
6. Therefore, they froze right in the park, spreading the balls in the snow. We tried not to deepen too much and place them so that the balls did not touch each other.
7. Filled the balls for two hours. During this time, the first batch was covered with a crust. Left it for another 2 hours. When they arrived, they found that the balls freeze perfectly from above, but from below, where they come into contact with snow, there is water. Conclusion - in order for the balls to freeze faster and better, they must be turned over after a couple of hours, and even better, minimize the area of \u200b\u200bcontact with snow.
Having turned over all the balls, we decided to leave them for the night, covering them from the children with snow.
However, this did not help - several juvenile vandals remembered where they saw a multi-colored carpet during the day and, having unearthed the balls, began to throw them. Fortunately, the park workers drove them away in time.
8. Most of the balls still survived. The next day they began to dig them out and, after holding a little more in the cold, take off their "clothes". Rubber is removed very easily - just tear it with a knife, keys or a stick. Some balls did not freeze to the end - they only took off their "clothes", as water poured out of them.
9. You can do anything with the received balls. These are both beautiful self-sufficient decorations and excellent building materials. Our choice fell on the construction of the pyramid.
We fix the first level with snow - so as not to disperse.
We pour water over each level - otherwise the structure will move apart due to the unevenness of the balls.
It is a pity that there was no normal camera at hand - they were filmed on the phone. But not every camera, or rather a photographer, will convey the magical play of reflections of lanterns and garlands on the edges of ice balls. And what a beauty during the day.
It was only later that the idea dawned on us that the frame of the pyramid could be made of snow, only by placing the balls on the outside. So the pyramid would have turned out 5 times more. Well, that's for next year.
There is still a week before the New Year, followed by the Christmas holidays - we hope you will take into account our experience and our mistakes, adding your ideas!
Successful creativity!
Original taken from vodolei_idei in "Ice Ideas" with your own hands
Ice is a whole world of entertainment in winter. Ice is beautiful. Ice is creative.
Ice is room for imagination and original ideas. Tableware, decor, games, candles and lamps, houses...
Something I'll try to tell you...
Ice is frozen water. Can you put flowers there? Someone came up with this idea - to put a rose in ice vase
- it will melt, gradually opening the flower ... romantic ... But only for a winter party.
Follow the link - description http://pastelwhite.com/2012/12/23/diy-frozen-roses/
Ice Wreath.
A regular cake mold will do to make it.
They will look bright and elegant in a winter snow garden.
But you can decorate them not only with a winter garden, but also use them as a decoration for a festive table.
In order for the "stuffing" to shine through the ice beautifully, it must be transparent.
HOW TO MAKE ICE TRANSPARENT AT HOME?
But "muddy" opaque ice is also effective. Such ice can be made ice buckets for champagne and lamps for candles.
Transparent and opaque ice can be combined to achieve the desired effect, as in the bottom photo.
This is such a "wreath - candlestick".
You can freeze inside any filling - for example, shells.
original openwork candle can be done with ice.
ICE FLASHLIGHT FOR THE STREET
The craft of ice lanterns is that the water near the walls freezes faster than inside.
Therefore, when a sufficient layer of ice has frozen, the excess water is simply drained.
To supplement it with something or not - the creator decides)
ICE WARE
Almost by the same principle, you can make ice glasses. 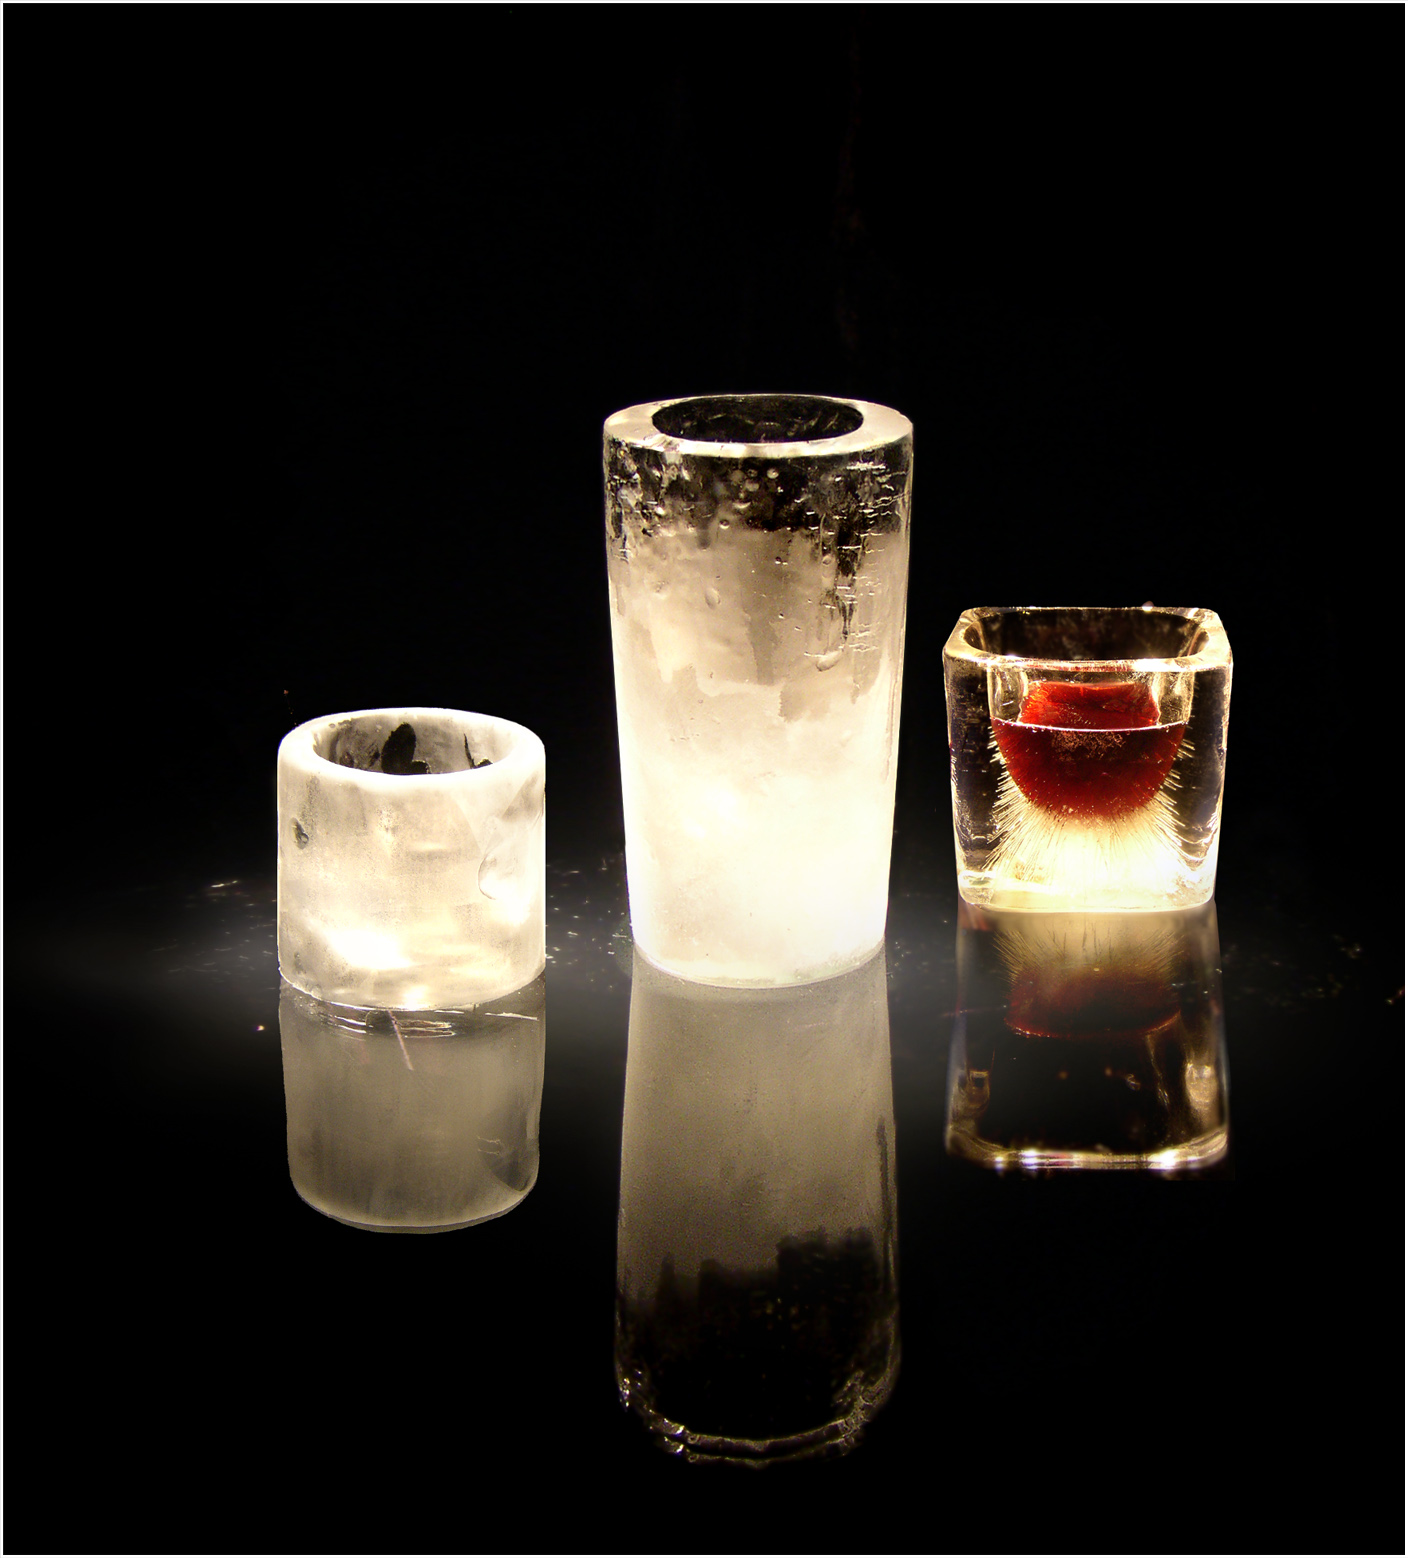
Containers for caviar from ice.
Ice dish for fruit it’s also easy to do - the shapes of a 5-liter water container are recognized, and the technology is the same: poured - froze - drained excess water.
And these summer ice containers with walls of flowers and herbs are unusually good, and just as simple in execution.
Cremanka for ice cream. What a beauty)))
Different containers, different fillings, different uses.
By the way, the bottle does not have to be frozen - you can do ice stand under her.
Two containers of different diameters: the smaller one should correspond to the size of the bottle and be heavy (you need to fill it with something) so that water does not push it out.
And here is a very laconic stand.
In general, iceware is already made to order, professionally.
Buffet ice table at the wedding.
JUST ICE CUBES
Ice cubes are the easiest thing to create. But ordinary cubes can also be made festive, original.
Cubes with rosebuds, for example.
Or with cherries.
Or - with berries cut into pieces?
Or - with fruit juice or puree.
Or - very gently - with flowers.
FIGURED ICE.
Ice figurines - the simplest ones - can be made by pouring it into disposable glasses or yogurt containers, adding dyes, berries and leaves, bright plastic toys of your choice.
And the thread must be frozen there - hung on branches.
A more complicated mold can be molded from foil.
And confess your love to your (your) beloved (beloved). Inexpensive and touching idea for Valentine's Day.
You can freeze ice in children's molds.

It’s not bad to freeze a snowflake inside or tint it.
Perfectly fit and different forms - for ice.
Yes, and just freeze a layer of water in a dish, put something there - it will turn out round ice pendant.
Inside is a frozen napkin.
Lime inside.
Pendant with orange and berries.
UNUSUAL FIGURES
By purchasing original forms, you can do, for example, ice rings.
Different forms - different figures.
But with the help of a rubber glove you can make famous Halloween ice hand.
For a cocktail.
For cold soup.
What about playing?
ICE PINS
Need:
9 plastic bottles filled with 0.5 - 1 liter of water,
1-3 balloons, a small amount of ink or other paint,
1 night of time for the skittles and balls to freeze.
Earlier in the publication "20 ideas for children's games with water" (http://website/20-idey-dlya-detskih-igr-s-vodoy) I already talked about an amazing ice crystal cocktail, but the cold season opens up the widest prospects on the use of colored ice in children's games. This element is able to add color and variety to any everyday outdoor activity.
The idea to use colored ice cubes for winter outdoor play first came to me a couple of years ago when my daughter was getting ready to participate in the New Year's festival. One of the points of the holiday was the modeling of a snowman, and the parents thought over the design of the figure in advance and prepared the inventory. Then I came up with the idea of making a glamorous snowman, the highlight of which was a necklace of multi-colored ice floes (of course, there was no thread, the icicles were simply pressed into the snow on the "breast" and around the "neck" of the woman). Since then, we have used colored ice many times in our outdoor games, and these activities are always a hit with the kids.
My husband's family sacredly honors the tradition of the Russian bath, while winter period becomes not an obstacle to passion, but rather an occasion to visit relatives with the end of the summer season. Until recently, there was a certain difficulty in entertaining children in the winter at the dacha or in the village, especially when you can’t run around the site and wallow in the snow because of the risk of damaging the plantings. But after my "enlightenment" with that snowman, it is no longer a problem to take fidgets. I just take a few trays of frozen tinted water with me, and arrange them on a bench or table on the veranda. I also give each mischievous person a spoon and a bowl (plastic or enameled) and they get down to business!

Perhaps my daughter's favorite game with these tools is a pastry shop where you can "bake" and decorate cakes. Even if the kid decides to taste such a tempting "lollipop" - it's okay, because I use food coloring. Things will go especially well if a lot of fresh snow falls the day before. Then the guys lay out colored patterns on a clean “carpet” or build a small snow castle, decorating the walls and turrets with precious “gems”. Playing with snow and colored ice can captivate children of all ages for an hour, which is just enough for adults to light a barbecue and melt a sauna.

For this, I had to work hard with the workpiece. building material. I collected all the ice cube freezer trays around the house, egg trays, and small food containers for storage. I turned out to have quite a lot of this stuff, but anyway, one batch of ice seemed not enough to me, and I had to use the molds several times.

You will need food coloring to color the ice cubes. At first I dripped a drop of dye into each cell, but in the end the crystals turned out to be too dark and gloomy, which I did not like. Then I diluted 5-7 drops of the concentrate into half a liter of water (it’s even more convenient to mix the base colors of the dye), and the result suited me. We pour colored water into molds and send it to the freezer for 8-12 hours (depending on the quantity and power). Then I just shook out the finished cubes into the freezer's common tray and reused the trays. So in two days I froze a large bag of multi-colored pieces of ice.

Once you've got enough ice, all you have to do is wait for good weather, which in the case of this game means... frost! I realize that at -20 there are few who want to swarm in the snow with children, but at temperatures around zero and above, it will not be possible to combine the ice into a single whole. Therefore, according to my feelings, a temperature of -10 degrees is ideal for creating a sculpture.
And so we once again came to relatives in the village. Seeing me with a large bag of colored ice, my sister-in-law asked how I was going to connect the cubes together, but I kept the intrigue.

The children and I chose a site and made a snow pedestal, and when everything was ready, I took out that very secret ingredient ... a bottle of ordinary water!
Every time you add a cube to your sculpture, put some water on the place where the pieces of ice meet, attach a new element and count to ten. Water will seize like glue and securely connect the cubes into a single composition. The kids and I worked at -5 degrees and some parts took more than 10 seconds to grab. The colder the day, the faster the water will freeze and the stronger your sculpture will be.

My little girl and her cousins, 7-9 years old, adequately accepted this creative challenge, and our new experience in creating large ice sculptures can be considered successful. The girls were delighted with the game and did not calm down until they used all the colored ice to the last. Let the first time turned out to be an abstract composition, but on the next visit we intend to create something meaningful.

We had a great time with the whole family, and it was clear from the faces of the children that they had not experienced so much fun and pleasure for a long time. Multi-colored ice crystals shimmered bewitchingly in the winter sun, and the whole composition looked very appetizing (as if a wonderful confectioner did not spare lollipops). By the way, our ice sculpture has been decorating the veranda of my grandmother's house for two weeks now, and continues to be a source of interest and compliments from guests and neighbors.

Teacher EFIMENKO ELENA ALEKSEEVNA.
Abstract of the experimental activity "Colored ice floes"
Experimentation with children of the middle group.
Purpose: In the process of experimenting, show children how water dissolves substances (paint, how at low temperature (cooling) water freezes, turns into ice. Consolidate knowledge of primary colors. To instill in children a desire to do something beautiful and unusual.
Course of the lesson: The teacher conducts a conversation about winter, its signs (cold, low temperature, snow, ice). To say that water freezes in the cold, cold, at low temperatures. And if you add paint to the water, then the water will turn into colored ice, which you can use to decorate the trees on the site ... We will use ordinary gouache for drawing.
Invite each child to add paint to the water and see if the color appears in the water? Ask what color the water has become? (color, green, red, yellow, blue). Why is the water colored? Pin colors
Pour all the molds with colored water, and put a thread in each mold. In the evening, take out all the figures with colored ice on a tray. Leave the molds with colored water on the site overnight. In the morning, pick up our molds with colored water. Show the children that the water froze and we got ice floes !!!
Ask the children the following questions: What are ice cubes made of? (water). Why are they colored? (added paint) .What are they in terms of temperature, why? (cold, because we left the molds outside in the cold overnight). And if the ice is put in a warm place? (they melt). Let the children understand that water freezes at low temperatures.
Put all the molds on the table and take out the ice cubes from the molds. Moisten the molds with hot water to make it easier to get the ice cubes out. The children are just delighted with this experiment.
The next day, we fixed the properties of water with the children, how we made colored water, why it froze and turned into ice. The parents were as delighted as their children, they promised the children at home to make the same colored garlands of ice! colored ice floes at home on winter holidays.


Ahead of the New Year and a garland of cones, complemented by woolen beads using the felting technique, will become an original decoration for your home to celebrate the holiday with your family. You can easily make such a New Year's craft with your children by following our master class.
Real home comfort is built from small things. And when these little things are created with your own hands and the hands of your favorite children, this is priceless. In addition to the aesthetic pleasure that such gizmos give, these joint classes creativity unites big and small, teaches patience and accuracy, develops artistic taste.
Autumn is rich not only with abundant harvests, but also with an endless variety of natural materials, from which it is so pleasant to make. I propose to choose a suitable day and dedicate it to family creativity! We will make a beautiful garland of woolen beads and cones.
For crafts, we need to prepare:
- Several beautiful pine cones;
- Coarse twine (such a rope can be found in any hardware store);
- Wool for felting;
- Soap;
- Large long needle;
- Glue.

Master class of New Year's garlands of cones
We will make a garland in two approaches. First we roll the beads. You can, of course, skip this step and buy ready-made ones. But we are interested in trying to do everything ourselves!
1) So, roll the beads. Tear off a small piece of wool.

2) We fluff it up, making it airy, like a cloud.

3) Gently rolling in the palms, we form a ball. We do not compress the ball, but only by slightly pressing, we give shape. You can fix the shape with a special felting needle.

4) Dilute soap in warm water.
Can be taken liquid soap or lather in ordinary water. I actually used a cap of baby shampoo.

5) We bathe our balls.

6) Squeezing lightly, we continue to twist the balls in the palms. You can roll the balls on a pimply film, which is used to pack equipment and fragile items.

7) You yourself will feel how they become denser and decrease in size. When the beads have reached the desired density, they will need to be rinsed in clean water, squeezed out and rolled a little more in the palms, fixing the shape.

8) We put still wet beads on a needle. You can put on several at once or, having pierced the beads with a needle, transfer them to a thin knitting needle.

9) The resulting "caterpillars" are left overnight on the battery. In the morning we remove the beads from the knitting needles and admire the result.

10) Now we move on to the second stage. We thread the twine into the eye of the needle and string the required number of beads on it.

11) This operation can also be entrusted to a child (not the smallest, of course), since it is difficult to prick with such a large needle.

12) Glue cones between the beads. If you are using Moment type glue, do this step without a child and ventilate the room well afterwards.

13) This is such a beauty!

14) Now cut off the excess rope.

15) Tie a knot at the end.

16) And we lower the nearest bead to it.

See also: How to make a hedgehog from a cone.
At the other end we form a loop. You can hang a garland for it.
Decorative garland of cones is ready!
DIY Christmas garland of snowflakes. Master class with step by step photos
DIY Christmas crafts for kindergarten
We decorate the site with parents. Christmas decoration from waste material.
Shmykova Svetlana Nikolaevna, educator, MBDOU - Kindergarten for Care and Rehabilitation No. 90, Yekaterinburg, Sverdlovsk Region.
Description: The material may be of interest to educators, teachers primary school parents, grandparents, older brothers and sisters.
The event was held in the preparatory school group of the kindergarten.
Purpose: decoration for a kindergarten site, for a Christmas tree in the yard or on the square.
Target: involve parents in joint activities with kids; learn to make crafts from waste material.
Tasks:
- to promote rapprochement between parents and children;
- to form in parents the desire to organize a joint creative activity with children using paper and waste material;
- create an atmosphere of preparation for the upcoming holiday;
- develop emotional positive family communication, the ability to find common interests and activities;
- continue to use new non-traditional forms of interaction with the family.
Materials and tools: a lid from a plastic bucket, a disk, a sheet of paper, scissors, a cutter, a pencil, an awl, threads (durable), containers from kinder surprises or caps from plastic bottles.
Preliminary work: preparing material on the number of children in a group, making invitation cards with children, making an announcement, posting an announcement on the OS website and sending out invitations via e-mail and SMS.
Giland is one of the main New Year's decorations. Let's decorate the yard, kindergarten, school, Christmas tree and try to make a garland from improvised material.
Manufacturing sequence:
1. We make a snowflake template. From a sheet of paper, cut out a circle according to the size of the lid.
Fold the circle in half 
then we bend so much that it remains half as much (we divide the semicircle into three parts, 
fold the folded part in half 
and bend the rest. 
Draw a ray of snowflake and cut it out. 

We draw a snowflake on the lid according to the template and cut it out with a cutter. (This work is done by an adult!) 
We string the cut out snowflakes on a rope - the first version of the garland is ready. 
Option 2.
With reverse side"snowflakes" you can paste old discs and 
snowflakes will "play" in the sun, from the light of lanterns and the rays of car headlights.
Option 3.
Tie colored caps to the bottom of the snowflakes by making holes in them. 
Option 4.
Having made holes in the disk at the top and bottom, in the lid (or container from the kinder), tie it with a thread to the snowflake (and for strength it is better to the rope on which the garland is assembled). 
Decorations are ready!
 Volumetric snowflake made of paper folded "accordion". Master class with step by step photos
  DIY chandelier decoration for the New Year
  DIY Christmas decoration for kindergarten. Master class with step by step photos
  How to cut paper snowflakes step by step with a photo
← Do-it-yourself Christmas decoration in kindergarten. Master class with step by step photos
Tags: do-it-yourself paper snowflakes, Christmas decoration kindergarten master class


Layout of the house, plans of houses and cottages
Small Business - Home Production Ideas
History of JANOME. Sewing machines. Janome, Veritas, Pfaff Sewing machine janome manufacturer country
Working with the tattis system
Properties of copper and its application