Ecology of consumption. Manor: With the onset of spring, every summer resident faces the task of planting seedlings and their further planting in open ground. A simple and cheap design of a greenhouse made of plastic pipes will suit all summer residents and owners of country houses without exception.
Many summer residents strive to provide themselves with self-grown vegetables for the whole year. But due to climatic features, it is not always possible to achieve this goal in those areas that are located in the northern regions of our country. An excellent solution to this problem is the construction of a greenhouse on the garden plot.
True, not all gardeners have the financial ability to buy a ready-made factory greenhouse. For such people, the way out of the situation can be the construction of greenhouses from plastic pipes with their own hands.
You can design and build a greenhouse from plastic pipes on your own, without resorting to outside help. And such a greenhouse made of plastic pipes will serve throughout the year, several seasons in a row. The obvious advantage in the construction of greenhouses from plastic pipes is the prevalence, long service life and low cost of polypropylene products.
CHOOSE A PLACE FOR CONSTRUCTION
When choosing a future place for building a greenhouse from plastic pipes, a number of factors should be taken into account that affect the quality and quantity of the future crop.
There are the following options for placing a future greenhouse made of plastic pipes in a garden plot:
- You need to place a greenhouse made of plastic pipes, created by yourself, in an open space, away from other buildings on the site and large garden trees. This placement option can be combined with the location around the greenhouse of small shrubs and plants. This will add aesthetic appeal to the building.
- If in force small area plot there is no possibility to use an open space of sufficient area, it is possible to provide for the location of a greenhouse with one side adjacent to the wall of an already erected building, house or barn. With this option, an important condition will be the location of the other sides of the greenhouse on the south side in order to receive the maximum amount of sunlight.
SELECTION OF FORMS
The most common form in the construction of a greenhouse made of plastic pipes is an arched structure. This is due primarily to ease of construction and relative cheapness.
When choosing a form for the construction of a future greenhouse from plastic pipes, it is necessary to take into account the features of the garden plot and the place that is chosen for the installation of the structure.
If a greenhouse made of plastic pipes will be located in an open area, then it is better to stop at a gable model. In the case when the greenhouse will be adjacent to the wall of an existing building on one side, it is more expedient to opt for a shed model.
The base of the greenhouse can be made in different geometric shapes, whether it be a square, rectangle, circle, oval or trapezoid. Recently, greenhouses in the form of a tent are gaining popularity.
Attention! Greenhouses of this design have greater light transmission than the classic options.
PROS AND MINUSES OF BUILDINGS FROM PLASTIC PIPES
Building a greenhouse from plastic pipes has several advantages over structures made from other materials:

The main and, apparently, the only drawback in the construction of a greenhouse from plastic pipes is its lightness. This can cause the entire structure to sway in strong winds. At the same time, this problem can be solved if additional metal rods are driven into the ground to strengthen the structure.
MATERIALS AND TOOLS REQUIRED FOR CONSTRUCTION
Before you make a greenhouse out of plastic pipes, you should calculate necessary materials and tools. This is recommended to be done immediately after determining the location on the site for the future structure. Such measures will help to avoid additional costs already at the construction stage of the structure.
So, for work you will need:
- Timber or boards for forming the base of the greenhouse. It is recommended to treat wooden elements with special protective substances before starting construction, which will protect the wood from decay.
Advice! To save money, it is recommended to use not branded professional woodworking tools, but improvised ones. For example, impregnate wooden beams with resin, smear several times with drying oil, treat with a blowtorch.
- Polypropylene pipes. It is necessary to calculate how many linear meters will be needed to build a greenhouse. For a more accurate calculation when building a greenhouse from plastic pipes with your own hands, it is recommended to make a drawing of the future design. After receiving a certain footage of plastic, you can add 10% of the total length for the stock.
- A polyethylene film is used to cover the polypropylene structure. It must be strong enough. High strength will protect it from tearing and allow you to use several seasons.
- Several metal rods. The reinforcement must be at least 1 m long.
- Nails and screws.
- Handles with locks and hinges for arranging doors and windows in the greenhouse.
- Additional metal loops for attaching individual plastic structural elements.
CONSTRUCTION OF A GREENHOUSE
If at the stage of calculating the materials used, a detailed drawing of the future structure was drawn up, then you can immediately proceed directly to the construction of the greenhouse. Otherwise, it is recommended to draw up a detailed construction scheme - this will greatly simplify and speed up construction work.
FOUNDATION INSTALLATION
Before you make a greenhouse out of plastic pipes yourself, you need to create a foundation. Under the future foundation of the greenhouse, a flat, flat area with a small depression is needed. Therefore, before starting work, it is necessary to level the ground and make a small depression of a few centimeters. As a material for the foundation, you can use either boards or a wooden beam.
Attention! Before proceeding with the installation of the foundation, wooden boards must be cleaned with a planer or sandpaper and also treated with protective substances.
To strengthen the foundation of the future structure, it is recommended to use additional metal brackets or corners. A metal corner is attached at each internal joint wooden planks. If timber is used as the material for the base of the greenhouse, it is more advisable to use staples that are driven in at each external junction of structural elements.
The finished foundation should lie tightly on the ground prepared for it. If gaps remain between the foundation and the ground, they must be sprinkled with earth.
INSTALLATION OF THE FRAME
After the construction of the foundation, along its outer perimeter, metal reinforcement should be driven into the ground in increments of no more than 100 cm. Pre-prepared and cut pieces of plastic pipe of the required length are mounted on these metal rods.
To fix plastic pipes, self-tapping screws are used, with the help of which the base of the pipe must be pulled to a wooden foundation. As connecting elements in the horizontal plane of the structure, plastic couplings, corners and crosses are used, which must first be drilled inside. This will allow the pipes to pass through the fittings.
WE CREATE A ROOF
When choosing a material for building a greenhouse roof, you should consider the features of some of the most common options:
- The optimal and common material for covering the greenhouse is polyethylene film. If financial possibilities allow, you can use a special reinforced PVC film as a cover. This material has good thermal insulation, which will allow you to maintain the desired temperature in the greenhouse even at night. At the same time, this material has high transparency and transmits up to 95% of sunlight during the daytime.
- A polycarbonate roof has the longest lifespan, but is more expensive and can be difficult to build. In addition, such a roof cannot be quickly dismantled, unlike a polyethylene one.
- Textile material for covering type "agrotex" has a low thermal insulation. True, the lightness and simplicity of this material allow minimum terms perform assembly and disassembly work.
CONCLUSION
Summing up, we can say that the option of self-construction in the garden plot of a greenhouse made of plastic pipes seems to be the most acceptable option. Such designs have a number of undeniable advantages. These include lightness and strength of the structure, its durability, ease of installation and dismantling. In addition, such greenhouses are ultimately the cheapest option, and from an aesthetic point of view, they are in no way inferior to expensive factory counterparts.
We learn how to build a greenhouse from plastic pipes with our own hands from the video
SUBSCRIBE TO OUR youtube channel Econet.ru, which allows you to watch online, download from YouTube for free a video about healing, rejuvenation of a person. Love for others and for yourself as a feeling of high vibrations - an important factor in healing - site
Put LIKE, share with FRIENDS!
Growing crops in closed ground, we provide ourselves with environmentally friendly vegetables, herbs from early spring to frost. But at the same time, the construction of a greenhouse requires time and financial costs, and if mistakes are made during construction, the plants get sick, wither, pests start up that can destroy the crop in a matter of days.
In the article, we will reveal the secrets of how to properly build a greenhouse with our own hands, we will tell you what to pay special attention to, and how to avoid mistakes.


Plot
Before you build a greenhouse, you need to choose the right place. The main criteria for site selection:
- Light regime: seasonal buildings should be illuminated by the sun in the first half of the day, in the second - it is desirable that they be in the shade; winter ones are best built in open areas, without tall trees. The optimal angle of incidence of sunlight is 15 o.
- Location relative to the wind rose: a large surface area should be turned to the south, along the length of the structure should be turned from west to east.
- If there are strong gusts of wind in the region, then from the side of the air currents, 12 m from the greenhouse, tall trees and shrubs should be planted, they will “break” the streams. You can build a low fence 7 m from the structure, but in this case the wind will rise up and can do even more harm.
We offer you to see one of the ways how to build a polycarbonate greenhouse with your own hands, the video instruction tells you how to make a wooden arched structure yourself.
Base
You bought a finished structure or thought about how to build a greenhouse yourself, in any case, you need to prepare the foundation. Strip bases are best suited, they can be made of monolithic concrete, blocks, bricks reliably, durable; rubble stones, timber - inexpensive and practical. For light structures, a columnar foundation is relevant, supports are installed every 1.5-2 m, in order to save money, foam blocks or flat stones can be placed under the frame.
The question often arises: how to build a greenhouse yourself from polycarbonate, film, old window frames, etc. materials on uneven terrain. Here, the best solution would be a pile foundation: driven or screw.

The photo shows an example of how to build a greenhouse from window frames
How to build a greenhouse at home - materials
Any greenhouse consists of a frame and a covering layer. For the construction of the base, wood, metal, pvc pipes, used materials (old window frames, boards) are most often used. The choice depends on the individual preferences of the owner.
frame
The easiest way to build a greenhouse with your own hands is from wood: enough household tools and minor skills. For the base, you can take a beam of 100 * 100 mm, and make the frame from an edged board, fasteners - nails, self-tapping screws, galvanized corners.
It is possible to build a greenhouse from plastic pipes in 1-2 days. For manufacturing, a pipe 25-32 mm in diameter, clamps, docking adapters are used. The base is a wooden box along the perimeter of a bar or board 50 * 100-150 mm.
If the question is how to build a greenhouse with your own hands from polycarbonate, then it is recommended to make a metal frame here:
- welded from a professional pipe;
- prefabricated from galvanized corrugated pipe or aluminum, bolted.
The cost of building metal structures will be more than wooden and PVC, but the construction is more reliable, stable, and practical.

In the photo, how to build a simple arched frame from a metal profile
Covering material
The most popular material for covering do-it-yourself greenhouses is cellular polycarbonate, 4-8 mm thick, it is many times more practical and stronger than glass, has better heat and light transmission capabilities. It is attached to the frame on thermal washers or a docking profile.
The film is much cheaper than polycarbonate at a price; it is more often used to build small seasonal greenhouses. The market offers wide range of film materials (polyethylene, multilayer, light-scattering, etc.), before building a greenhouse with your own hands from a film, you should carefully study the characteristics.
We bring to the attention of readers a useful and very informative video on how to build a greenhouse, on the video a detailed process: from the foundation to drip irrigation, special attention is paid to how to avoid common mistakes.
Projects and drawings
There are two ways to build a greenhouse with your own hands from wood, metal, pvc, etc.:
- a separate building;
- attached to the building, one of the walls is deaf, in order to maintain the light balance, it must be sheathed with a reflective film.
The shape of the greenhouse are:
- arched;
- rectangular under an arched or gable roof;
- rectangular with a shed roof, usually these are extensions to a house, garage, bathhouse;
- less common are round, polyhedral, curvilinear, pyramids.

Diagram of how to build a pyramid
What is important to consider in the drawing:
- Decide on the size, an ergonomic building is considered to be 3 m wide, 1.9-2.4 m high, 3, 4, 6, 12 meters long.
- Choose the shape and materials.
- Make a diagram of key nodes in detail:
- frame - vertical racks, strapping, transverse elements for rigidity;
- how the frame will be attached to the foundation;
- roof - the shape of the truss system, as it will adjoin the base.
- Competent ventilation will help to minimize the appearance of pests in the greenhouse, ensure the proper development and good growth of plants. Ventilation windows should be 25% of the total coverage area. They are located from the ground not lower than 2/3 of the total height of the structure. For convenience, transoms should be equipped with an automatic drive.

How to build a simple wooden greenhouse, suitable for covering with film and polycarbonate
- For growing early crops, as well as in winter greenhouses, lighting should be provided. The artificial spectrum of light must match the sun's rays, so several types of lamps should be combined. The average duration of lighting (daylight + artificial) is 12-17 hours a day, the intensity depends on the crop being grown.
- Before you build a winter greenhouse with heating, you need to consider engineering communications. Which ones depend on the type of heating: electric - convectors, ultraviolet lamps, water, steam heating.
Watch the story on how to build a winter greenhouse with your own hands, video from practical advice and explanations of how to make a thermos for growing vegetables indoors.
Advice: For independent construction, it is advisable to take a ready-made serial project and adapt it to individual requirements. Typical products are correctly calculated in terms of material consumption, ergonomic, with good aerodynamic characteristics, they provide for the specifics of climatic conditions and loads from them.

How to build a greenhouse with your own hands with heating - a simple, effective scheme for heating
We have described the key steps on how to build a greenhouse with your own hands, the video materials selected for the article will help you understand in more detail the construction of structures of various shapes, from different materials.

A universal way to build a greenhouse from PVC pipes, the length can be any, you just need to add arcs
Greenhouses are the best facilities for growing fruit and horticultural crops on protected ground. By design, it consists of a frame and a coating that transmits light (propylene, glass or film). In addition, the building must have windows, doors and vents for maintenance and ventilation. Also, some walls can be sheathed with boards or lined with bricks for additional protection and insulation.
Do-it-yourself greenhouses from improvised materials are easy to build, but at the same time, such structures have a fairly high functionality and allow you to grow vegetables, fruits and herbs year-round.
How to make a greenhouse at home
Many greenhouse owners are interested in the question of whether it is possible to use a conventional design in the cold season. It should be noted right away that without special equipment for heating and ventilation, a conventional design will not be suitable for growing vegetables and fruits (Figure 1). Based on this, it is worth wondering how to build a greenhouse for the winter cultivation of fresh vegetables and herbs.
 Figure 1. Types of winter greenhouses
 In general, all greenhouses are built according to the same principle: first they build the foundation, then the frame, after which they proceed to sheathing and installation necessary equipment. But during the construction of winter types, there are certain features that we will describe below.
Conditions
A winter greenhouse can be made both single-sided and double-sided, and the building can both adjoin the house and be at some distance from it. But it should be borne in mind that wall structures are more suitable for small farms, since the wall of the house will protect the structure from the cold and reduce heating costs.
Before construction, you need to choose a site that is as much as possible illuminated by the sun. To do this, it is better to place the building from east to west: this way the plants in it will receive a sufficient amount of light, although lamps for additional lighting will still have to be used. In addition, if cold winds are often observed in your area, you need to provide wind protection: place the room near another building or plant a hedge a few meters from it.
Peculiarities
The construction technology of a winter greenhouse is typical, but still has some features that help to keep warm for the normal growth of crops.
If you are interested in how to make a heated greenhouse with your own hands, be sure to take into account these rules:
- The foundation must be strong and high enough so that the cold from the ground does not penetrate into the building;
- Inside, it is desirable to equip warm beds with a special soil mixture (sand, soddy soil and humus);
- Heating and lighting devices are installed necessarily in order to create an optimal microclimate inside. It is also necessary to install a ventilation system, and heating is best done by stove or gas.
 Figure 2. Marking the foundation
 At the same time, it is necessary to equip all life support systems with automation so that growing crops in closed ground requires minimal human intervention.
Do-it-yourself greenhouses from improvised materials
The construction of the greenhouse begins with marking the place for the foundation. To do this, take a cord and a few stakes and mark one of the side walls. Having stuck the stake into the ground, measure the required length and pull the cord. After that, with a square, determine the location of the end wall, measure its length and stick another peg. The rest of the stakes are placed according to the same principle, and a cord is pulled between them. Next, we check the corners and measure the diagonals (they should be the same). detailed instructions for marking and building the foundation is shown in Figure 2.
What covering material is better
It is impossible to build a greenhouse without the correct selection of covering material. Many people prefer to use ordinary polyethylene film for this purpose, but this material is far from the most successful one on the market today.
 Figure 3. Types of covering materials: film, glass and polycarbonate
 Let's try to figure out which material is better to use as a coating for the frame (Figure 3).
The use of glass is considered a fairly popular way of making cladding. For example, you can make a small greenhouse out of old window frames, but if the greenhouse is large, you will have to order glass for it separately, and they are quite expensive. Despite the high cost, such a construction will serve for a very long time, and the glass itself is not afraid of sudden temperature changes, perfectly withstands the heavy weight of snow and helps maintain a stable temperature inside the building.
Note: A film coating is considered a more economical option, but at the same time it is not durable enough. Conventional film can last only one season, so for more durable buildings it is better to choose a reinforced film that does not need to be replaced within 6-8 years. In this case, it is desirable to fasten the film so that it is not damaged by sharp corners.
The best coating is polycarbonate. This is a lightweight and durable material that allows enough sunlight to pass through, while retaining heat inside the structure. Since it is quite expensive, it is worth buying it only if the room will be used constantly.
Greenhouses: how to make land for planting
The abundance of the crop largely depends on the quality of the soil that is used to grow plants. It is impossible to pour ordinary soil from the garden onto the beds, as it may contain weed seeds and pathogens of dangerous diseases that will destroy plants.
Note: If it is not possible to prepare a special soil mixture for the greenhouse, and ordinary garden soil will be used for the beds, it is advisable to disinfect it using special preparations (for example, Inta-Vir).
But, if you want to get a really rich harvest, you still have to spend a little time making a suitable soil mixture. The most fertile substrate is considered, which includes one part of peat, humus, soddy land and sawdust. Such soil is quite light and fertile, so additional fertilizer is required only at the stage of direct cultivation of crops. But, as is the case with ordinary garden soil, it is advisable to disinfect the mixture before laying it on the beds.
How to build a greenhouse with your own hands from wood
Depending on the design, greenhouses can be single-slope, gable, tent, arched, wall-mounted, pit, or be part of the house. In addition, they can be stationary (the design is not disassembled) and portable.
Additionally, they are divided according to the type of coating (film and glazed) and the method of heating (heated by the sun or equipment).
When choosing a form, one should take into account the location of the building relative to the parts of the world, other buildings on the territory, as well as the purpose and shading. The optimal location is considered in which the southern part of the horizon is visible from the entrance. To do this, imagine that you are standing with your back to the entrance. When positioned correctly, the sun will travel from east to west in a clockwise direction. The transparent wall should be oriented to the south, as in this case the maximum amount of light will get inside.
Note: The location of the greenhouse on the cardinal points is important only if the walls (all or several) are made of opaque material. If it is completely covered with film or glass, these indicators do not play a decisive role.
If the building is shaded by trees or neighboring buildings (for example, in a small area), its north side is made of an opaque material that will not allow hypothermia inside the building. To improve the reflection of heat and light, the roof is made transparent, and one of the walls is covered with white paint or a reflective screen.
Each type of greenhouse has certain characteristics, advantages and disadvantages.(picture 4):
- Single and double- one of the most popular. They are rectangular, and they can be placed in any part of the site, and the interior space is used almost completely. If a structure of this type is built on a foundation and equipped with heating devices, crops can be grown all year round. The only drawback of one- and two-slope types is the rather complicated construction and the need to purchase a large amount of materials.
- Arched easier to build, but they are not designed for long-term use due to insufficiently strong frame. However, the streamlined shape makes it resistant to gusts of wind, and the condensation that collects inside drips onto the ground, not onto the plants. In addition, it is difficult to grow garden plants in an arched greenhouse (special shelves are equipped for them). Additional costs will be incurred by ventilation equipment, since standard side ventilation is not suitable for this type.
- wall greenhouses and buildings that turn into a residential building are mainly used as winter gardens. They are economically more profitable, since the heat in them is maintained by heating the house. The disadvantage is that additional lighting equipment is required to grow full-fledged plants.
- Pit are single and double. Their main feature is that the side walls are laid out of brick and immersed in the ground. This results in significant savings in heating costs.
 Figure 4. The main types of greenhouses: 1 - single-sided, 2 - double-sided, 3 - arched, 4 - wall-mounted
 If the greenhouse will be used not only for growing crops, but also as a decor for a personal plot, it can also be made polygonal. But in this case, construction costs increase significantly.
What is needed for this
Building a greenhouse with your own hands from wood is quite simple, because it requires a minimum of knowledge, tools and materials (Figure 5).
A frame is built from wood, which is later sheathed with glass or film. The main condition is to properly prepare and process the wood. The bars that will be used to build the frame are cleaned of dust and dirt, washed with clean water and dried. After that, they need to be cleaned with emery and treated with an antiseptic solution that prevents early decay.
 Figure 5. Do-it-yourself wooden greenhouse construction
 The bars are fastened together with nails or self-tapping screws, and after the structure is completely ready, it must be painted, painting over not only the wood, but also the metal parts.
Where is the best place to place
When planning the location of the greenhouse on the site, you need to take into account the prevailing winds and the movement of the sun. In order for the plants inside the structure to be as much as possible illuminated by the sun, it is better to place it from east to west.
If strong winds are often observed in your area, it is advisable to install the structure near other buildings or large trees. At the same time, too much shading of the structure should not be allowed.
Foundation
When marking the site for the foundation, use the level, since the ground must be absolutely flat. Otherwise, it will be difficult to install the frame, and if its parts can be adjusted and mounted, the structure will be overloaded and the frame may be deformed.
Note: According to the rules, the room should have a slight slope for water flow, but this rule can be ignored when building small structures.
After marking, you can start building the foundation. It must be very durable, because it not only bears the weight of the greenhouse itself, but also protects the plants from cold air and pests. As a rule, ready-made collapsible structures in the kit have materials for the construction of the foundation (beams or pipes). But they are not strong enough and do not protect against frost and rodents. Therefore, it is recommended to lay it out of concrete or brick. The width should be at least 10 cm, and it should be placed below the freezing level of the soil.
For the construction of the foundation, you can also use special blocks. They are hollow inside, so after installation, the inside is poured with concrete. A curb stone laid on a layer of concrete is also used. Foundation construction options are shown in Figure 6.
 Figure 6. Options and procedure for building the foundation
 If the foundation is high (for example, located at a height of 30 cm from ground level), it will be inconvenient to bring in or carry fertilizer and water inside. In this case, floorings are equipped at the entrance or the door is lowered to the ground level, using the free space for equipping shelves, on which seedlings can later be grown.
Additionally, it is covered with waterproofing material so that heat is retained inside. During construction, care should also be taken to equip a container for draining excess water. It is better to bury such a container in the ground so that it does not occupy the interior space. The drain must be tightly closed so that condensate and water for irrigation do not get into it. Practical recommendations for marking and building the foundation - in the video.
Stages of construction
For the construction of the basement, several methods are used.:
- From the inside, sheets of heat-insulating material are laid, a binding wire is laid and the surface is poured with concrete;
- Cast blocks with gravel are laid on the base. Such material perfectly retains heat and has a high bearing capacity. But if it is assumed that the wall will be high, it is additionally reinforced with reinforcement;
- Lay wooden materials impregnated under pressure with protective compounds. In the future, the tree is additionally insulated.
The choice of material and method for building a basement depends not only on your financial capabilities, but also on the type of soil and type of foundation. In addition, certain types of plinths require additional processing. For example, a concrete plinth does not need to be painted, but if it is built from concrete or sand blocks, the surface must be plastered and covered with moisture-resistant paint (Figure 7).
As a rule, a frame is included in the package of finished products, which only needs to be mounted. But if you build with your own hands, the frame is most often made of wood or metal.
 Figure 7. Basement construction technology
 For this, planed lumber or a metal profile is used. When choosing materials for the frame, you should pay attention to several important details:
- Lumber intended for construction is treated with a special green compound, so the frame will have to be additionally painted. Such wood is quite expensive, but its service life is higher than usual. It is important that the impregnation composition is poisonous, so the roots or leaves of plants should not be allowed to come into contact with the tree.
- Pillars, ceilings and other vertical elements can be made from boards (50 x 100 or 50 x 125 mm). For the installation of beams, a beam is used, the size of which depends on the length of the building.
The construction of the frame begins with the fact that roofing material or rubberized material is laid on the base. On lumber intended for horizontal fastening, mark and drill holes for bolts and arrange them around the perimeter of the plinth. After that, we outline the attachment points for the vertical beams. A detailed frame installation scheme is shown in Figure 8.
After attaching the horizontal elements to the plinth, check them for level, saw the vertical beams into pieces of the desired size.
Note: Sawing vertical beams in advance is not recommended, because when installed on a plinth, they can give an error.
In the next step, attach the vertical posts to the top beams. Having outlined the position of each board or beam, fix it obliquely with a driven nail. The optimal distance between vertical posts is 30 or 60 cm, since in this case it is easy to carry out glazing.
 Figure 8. Scheme of mounting the frame for gable greenhouses
 At the final stage, the vertical posts are attached to the lower and upper beams with nails, and to reinforce the structure, it is recommended to tie the joints with steel brackets, wire or tape with an anti-corrosion coating. After that, facing boards and gutters are attached. In the process of work, all places of cuts and holes for fastenings must be treated with an antiseptic. You will learn detailed recommendations for mounting the frame from the video.
How to make a greenhouse out of old window frames
Do-it-yourself greenhouses from improvised materials practically do not differ in functionality from expensive polycarbonate structures. Of course, they are not very suitable for winter crops, but they will successfully last for several seasons under operating conditions in spring, summer and autumn.
One of the simplest structures is considered to be a greenhouse made of old window frames (Figure 9). For it, you need to make a concrete foundation, and if the building is located on clay or swampy soil, additionally equip a gravel pillow.
 Figure 9. Building a greenhouse from old window frames
 But the most important step is the preparation of the raw material itself - the old window frames. To do this, they remove all handles, latches, hinges and other metal parts. The old paint is removed, the wood is treated with an antiseptic and repainted. In most cases, the frames are fastened together with nails. Therefore, it is advisable to remove the glass in advance so as not to damage them during installation.
Frames are attached to a frame of wooden beams. You can leave a few vents for ventilation, and make their roof polycarbonate. The remaining windows that will not open during operation are carefully sealed with sealant.
How to make a foundation
The choice of material for the construction of the foundation depends on the characteristics of the soil and the type of greenhouse itself. Consider the most popular options.
- Concrete
Suitable for homogeneous soil with medium bearing capacity. In this case, a support is made directly at the construction site: a wooden formwork is installed in a pit 30 cm deep, and the space is poured with liquid concrete. The bottom of the pit should be flat and covered with a layer of gravel or sand. If the site has rocky soil, a hole is dug to the rock and its surface is thoroughly cleaned (Figure 10).
The formwork must be square (side length - 30 cm). The boards must be tied together so that they do not deform when poured. Reinforcement is laid inside the formwork and concrete is poured.
- From piles
For areas with soft soil, a pile foundation is more suitable. As a rule, piles are made of concrete and buried or driven into the ground. However, this method of construction is too expensive and requires the use of special equipment. Therefore, other methods of building a pile foundation can be used on a personal plot:
- Drive old rails or other metal beams into the ground;
- Use sleepers impregnated special formulations for longer operation.
 Figure 10. The procedure for the construction of a strip concrete foundation
 Metal piles can be freely driven into the ground without fear of deformation. When doing this, choose beams long enough so that their lower part reaches the soil layers with high bearing capacity.
Note: Before driving piles, mark the site so that enough space is allocated for the foundation. This is necessary, because in the process of driving the pile may stumble upon a stone or other hard rock, and you will have to change its direction.
You need to drive piles while standing on a special stand. But even if you decide to build a small greenhouse on piles, it is better to consult with a specialist in advance.
- From concrete slabs
The foundation, built of concrete slabs, is quite expensive. But its cost pays off with high strength, reliability and bearing capacity even on soft soils.
It is based on a reinforced concrete slab 20 cm thick, which evenly distributes the load. However, concrete slabs must not be laid on loose ground. If, nevertheless, this is necessary, the soil layer is removed and replaced with crushed stone or gravel. Styrox is laid on the crushed stone (thickness 10 cm) and the surface is poured with concrete. The technology for building a foundation from piles and concrete slabs is shown in Figure 11.
 Figure 11. Foundation construction based on piles and concrete slabs
 The selection of a foundation is especially difficult for clay areas or soil, which changes its composition in depth. In this case, it is better to consult a specialist so that the greenhouse does not deform after construction and has sufficient thermal insulation.
Construction steps
To make a greenhouse out of old window frames correctly, you need to follow certain rules.
Step-by-step instructions for building a greenhouse include the following steps:
- Foundation construction: since this structure is quite heavy, it is desirable to make the corner of the foundation from stone, and between them to make a structure of concrete on a pillow of gravel and sand.
- Prepare construction material : remove all metal fittings from old frames, remove old paint, treat wood with antiseptic and repaint.
- Make the floor: for this, the ground is first tamped, and then a concrete screed is made on it, on which the beds will be located in the future
- Frame construction and sheathing: the base to which the frames will be attached is made of bars of the same thickness as the frames. The parts are fastened together with nails, and the roof can be made of film or polycarbonate.
After the greenhouse is completely ready, beds are equipped in it or racks are installed. It is also desirable to provide a vestibule in which inventory and necessary equipment will be stored.
How to make a greenhouse from a profile pipe yourself
Profile pipes are widely used in construction, and since this material is light and durable, it can also be used to make a greenhouse.
Since it is difficult to bend a profile pipe at a right angle without the use of special equipment, it is best to build arched models with it.
Where is the best place to place
Place a greenhouse from profile pipe possible in almost any part of the site. Since such a structure is light, it does not carry a large load on the soil, and they can be built even in swampy and clay areas.
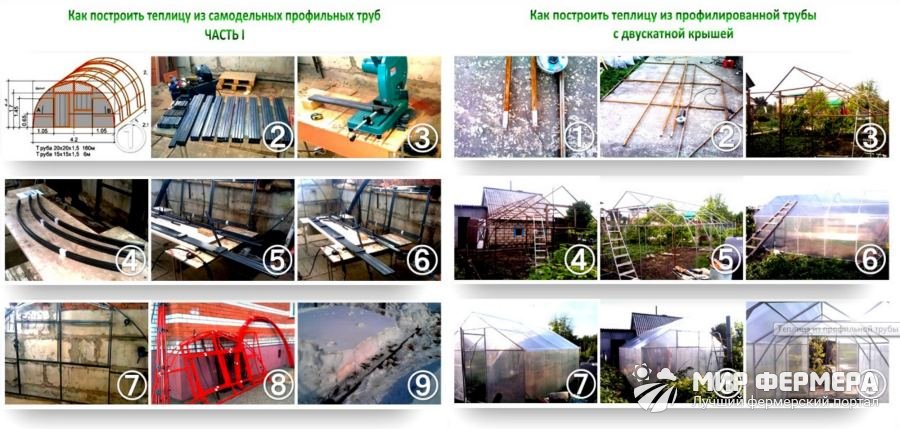 Figure 12. Recommendations for the construction of a greenhouse from a profile pipe
 At the same time, it is important to take into account that the same requirements apply to greenhouses from a profile pipe as to buildings made of other materials. To protect the structure from strong winds, it is advisable to build a greenhouse under the protection of other buildings or hedges. And to provide plants with optimal lighting, it is advisable to place the building from east to west.
Foundation
The profile pipe is much lighter than wood, so the foundation for a greenhouse from it can be anything. However, if you plan to operate the building for a long time, it is better to make a concrete foundation.
If the greenhouse from the profile pipe will be used only in summer, you can get around without a foundation by installing the frame supports directly into the ground. But in this case, it is necessary to provide the plants with additional protection by installing wooden formwork around the perimeter.
Stages of construction
The construction of a greenhouse from a profile pipe begins with the preparation of the site (Figure 12). It is advisable to choose a flat area with sandy soil. If there is no such place, the soil is leveled manually, and drainage is arranged on marshy soils.
Next, proceed to the manufacture and installation of the frame. If you want to build a rectangular greenhouse, you will have to buy special equipment with which the pipe can be bent to the desired angle. To avoid additional costs, it is better to build arched structures. In this case, the pipe can simply be bent in an arc and dug into the ground from both sides.
At the final stage of construction, the frame is sheathed with film, glass or polycarbonate, the floor and beds are made, or shelving is installed.
Make a polycarbonate greenhouse with your own hands drawings
The most modern and functional option is the construction of a polycarbonate greenhouse (Figure 13). It is lightweight, durable and wear-resistant material that will last for many years. Its only drawback is high price, therefore, it is worth building such greenhouses only if it will be operated for a long time.
You can make a polycarbonate greenhouse with your own hands according to the drawings, but many prefer to buy ready-made structures and carry out installation on site. We will tell you how to save money and build a protected ground structure with your own hands.
What is needed for this
First of all, for the construction you need to buy polycarbonate. Another advantage is that the sheets have a standard length and width (12 and 2.10 meters, respectively). This allows you to build a greenhouse 3.5 meters wide and cover the roof with one whole sheet.
In addition to the polycarbonate itself, for the construction you will need materials for the foundation, accessories for attaching sheets and a plastic U-shaped profile, which covers the edges of the polycarbonate to protect its honeycombs from dust.
Peculiarities
In addition to the high cost of polycarbonate, the material has no other significant drawbacks. Of course, its honeycombs can become clogged with dust, and the coating will lose transparency, but this problem is easily solved with a plastic profile that is attached to the edges of the sheet.
 Figure 13. The order of construction of a polycarbonate greenhouse
 As with other types of structures, polycarbonate greenhouses require a foundation, but its purpose is not to strengthen the building, but to protect plants from the external environment.
Where is the best place to place
In addition, it is desirable to install the greenhouse so that the plants receive the maximum amount of sunlight. To do this, you need to arrange the structure from east to west.
Foundation
To build a foundation that will exactly match the size of the greenhouse, you need to place the site by setting pegs and pulling a rope between them. After that, you can proceed to the installation of the foundation.
Note: Since polycarbonate is a lightweight material, the foundation can be built both as tape (made of concrete) and wooden - from beams and supports.
As a support, you can use asbestos-cement pipes, which are installed at the corners of the greenhouse. The soil around them is compacted, and the foundation is mounted from wooden beams. It is better to treat the tree with an antiseptic and paint it so that the structure does not rot.
Stages of construction
The steps for building a polycarbonate greenhouse are the same as for other materials. First, mark the site and build the foundation. After that, proceed to the installation of the frame. It can be made of wood, shaped pipes or aluminum. The latter option is considered preferable, since aluminum is quite light, but at the same time durable.
At the final stages, the frame is sheathed with polycarbonate sheets, equipment for irrigation, heating and ventilation is installed inside the structure, and the beds are equipped.
How to make a heated greenhouse with your own hands
The design of a heated greenhouse practically does not differ from conventional structures. But at the same time, several important nuances must be taken into account. First, you need to carefully seal all the cracks so that heat does not leave the greenhouse.
Secondly, you need to install heating equipment. You can make warm beds by arranging them according to the principle of a warm floor, and laying pipes under the ground. But a more popular option is the installation of heating: gas, electric or furnace boiler.
Every summer resident and owner of his own house, sooner or later, has a desire to have on his site good greenhouse. After all, everyone knows that vegetables and herbs from their own greenhouse, also grown with their own hands, are much tastier and healthier than purchased ones. Therefore, someone follows the path of buying a finished greenhouse. Someone buys a disassembled greenhouse and assembles it on the site as a constructor. But a considerable part of gardeners want to build a greenhouse with their own hands. After all, everyone knows: if you want to do something well, do it yourself.
How to build a greenhouse with your own hands? To begin with, let's figure out what types of greenhouses are. This is important for choosing the future design and material of the greenhouse.
Winter and summer greenhouses
All greenhouses can be divided into two large groups: winter and summer. They differ in the presence of a heating system in a winter greenhouse, which allows you to grow plants in such a greenhouse all year round. The summer greenhouse is designed for faster ripening of fruits and protection of plants from accidental frosts.
Winter greenhouses are usually more solid than summer ones. They build them closer to the house, sometimes even attaching them to the south side of the house. So they are closer to the heat source. Winter greenhouses are almost never made from film. The heating system can either be connected to the heating system of the house or be autonomous. For this, an oven is made in the greenhouse.
Video review of a self-heating winter greenhouse
Arched, single-pitched and double-pitched greenhouses
Everyone chooses the type of roof for the greenhouse based on the location of the greenhouse. As well as your personal preferences. We can only suggest the advantages and disadvantages of each of them.
shed roof they usually choose by attaching a greenhouse with their own hands to the house. This type of roofing is simple in construction, economical. Under such a roof, you can make an inexpensive, but solid base from a wooden beam or a metal profile pipe. The disadvantage of this roof is that snow will accumulate on such a roof.

gable roof, like a lean-to, it can have a cheap and durable frame. It is a little more expensive than a single-sided one, but more aesthetically pleasing. But snow will also accumulate on such a roof. Consider this factor when choosing a roof for a greenhouse.
Types of greenhouses. Video review
And finally arched roof. A very popular type of roofing and deservedly so. Economical, quickly built, he won his niche very quickly. In combination with cellular polycarbonate, such a greenhouse has almost all the advantages. It does not collect snow, it is very resistant to winds and the dispersion of sunlight in it occurs naturally. The only drawback may be a frame for this type of roof. Making a strong and reliable frame will be more expensive and more difficult than for previous types of roofing. Let's talk about frames for greenhouses with our own hands.

Types and materials for the frame of the greenhouse
We continue to answer the question of how to build a greenhouse with your own hands. If you decide to build a greenhouse on your site, have chosen the type of roof for your future greenhouse, now you need to think about choosing a material for the greenhouse frame. What to build a greenhouse from?
The greenhouse frame can be made from:
- tree
- metal
wooden frame
Timber frames are very easy to work with. The tree is easy to process, it can be used to build a greenhouse of almost any kind. The disadvantage of such construction will be the susceptibility of the tree to decay. Therefore, the entire timber before construction has to be treated with special impregnations.

Greenhouse made of wood and film. Video building instructions
Metal
In order to assemble a metal frame, good skills are needed. After all, the metal will either have to be welded or bolted. Such a frame for a greenhouse is very expensive. But it is very durable, reliable and will last for decades. Such a frame is suitable for a capital greenhouse.

Video of building a glass and metal greenhouse
Plastic
Today, the construction of greenhouses from plastic pipes is gaining popularity. This type of construction is relatively cheap, even beginners can do it. Moreover, such a construction will not take much time. The disadvantage of such a frame is its low strength. Over time, plastic pipes bend, the greenhouse loses its shape. Therefore, as a capital structure, such a frame is not suitable.
Video how to make a greenhouse from plastic pipes and film
Greenhouse cover
The materials for the walls and roof of the greenhouse are very diverse. Each has its pros and cons. Let's look at them in more detail.
- glass
- film
- agrofibre
- cellular polycarbonate
DIY glass greenhouse
How to build a greenhouse with your own hands? If you want to build a capital and durable greenhouse with your own hands, then a glass greenhouse is a good option. Moreover, such a greenhouse will not necessarily be expensive. After all, it can be built from.

Many people, when replacing old wooden windows with plastic ones, simply throw the frames into the trash. So you can get the material for your greenhouse for free. You just have to process the wood of the window frames and fasten them together. You will even have windows and vents ready to ventilate the plants on hot days.
Video review of a greenhouse from old window frames
However, do not forget that glass is a heavy material. Therefore, the foundation of such a greenhouse should be appropriate. It must be recessed, or . Or you can make a slab foundation and divert water from under it.
DIY film greenhouse
Such a greenhouse, although it requires frequent film changes, is still common. Because the film is easy to mount and it is cheap. In addition, with careful attitude, it can withstand several seasons. It is not suitable for a do-it-yourself winter greenhouse, but it copes very well with the functions of a summer one.

An ideal design option for a film greenhouse would be a frame made of plastic pipes curved by an arch. Such an arch is built in one day, it is cheap and even one person can handle it. The arch is closed with a film. And for the winter it can be removed. It is possible to modernize such a greenhouse somewhat if agrofiber (geotextile) is used instead of a film.
Do-it-yourself agrofibre greenhouse
Can be used as a do-it-yourself greenhouse covering material. It passes water and steam well. Your plants will be irrigated with rainwater and will be able to "breathe" freely. White geotextile provides enough light for plants, and at the same time will not let the sun's rays burn the foliage. Such a greenhouse needs less ventilation than those made from other materials. Agrofibre is a durable material, unlike film. You can use it for many years. It does not tear, is not afraid of piercings, stretches well. Today, this is a good alternative to film.
Step-by-step video instructions for making agrofiber greenhouse
Do-it-yourself cellular polycarbonate greenhouse
Do-it-yourself such greenhouses are made for all types of roofs and frames. They are both arched and single-gable. Polycarbonate is attached to both wood and metal. They are covered with frames made of plastic and aluminum pipes. In general, this is a universal material for building a greenhouse with your own hands. When choosing polycarbonate, pay attention to its thickness and weight. Choose sheets with a thickness of 4 mm. Better than 6-8 mm. In addition, the sheet should be heavy enough. Do not forget that polycarbonate cannot be mounted in a horizontal position. The condensate in the combs must be free to roll and flow out. Otherwise, polycarbonate will quickly become overgrown with algae and lose its transparency.


How to make a polycarbonate greenhouse on a metal frame. Video
We hope that our article helped you in choosing the type of your future greenhouse and we answered the question of how to build a greenhouse with your own hands. Share your thoughts and questions in the comments to the article. We are very interested, but what kind of greenhouse did you make with your own hands?
Many owners of private houses dream of having a greenhouse on their plots. This agrotechnical facility will help the owners provide their family with greens and some types of vegetables already in late spring or early summer. Well, some greenhouse designs, involving heating and lighting systems, are used to grow crops all year round.
A do-it-yourself greenhouse can be built of wood and brick in combination with metal elements, have a frame structure, for example, made of lightweight metal-plastic pipes.
When implementing the idea, the place where the greenhouse will be installed is first determined. The size of the future structure directly depends on its area.
Next, you need to decide when this structure will be used - only in the spring or throughout the year. If the "winter" option is chosen, then you need to know that the construction will cost much more, since it will require more materials, and it will also be necessary to carry out lighting, heating, plumbing and ventilation.
Then, it is necessary to choose the material of manufacture and the type of greenhouse construction. To focus on one of them, several of the most commonly used options will be considered.
Varieties of greenhouses
The design of greenhouses, in principle, is not very complicated, so any owner of the site can build it on their own. To do this, you only need to prepare the material and tools. Greenhouses can be divided into types, based on various criteria - this is the material of manufacture, the shape of the structure, whether it will be stationary or temporary.
Greenhouse covering material
Several different types of materials are used to cover greenhouses. They should be transparent, may have shades favorable for plant growth. For example, which has become especially popular recently, sometimes not only colorless transparent is chosen, but also a yellowish or green tint.
The KINPLAST company offers high-quality cellular polycarbonate for greenhouses. The material has excellent technical and operational characteristics. KINPLAST is the leading manufacturer of polycarbonate in the domestic market. The line of cellular polycarbonate includes brands such as WOGGEL - a material created in collaboration with foreign colleagues; SKYGLASS - universal polycarbonate with excellent characteristics at an affordable price; as well as specially designed grades of polycarbonate for use in agriculture AgroTITAN.
Often glass is used to cover the walls and roof of the greenhouse. In terms of its structural structure and transparency, it is excellent for this room, but for the installation of glazing, it is necessary to create an especially reliable, durable frame structure, since this material has a considerable weight. Capital winter greenhouses are sometimes erected from metal-plastic frames and double-glazed windows, but such a structure will be extremely expensive.
Another option that is most often used to cover greenhouses is plastic wrap. It can be used for pulling on a frame erected from any material, as it has a very small mass. Recently, a special reinforced film has appeared on sale, which is more durable, and it is easier to fix it on the frame crate.
To determine the choice of material, you need to carefully study its performance characteristics, which are presented in this table:
| Material evaluation parameters | Cellular polycarbonate | Glass | Film |
|---|---|---|---|
| Miniature | |||
| Mount and weight | It is light in weight and can be used in certain structures without additional frame elements, as well as without a foundation. | Glass has the heaviest weight compared to other covering materials, and when choosing it, it will be necessary to think over a reliable frame installed on the foundation. | Polyethylene has a very small mass, but requires special fastening. If the material is not reinforced, then it is fixed to the frame through special rails and additionally fixed with thin stretched ropes. |
| Durability | Polycarbonate as a greenhouse cover can last 18÷25 years, depending on its quality. This material is flexible and has sufficient rigidity to be an element of a self-supporting structure. Fixed to the frame, it does not deform and does not warp. | Glass can last a long time, as it is not affected by ultraviolet rays and moisture. On the other hand, glass is a brittle and inflexible material, therefore it does not tolerate mechanical stress, heavy loads and deformation of the frame structure. | Polyethylene has the shortest service life compared to other coating materials, as it is exposed to ultraviolet radiation, from which it gradually collapses. In addition, it cannot be called resistant to temperature extremes. |
| Noise isolation | Cellular polycarbonate well muffles the noise of wind and rain, thanks to its structure. | If the installation of the material is performed poorly, then during a strong wind gusts of air can penetrate inside, and the glass will ring. | The film will not protect the greenhouse from noise, and if the wind is very strong, the material will rustle a lot in the wind. |
| Appearance | Polycarbonate gives the building an aesthetic appearance and is able to make an ordinary greenhouse a real decoration of the territory. | Properly installed glass will give the greenhouse a neat appearance. | The film looks neat and remains transparent only for the first season of its use, and even then - not always. Then, under the influence of the sun, temperature changes and wind, it becomes cloudy and loses its aesthetic appearance and light transmission. |
| Security | Polycarbonate has high strength, exceeding that of glass by about 200 times, and also lighter by about 15 times. When falling, the material does not break and cannot injure people inside or near the greenhouse with fragments. | Poorly installed glass is extremely dangerous for people working inside. In addition, if the fragments fall into the soil of the greenhouse, then you can seriously injure yourself during the subsequent tillage. Therefore, if the installation of glass is planned, then it is recommended to entrust its installation to professional craftsmen. | It is completely safe for people and for the soil of the greenhouse. |
| Care | It is easy to take care of this material - it is enough to wash it with water, setting a strong pressure in the hose. However, it should be noted that the dust on the surface of the polycarbonate is almost invisible, so the greenhouse does not have to be washed often enough. | Traces of raindrops remain on the glass, and dust is also well retained. To get rid of dirt on the surface, you need to make a lot of physical effort. It is especially uncomfortable and dangerous to carry out cleaning activities on the greenhouse roof. | The plastic film is not washed, because after wet cleaning, stains remain on it, and it becomes cloudy, which makes it difficult for the full penetration of light inside. The only way out in case of severe pollution is a complete replacement of the film. |
| Created microclimate | Polycarbonate is able to reliably thermally insulate the greenhouse and protect plants from the wind. Vapors deposited on the inner surfaces flow down them into the soil. In addition, the material not only perfectly transmits light, but also makes it softer and more diffused. The heat generated by the soil and plants is reliably stored indoors, which creates the greenhouse effect. | Glass is not able to create high thermal insulation, if it is not metal-plastic structures with double-glazed windows. The material perfectly transmits light, but does not scatter it, and sometimes even focuses on a specific bed, which is extremely harmful to plant leaves. | A dense new polyethylene film is capable of creating high thermal insulation, but over the season, under the influence of temperatures, sun and wind, it becomes thinner and loses its original qualities. Therefore, it is recommended that the film coating be changed every year. |
After weighing all the "pluses" and "minuses" of materials, as well as taking into account the design of the intended structure, it will be possible to make a choice of the type of coating.
Greenhouse structures
Greenhouses have various designs - it can be a spacious room or just a large box covered with a glazed frame. Structures are also used, half of their height going into the ground. It will be possible to stop your choice on one of the varieties only after the owner understands the features of each.
- The simplest greenhouse design, which can be built from improvised materials, consists of an ordinary box, for example, 2000 × 1500 mm in size, assembled from boards and installed in a favorable area of \u200b\u200bthe local area. For such a greenhouse, old ones are often used as a roof.
Such greenhouses are usually used for growing seedlings or greenery from early spring to late autumn.
- Another option that is simple and affordable in the construction of a greenhouse is a simple frame structure made of metal-plastic or polypropylene pipes, fittings, and sometimes even thick steel wire, covered with plastic wrap.
If plastic pipes are chosen for the greenhouse, then even women's hands can make a frame out of them, since this material bends quite easily and keeps its shape well.
A similar version of the greenhouse can be used throughout the spring-summer season, from spring to late autumn. The convenience of the design lies in the fact that by planting seeds under the film, for example, tomatoes, after germination and strengthening, the seedlings can not be transplanted. It is simply thinned out, and when a stable and comfortable temperature for plants is established on the street, the film is removed from the structure, opening the free flow of air and sunlight. In very hot weather, a special mesh can be quickly thrown over the created frame, creating partial shade, but allowing light to penetrate to the plants in the right places.
- A more complex structure, which is assembled from a wooden beam and covered with a film, can also be used throughout the spring-summer season. The dimensions of such a greenhouse can be different - they vary on how many seedlings are planned to be planted, and taking into account the convenience of the gardener.
This design necessarily provides for a hinged raising of the roof for access to the plants of sunlight and air. This is also a seasonal version of the structure, and it is advisable to use it only for growing seedlings, since in stable summer temperatures it is recommended to grow vegetables and herbs in open ground.
Video: homemade greenhouse on a wooden frame with film coating
- If you want to grow a small amount of greenery or seedlings, then you can make a greenhouse from a metal barrel, in which slots are made in the form of windows. A transparent polyethylene film is used as a roof in this design - it can be removed at any time by opening access to air, and if necessary, closed so that the night coolness of the off-season does not harm the plants.
- A more complex greenhouse design, in which it is already possible to install moderate heating and start using it in the very early spring. It consists of a wooden or metal-plastic frame. This is already a full-fledged room, and in it not only plants, but also the gardener will be protected from wind and low temperatures. Such a greenhouse can be covered with a very dense plastic film or cellular polycarbonate. When creating a pipe structure, you need to remember that it will turn out to be quite light, and a strong wind can move it from its place, damaging the seedlings, therefore, to bind it to a place, it is necessary to drive metal corners or reinforcement into the ground.
- The capital structure of the greenhouse, equipped with heating and irrigation, can be used throughout the year. In order for such a greenhouse to work effectively, it is usually made of metal-plastic or aluminum structures and double-glazed windows, which are installed on the foundation.
To make it easier to provide heating and water delivery to the greenhouse, quite often such structures are attached to the southern wall of the house. In this case, the building will serve as a kind of winter garden, which at any time of the year will delight the owners not only with fresh vegetables and herbs, but also with the color of ornamental plants.
Sometimes greenhouses are attached to the south side of the house, and they become real "winter gardens"- Another option for a winter greenhouse, the design of which helps to save on heating, is a room that extends half its height into the ground. This building, due to its high energy-saving qualities, is often called a "thermos greenhouse". To achieve the desired effect, a foundation pit is dug for this greenhouse, going deep into the ground by 1600 ÷ 2000 mm. Additionally, walls 500 ÷ 700 mm high are erected above the soil surface, and then the entire structure is covered with a frame made of timber or a metal corner.
The work on the construction of a building is quite laborious and lengthy, but during its operation it will be possible to save enough on its heating system. One of important points in the construction of a thermos greenhouse is the arrangement of not only the heating system, but also effective ventilation.
greenhouse roof shape
The next criterion by which greenhouses are subdivided is the shape of the roof. Insolation largely depends on this, that is, high-quality lighting of the room, and hence the creation optimal conditions for growing plants.
- gable roof
Greenhouses with a gable roof can most often be found in suburban areas, since it is this form that contributes to the effective illumination of the room from above. Given the correct location of the greenhouse, the sun will “work” all day from sunrise to sunset, contributing to the growth of plants.
"Classic" option - gable roofTherefore, this design is often used to create winter options for greenhouses, since at this time of the year the plants experience a shortage of sunlight.
- arched structure
Arched structures are made of metal-plastic pipes or metal elements. The first is usually covered with a polyethylene film, and the second option is most often covered with polycarbonate. Metal structures can be purchased ready-made, and they will only have to be assembled on the site. Well, a frame made of metal-plastic pipes is quite easy to make on your own.
The convenience of such a greenhouse lies not only in its maximum illumination, but also in the fact that snow masses and water do not accumulate on the arched roof, which means that the coating will not be subject to deformation due to heavy load. Again, it will not be necessary to climb to a height to remove snow from its surface.
- shed roof
- Under it, according to the marking, a trench digs, having a depth and width of 300 mm.
- Since the walls of the greenhouse are not as heavy as those of residential buildings, a foundation depth of 300 mm is sufficient to withstand relatively small loads.
- Above the ground, the base can be raised to a height of 200 to 500 mm, depending on whether the foundation will serve as walls or they will be made of brick.
- A sand cushion 50 ÷ 70 mm thick is laid and rammed into the finished trench, a layer of the same thickness is poured on top of it, and crushed stone is distributed.
- A formwork of boards and timber is fixed along the trench, into which roofing material is laid, which will become an excellent waterproofing for the foundation.
- In the next step, the formwork is filled with concrete, it is distributed, and then pierced with a bayonet spade and gently tapped on the formwork to remove air from the solution.
- If the frame will be made of a metal corner or it will be needed to fix the wooden bars, then sometimes the support posts or pieces of the corner can be immediately embedded in the foundation.
The basis for the greenhouse-thermos
For a thermos greenhouse, it is necessary to dig a deep enough pit, and if you plan to arrange an agrotechnical structure of a large area, you will have to use specialized equipment, since such manual work will take a lot of time.
- After marking the site, it is recommended to remove the top layer from it fertile soil. After removing the soil, they pile it up, because it is perfect for laying a finished greenhouse in the beds.
- When digging a pit, among the layers, you can stumble upon clay, which also should not be mixed with the rest of the soil, as it can be useful for waterproofing walls or making adobe blocks for warming a greenhouse.
- The pit is deepened so that the gardener working in the greenhouse feels free, and there is a lot of free space above him. In order to maintain the desired temperature in the greenhouse, and the soil does not freeze, it is recommended to deepen the pit by about 2000 mm.
If the pit is not deep enough, then you will have to raise the side walls, as it will be ideal when the total height of the pit will correspond to the growth of the gardener.
- The width of the greenhouse is usually from two to five meters. If the room is made wider, then it will quickly cool down, and a large amount of electricity will be required for lighting and heating. In addition, the construction of a transparent dome would be too complicated.
- When digging a foundation pit, a descent ramp is arranged on one side of it, where, along with the erection of walls, a ladder of several steps and an entrance door to the greenhouse will be installed.
- To begin work on ennobling the walls, a base is made under them. To do this, a trench is dug around the perimeter inside the pit. After that, a formwork is arranged in it and in the same way as in the case already considered, a strip foundation is poured.
- After the foundation is ready, you can proceed to lining the walls with bricks or foam blocks. When laying in the opposite direction from front door one or two ventilation pipes are immediately installed on the wall, at a height of 400 ÷ 500 mm from the floor.
The ventilation pipe is brought out and raised above the ground by 1000 ÷ 1500 mm.
- Separately, it must be said about the masonry, since in this case, it is produced in a special way.
- To save on insulation, instead of bricks or foam blocks, which are not cheap, you can use clay extracted from the pit, which is mixed with chopped straw and adobe bricks are formed from this mixture.
- If there is no desire to waste time, and there is an opportunity to purchase foam blocks, which are called fixed formwork, then you can immediately get "bricks with insulation." The blocks are hollow, and they are filled as they are installed on top of each other with concrete mortar. Choosing the latter option, you will need to separate the foam wall from the soil surface of the pit with roofing felt or plastic wrap.
After the solution in the blocks hardens, a film or roofing material is hooked onto it, and the gap remaining between the waterproofing material and the soil wall of the pit is filled with clay or a mixture of clay and soil, and when filling, it is periodically tamped.
- If a brick is chosen for wall decoration, then it is insulated from the outside with the help of foam, which is mounted between the brick and soil wall. Thermal insulation material must also be protected or roofing material. The resulting gap, as in the first case, is filled with soil.
- If the walls rise above the ground by 400 ÷ 600 mm, then they also need to be insulated and waterproofed. If desired, the wall protruding above the ground can be finished with a decorative coating - it can be clinker tiles or plastic lining for outdoor use.
- If the walls are not high, then after waterproofing they can be sprinkled with a layer of expanded clay, which is covered from above with corrugated board, fixed to the top of the wall. The corrugated board will provide an outflow of water that will drain from the greenhouse cover and keep the walls dry.
wooden foundation
Another material for the foundation can be wood, or rather, a wooden beam, having a section size of 100 × 150 or 150 × 150 mm. Such a foundation is suitable for a greenhouse that is used seasonally - from spring to autumn.
In order for such a foundation to serve for a long time, the wood must be treated with antiseptic and water-repellent compounds and installed on a sandy, well-packed pillow. Another option is to raise it above the ground using concrete slabs.
Construction of a thermos greenhouse
The installation of all greenhouses takes place in different ways, depending on the type of construction and the period of use of the structure, since the "winter" options require a more thorough approach and additional functions. Probably, it is worth considering this, the most difficult option.
- After the walls are ready, you can proceed to the installation of the frame under the greenhouse cover.
- The frame is mounted from a metal profile or a wooden beam.
- The first step is to attach a 100 × 150 mm beam to the walls of the greenhouse. Fixation is carried out by anchor fastenings or using embedded embedded elements.
- The rafter system must be assembled from a bar of the same section as the strapping. To install the rafter legs on the harness, marking is carried out, since the rafter pairs must be distributed at the same distance from each other.
- The rafters are fixed to the strapping with metal corners, and in the upper part they are interconnected using metal plates or using a ridge board.
- Wooden bars of the crate are fixed to the rafters, but with a fairly large step. There should be no more than two or three of them for each slope so that they do not block the sunlight.
- Polycarbonate sheets are laid on the crate, which are fixed to it with the help of special fasteners with bushings and rubber gaskets to prevent the possibility of leakage.
- Having completed the fastening of the covering material to the slopes, it is mounted in the same way on the gable parts of the roof.
- After that, the door frame and the door itself are installed. It is desirable that the door leaf also be equipped with a transparent insert.
Creating optimal conditions for plants in the greenhouse
Thermal insulation of the greenhouse
In a greenhouse with a gable roof, one of its slopes must necessarily go south. The second side inside the greenhouse is recommended to finish. Such a system will help not only to keep warm, but even increase the illumination inside the structure, since the sun, falling on the insulation foil, will be reflected into the room.
The insulation is fixed on the rafters with self-tapping screws, then it is bent onto the wall and glued to its surface using liquid nails. In the same way, all the walls of the greenhouse are insulated, only the transparent southern slope is left uninsulated, and the western end transparent side of the structure can be left.
It should be noted that foil polyethylene foam is an excellent vapor barrier membrane, and is able not only to enhance the lighting of the greenhouse, but also to keep water vapor and carbon dioxide inside it, which are the main nutrient medium for photosynthesis, which determines the growth and development of plants.
In order for the heat not to leave the greenhouse, it is necessary to create a reliable tightness of the greenhouse space. To do this, it is imperative to install doors or valves on the ventilation openings, on which it will be possible to set the desired gap as necessary or close them completely.
Greenhouse heating system
2. The coefficient of infiltration depends on the difference between the external and internal temperatures in the greenhouse. You can use the following table:
3. The temperature inside the greenhouse (indicated in the formula t1), is usually taken equal to:
- For growing seedlings - + 25 ° С;
- For the normal development of vegetable beds - + 18 ° С.
If some exotic plants are grown, then the corresponding values are taken.
4. Outside temperature ( t2) are taken based on the results of meteorological observations in a particular region - the minimum during the coldest week during the planned season of using the greenhouse.
5. Thermal conductivity indicators ( wtp), that is, the amount of thermal energy that is transferred to the outside by a coating of 1 m² with a temperature difference of 1 ° C, depends on the type of material and its thickness. The table below shows the values for the most commonly used materials for covering stationary greenhouses:
| Material | Thermal conductivity (W/m²×°С) |
|---|---|
| Glass: | |
| - thickness 4 mm; | 5.82 |
| - thickness 6 mm; | 5.77 |
| - thickness 8 mm; | 5.71 |
| Polycarbonate sheet monolithic: | |
| - thickness 4 mm; | 5.33 |
| - thickness 6 mm; | 5.09 |
| - thickness 8 mm; | 4.84 |
| Polycarbonate honeycomb sheet: | |
| - thickness 4 mm; | 3.6 |
| - thickness 6 mm; | 3.5 |
| - thickness 8 mm; | 3.3 |
| - thickness 10 mm; | 3.0 |
| - thickness 16 mm; | 2.4 |
Having all the necessary data, it will not be difficult to calculate the required electric heating power of the greenhouse. Even easier - use the online calculator below.
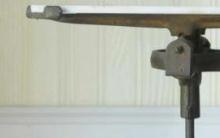


Summer corporate parties: new ideas for outdoor leisure
What is franchising and franchise: understand the intricacies, get to know the giants What is the name of the franchise seller
How to make life easier. Book: Carnegie D. “How to make your life easy and interesting. Do what you really really like
How to resist the tricks of sellers and buy only the things you need
How can a worker, a peasant and an intellectual make money for bread and butter?