If you want to present information in a structured way to business partners or the whole room at an event, you should arrange it in the form of a presentation, not a Word document. A concise summary of the main ideas will serve as an excellent accompaniment oral speech. And it doesn’t matter if you still don’t know how to work with the relevant programs - how to make a presentation on a computer: a step-by-step instruction with a photo will tell you in detail.
Presentation plan
Before picking up a mouse or typing, think over a speech plan. You can build it according to one of the run-in templates, for example, “Problem - solution - arguments”, or think over your own version of the structure. The main thing is that the sequence of presentation should lead the audience to the idea that you put into the presentation as the main goal.
What to use to create a presentation
There are various tools for preparing presentation materials:
- editors installed on a PC. If in doubt about which computer program is better to make a presentation, try the de facto standard PowerPoint and one of its analogues, for example, the free Impress from the OpenOffice package. Compare the sensations and choose the right tool for you;
- online services that require only a browser. Both Microsoft and Google and other companies have such tools.
How to make a presentation on a computer in PowerPoint
For example, let's figure out how to make a presentation in the most popular Point. All screenshots below assume office suite 2013 or newer. In 2010 and 2007, the steps may be slightly different.
How to create a presentation and add slides
To make a presentation, you must first click on the “Create” item in the “File” section of the Power Point menu, and then select one of the proposed options on how to arrange it (you can then change it yourself). Each theme comes with a good mix of backgrounds, key colors, fonts, and other settings. You can also immediately click "Create", then the "empty" template will be used.
To add slides, use the special button in the "Home" submenu.

Clicking on the bottom of the button will open a selection of one of the preset slide layouts.
If you want to make a picture as a background, or fill it (with a single color or as a gradient), select Design from the presentation menu in Microsoft PowerPoint and then from the tools select Background Format. A special panel will open where you can switch between options and adjust their parameters.

Changes you make are applied to the selected slide by default.

Hint: The quick save command is Ctrl-S.
Work with text
To add an inscription to the desired element, first click on it. After that, you can type text.

In PowerPoint, you can use various decorations, such as a colored background under the text or changing the color of the letters, to make your presentation look beautiful. To do this, select a piece of text and then use the appropriate element from the main tab.

If you need to change the background or border of a text element, then first select it with a click, and then on the Format tab, use the buttons to fill or outline the shape.

The Text Effects button in the same section allows you to add:
- shadows;
- reflections;
- backlight;
- relief.
You can also expand or transform text.

Inserting additional elements
To insert images, use a separate button in the Insert section. By clicking on it, a file selection dialog will open, where you need to specify an image and click "Insert". Also in this section of the menu there are tools for adding tables, charts and other elements.

If your own graphics are not enough, you can choose to insert an image from the Internet. The search is performed using the Bing search engine developed by Microsoft.

Life hack: for quick insertion, you can use the icons that appear directly in the empty field.

How to make a hyperlink in a presentation
If you're preparing a presentation to send to someone, knowing how to hyperlink it to an online resource will come in handy. This is useful when you need to add regularly updated content, but the file will no longer be available.
Select the piece of text that will be used as a link. Next, open the "Insert" menu, and in it click on the link button. A submenu will appear with two options.

Working with multimedia
To make your slide presentation more lively, you can add a media file on your computer to it, or you can create a new one. To do this, use the corresponding item in the insert submenu.

By clicking on it, a choice of options will appear:
- video - allows you to specify a video from a PC or from the Internet;
- sound - allows the integration of an existing track or the recording of a new audio fragment;
- screen recording - calls a special module for recording actions, in which you can specify the area, activate sound (from the microphone) and display the mouse pointer.
Applying transitions and animations
Animations, like transitions, were considered by the developers to be important enough elements of the presentation to make separate tabs for them in the menu.
Various preset options are available for transitions between slides, such as shift or fade. By default, they are not active, so choose the appropriate type yourself.

Additionally, you can specify the sound used, set the duration of the effect and specify when it should work - on click or after a certain time.
The animation submenu allows you to apply effects to individual slide elements. For example, you can set up the sequential appearance of list items, both in automatic mode by a set delay, and by clicking (if the presenter prefers to manage the process himself).

Demonstration and presentation
When the preparation is over, you need to rehearse the performance. You can make a presentation right on your laptop, as if you were presenting a presentation to potential listeners. To do this, go to the "Slideshow" tab and select the leftmost icon (if you want to start from the very beginning) or the second one, to start from the current position.

Nearby is an icon for conducting a demonstration via the network. This is a good option if you want to show it to a remote listener. However, there is another way that allows you to make a full-fledged video from a presentation on a computer, including media inserts, both photos and music - this is to run it as a slide show recording.

In this mode, you can add voice-overs and pointer movement to your slides. Also, the program will automatically fix the time intervals. After that, all that remains is to use the "Save As" option from the File submenu.

And specify one of the available video formats as the result type - for example, MPEG-4.

Keep in mind that this operation may take a significant amount of time, especially on weak PCs.
Online tools
If you need to make a presentation for free, but want to do without PowerPoint, you can use online tools (however, you can hardly do without registration). However, if you already have a Microsoft or Google account, the corresponding services will be available to you.
PowerPoint Online
An online version of MS Presentation Editor is available at https://goo.gl/VXCC37 . Its operating principle is the same as similar program for PC.

However, there are also some differences. For example, there is no option to add a chart in the insert panel. But pictures, tables, shapes and hyperlinks are easily added.

Also, by default, a simplified display mode of the menu ribbon is used, but it can be returned to the full view with the switch at the top.

Google Slides
Google to create new presentation selected a whole domain - https://slide.new/ .

You can also jump to the appropriate tool directly from the service itself https://docs.google.com/presentation/u/0/ .

Functionally, the editor is similar to its counterpart from Microsoft - and even knows how to save it in its format.

Plus there is support for charts along with other objects.

How to avoid preparation mistakes
Leave only the most necessary slides. If there are too many of them, the attention of the listeners will be overloaded, they will hardly remember everything.
The same applies to the content of the slides: it is better to leave only the key thoughts or ideas, accompanied by a vivid and memorable illustration. Long text should be avoided, as the audience switches to reading and stops paying attention to the speaker.
If you need to mention some facts, it is better to use slide notes. In PowerPoint, you can open them from the bottom of the screen.

Finally, check the presentation for errors - factual, logical, spelling. All of them reduce the credibility of the speaker.
A presentation is a great way to make your presentation more understandable and interesting to the public. Now presentations are created mainly in the PowerPoint program that comes with the kit. office programs from Microsoft. In this article, you can read a small step by step instructions creating presentations in Microsoft PowerPoint. The article will be relevant for PowerPoint 2007, 2010, 2013 and 2016.
Step 1. Launch PowerPoint.
To start creating a presentation, just run PowerPoint. This can be done using a desktop shortcut.
If there is no shortcut for PowerPoint on your desktop, you can launch the program by searching the Start menu. To do this, open the Start menu and search for "PowerPoint".
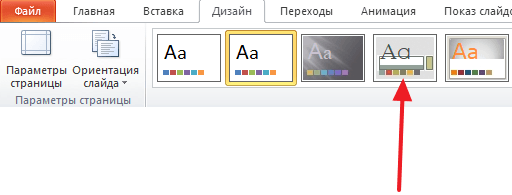
Step number 2. Choose a design future presentation.
After PowerPoint is launched, you can immediately start creating a presentation. It is best to start with design, for this go to the "Design" tab. On this tab, you will see a large list of ready-made presentation designs. Choose one of the available options.
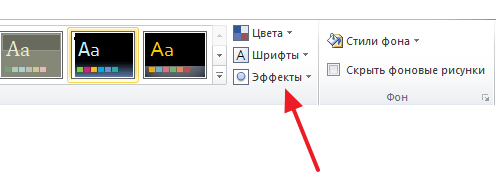
To the right of the list of pre-made designs, there are Colors, Fonts, Effects, and Background Styles buttons. With these buttons, you can customize the selected design to suit your requirements. You can change the color and font of the text, the background color of the presentation, and add additional effects.
If ready-made designs are not enough for you, then you can search the Internet for other templates for PowerPoint presentations.
Step #3. Create slides.
After choosing a design, you can start creating slides for your future presentation. This is done using the "Create Slide" button, which is located on the "Home" tab. Click the down arrow below the Create Slide button to open a menu of available slides.
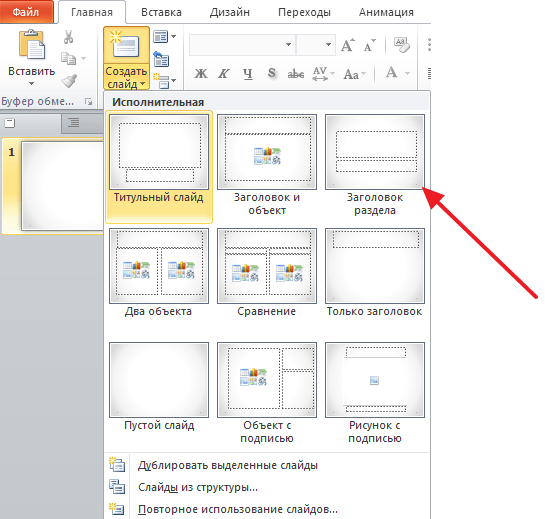
In the menu that opens, you will see several types of slides. These are the Title Slide, the Title and Object slide, the Section Title slide, the Two Objects slide, and so on. Choose the type of slide that suits you and click on it with the mouse. For example, we will create a title and object slide. The result will be new slide with a title at the top of the slide and an empty box at the bottom.
Step number 4. Filling in the created slides.
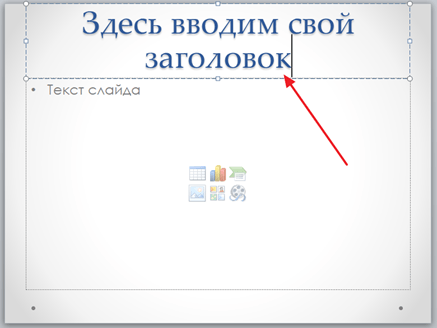
After creating a slide, you can fill it with information. To get started, you can change the title of the slide, to do this, double-click on the inscription "Slide Title" and enter another text.
After the title is entered, you can fill in the empty field under the title. If there should be text under the heading, then simply click on the empty field and enter the desired text.
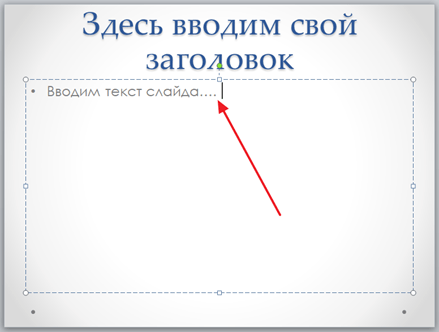
If there should be some other information under the title, for example, a video or a picture, then for this you need to use the buttons that are located in the middle of this field. There are six buttons available for inserting tables, charts, SmartArt, photos, pictures from your PowerPoint library, and videos.

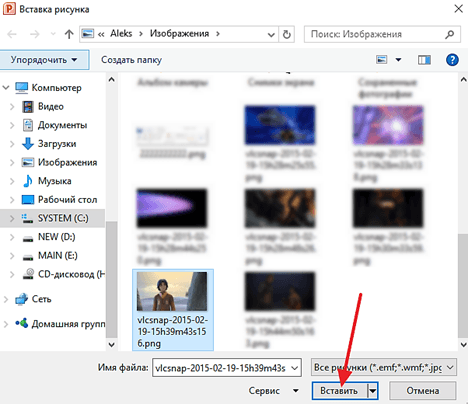
When creating presentations in PowerPoint, photos are most often inserted, so we will consider this option. In order to insert a photo from a file, you need to click on the button with the image of the photo. After that, a window for selecting a photo will appear. Select the desired photo and click on the "Insert" button.
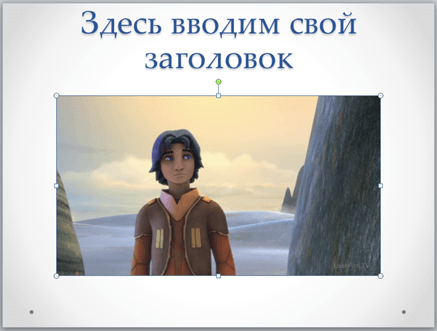
The photo of your choice will then appear below the title of the slide.
Thus, you have created a PowerPoint presentation from one slide. To add another slide, return to the Home tab, click the New Slide button again, and add another slide to your presentation. After that, you can fill in another slide with information. Repeat this procedure until the presentation is ready.
Step #5 Preview presentations.
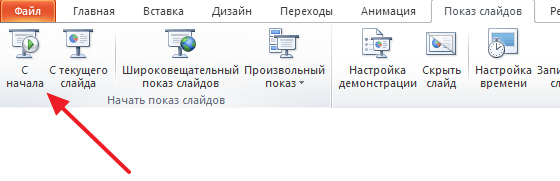
In order to evaluate the created presentation, go to the "Slide Show" tab and click on the "From Beginning" button there. After that, the presentation will open in full screen, and you can see how it will look in its finished form.
You can also click on the "From Current Slide" button. In this case, the playback of the presentation will not start from the beginning, but from the frame where you stopped while working with the presentation.
Step #6: Save the presentation.
After the presentation is created, it must be saved. To do this, open the "File" menu and select the "Save As" option.
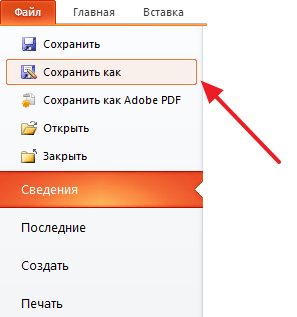
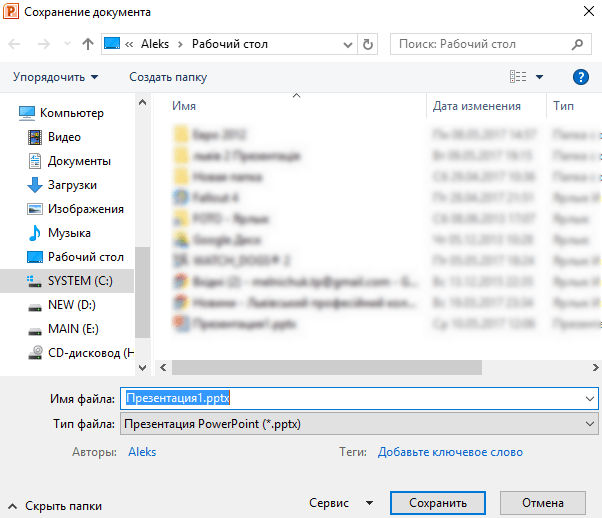
As a result, a window for saving the file will open. In this window, you need to select a folder and click on the "Save" button. This way you will get the file PowerPoint presentations in PPTX format, which you can then open and continue creating your presentation.
If your presentation is already ready to be shown, then you need to additionally save it in a different format. To do this, you need to use the “File - Save As” menu in the same way, but before saving, change the format to “PowerPoint Demonstration”.
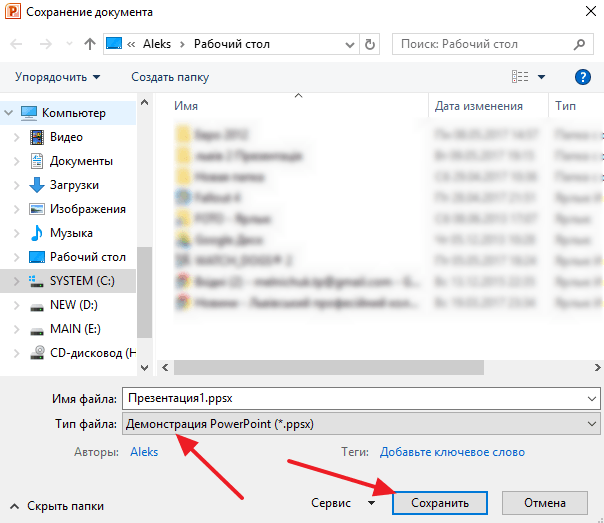
After such saving, you will receive a file in PPSX format. The advantage of this format is that the presentation starts playing immediately after opening it, while the interface of the PowerPoint program does not even appear. But, files in PPSX format cannot be edited, so the presentation must be saved in both PPTX and PPSX formats.
I want to disappoint you, but PowerPoint does not include design templates. Often these templates are no longer in vogue and will immediately be perceived by your audience as a "low-quality product".
I suggest 2 solutions:
1. Don't use templates at all. Unite your slides with a single color scheme and make the format and position of the titles the same on all slides except the first and last.
2.Create your own templates if you plan to use and edit this presentation in the future. To do this, we need to go to the tab View -> Slide Master. This is a secret room, which not everyone knows about, as practice shows :) 
In this section, we can create our own template!
I usually delete all the default master slides in the left tab and create mine from scratch. All you need here is to add fillers and decorate them.
Now you have your own template. Bonus: As a reward for reading this section, I want to give you my secret weapon for creating presentations - a free template of 800 animated slides with infographics, icons and maps, which is very creative. Believe me, it's worth it :) (on our page you can subscribe and get 800 cherished templates)
2 Use 3-5 base colors when creating presentations.
Please do not use more than 5 different colors in your presentation. Moreover, use only 3 base colors, as the other 2 are usually shades of the base colors. How to choose a color palette.
⁃ One of the three shades should be highlighted for the background. Decide right away - it will be a presentation with a light or dark background. If you are an advanced designer, you can try to alternate, but in this article I skip these experiments.
⁃ Next, choose a color for the text. It should be as contrasting as possible with respect to the background color. The ideal and often found option: the background is white - the text is black. But this option is inferior in terms of creativity :) So let's look at a few examples. Maybe I can give you some ideas:Gray background, blue body text and dark gray accent. White background, black text, blue accent. 3 Colors. Alternates with a dark background and white text. Dark background, white text, light green accent. Shades of light green are also used here and a dark and light background alternates.
If you still couldn’t decide on a color palette or you don’t have a company/project brand book, then I suggest you the following resource color.adobe.com
Here you can choose a color palette based on the image, and also in the "Explore" tab (Watch) see the solutions of other users and even find out the number of views and likes :) 
3 Refuse 3D icons from search engines - turn to linear and flat icons.
Unfortunately, I still often see slides that use voluminous low-quality icons. Now it is an outdated theme and looks very ugly. And some do not use icons at all, which is also bad, because visualization is important in the presentation, and not just solid text. Purpose of icons: replace unnecessary text and speed up the memorability and comprehensibility of information. My advice to you: use icons from this resource when creating a presentation - flaticon.com
Flaticon icons will make your presentation more modern and concise.
There is a section there Packs", where you can find icons of the same style on a specific topic from one designer. I advise you to comprehensively select icons in this way so that everyone is in the same style.
Subconsciously, we feel every detail in the presentation up to the line thickness of the icons, and if this thickness is different between the icons, then the presentation immediately ceases to harmonize, and subconsciously we no longer perceive it as a quality one.
Also, when working with icons, I want to note such a trend among people as "syndrome of blindness". This is when everything in the presentation is done in large sizes - "for everyone to see." Making everything huge will greatly reduce the quality of your presentation, and icons only look good at small sizes. Let's look at an example:
4 Each slide is a picture and needs a frame. Or not needed?
When creating a presentation, respect the frame from the borders of the slide. Moreover, large frames are in fashion now. Important: the distance from the borders to the content of the slide should be the same on all sides. Example: What can happen? It may turn out that the content that you planned to place does not fit on one slide, and that's good! No need to try to cram everything on one page. It's better to split it into two slides with the same title.
One slide - one message.
Why do everything in large sizes - the slide needs air.
5 Give up bad habits. Quit with serif fonts.
If you are not an avid designer and do not experiment with fonts, then I advise you not to use serif fonts.
I offer you the following list of fonts: System fonts:
Arial Black (headers only)
Calibri Third party fonts:
Bebas (headers only)
Gotham Pro How to combine fonts when creating a presentation?
If you have never touched on the topic of font combinations before, then I advise you to use only one group of fonts when creating a presentation and change only its type. For example, make the heading Arial Black, and for plain text Arial, or another option from third-party fonts - the heading is Raleway Bold, and the body text is Raleway Regular.
If you still decide experiment, then you can try the following combinations:
Bebas Bold - header
Raleway Regular - plain text
For other combinations, I prefer to choose one font and change only its type. This is more correct.
And here's a couple links which I personally use to download fonts:
6 When creating a presentation, use only high-quality images.
This is generally a sore subject. Especially here in Russia. If anyone read Artemy Lebedev's book "Kovodstvo", then there he clearly notes how, due to the fall of design culture after the collapse of the USSR, our population's taste for quality design was distorted in parallel. Perhaps you are reading now and will never appreciate the work that I am celebrating here. And it's not because you're a bad person, but because our environment hasn't allowed you to develop good design taste.
I can only give advice something that has been working great in our studio for several years and is valued internationally (tested on all continents of planet Earth):
⁃ Do not use images from search engines as background images if it is not necessary
⁃ Download images only from specialized sites where photographers publish their work
⁃ Use images as background high resolution- for me it is at least 1000 pixels in height and width
⁃ Do not use stock images with forced smiles of people and a white background. It looks unnatural.
⁃ You can use the following resources as sources: flickr , unsplash , everypixel
7 Do not use outlines. Either fat or nothing.
Now let's dive into the design a bit.
You may notice that when you draw a shape in PowerPoint, it may come out blue and with a light blue outline. Important: remove these lines immediately. They will only emphasize that you are not in trend and did not want to bathe with the design of the presentation.
Which begs the question: are contours out of fashion now?
Answer: no, they just mutated into large frames :). Here are the contours you can still use now:
And the rest - yes, the contours have gone out of fashion like white wigs once did.
8 Do not use shadows. Either large and blurry, or none.
Shadows, of course, have not gone out of fashion, unlike contours. But they have turned into something exclusive and expensive. Like a Patek Philippe watch. You either buy an original or a Chinese fake and everyone understands that this is a Chinese fake.
The moral of the story is this: if you can create trendy shadows, great! If not, then please cancel them everywhere in the tab " Format".
PowerPoint comes with shadows by default (especially in earlier versions). And I can tell you for sure that such shadows should be removed immediately from the template. Let's look at examples: Bad shadows from PowerPoint

Nice shadow from Dribbble Nice shadow from PowerPoint I even attach the settings for you if you still want to use shadows. But use this power wisely ☝ and don't cast such a shadow on all the figures in a row so that they don't fill the entire background.
9 How to make tables and charts beautiful? Remove all unnecessary.
Here, in fact, the rules intersect, but I noticed that for some, when it comes to tables and diagrams, they seem to forget everything: the rule of colors, outlines, shadows, frames, and the like.
However, I have already described all the errors. The only thing left to do is not to do it. :) Let's see in practice:
Here is the smoker's table:

What is the difference? One is heavy and bulky, the other is clean and concise. Note:
⁃ There is free space between the cell border and the content.
⁃ Of course there are no contours
⁃ No extra shadows
⁃ Some fields are not shaded at all
10 The slide is your canvas. Be creative. Imagine that you have a brush in your hand.
If presentations were created in Paint, the slides would look much more creative. I say this because often we ourselves drive ourselves into PowerPoint template frames, although there you can also create unique works of art. Consider examples of slides created in PowerPoint:
 I wish you to create only high-quality presentations for your projects!
Microsoft's Power Point presentation program has become a powerful tool for designing the visual component of any report. No serious performance is complete without a video presentation or slideshow. The ability to create them will become a reliable assistant to any speaker.
How to create a powerpoint presentation
You will need a computer or laptop to work. The second option is preferable because it can be brought to the venue and connected immediately to the projector. Before you make a presentation in powerpoint, you need to find all the information that will be used, draw up a report plan. Remember that the program saves the result in electronic format. books pdf, only playable with powerpoint or PDF Reader.
Before starting production, it is important to clearly understand that the presentation is a reinforcement and accompaniment of your words, but not a replacement. It is necessary to think over all the components well, to find necessary materials. The concept of the performance will form the basis of the design, structure, font selection, and more. Here's what should be the base before you do it beautiful presentation in powerpoint:
- theme for the presentation;
- text;
- drawings, photos and graphics (where relevant);
- music and other sounds (if musical accompaniment is also considered).
To get started, turn on the powerpoint presentation editor. And here you will face several important tasks:
- use ready template;
- create each slide separately manually;
- use a standard design or make your own.
Presentation title page design
Making a title page is both easy and difficult at the same time. On it, as a rule, the title of the report, companies, name and surname of the speaker is located - nothing complicated. However, the first slide creates the first impression, which, as you know, cannot be made a second time. In many modern versions, when creating the main page, only the topic of the report is used. For this you need:
- Select "Create Slide" from the top menu.
- Right-click on it and select "Layout" from the drop-down menu.
- In the next drop-down submenu "Header Only".
- Move the frame that appears to the center or to the top of the sheet with the mouse.
- Enter the required text.
Background for power point
In the program, you can make a picture a background or use one of ready-made options color schemes (schemes). Settings allow you to apply drawings to the entire document or to individual selected pages. To assign a design to the entire file:
- Select the "Design" menu.
- Go to the "Themes" tab.
- Activate your favorite.

In some cases, it is necessary to highlight one specific or group of slides so that the style does not match the rest of the presentation. To do this, you need to follow these steps:
- Go to the "Slides" tab.
- Select with the mouse the pages to which you want to apply a different design.
- In the "Themes" tab, right-click on the desired option.
- Select Apply to Selected Slides.
How to make a slide
The basis of any report with visual accompaniment are presentation slides. To create, you need to find the “create slide” icon on the top panel and click. If you do not find such a button, then you can go through the "Home" menu section and find it there. Next, you will have the opportunity to design a section: insert text, pictures, create a background, etc. If necessary, slides can be deleted or numbered. To do this, select the desired one in the left column and press the “delete” button on the keyboard. You can swap frames by dragging them in the left menu with the mouse.

text in powerpoint
After the report is created, it must be issued. As a general rule, all pages should have text − short phrases or whole sentences. You can insert text directly from other documents or add it yourself, for example:
- Select the area you want and click on it.
- Type the required text.
- Using the powerpoint top menu, which is very similar to Word, adjust the font, size, color.
- You can move the text with the mouse.
Working with pictures
When you need to make a beautiful, visual and cool presentation, use pictures, photographs and graphics. The latter are now particularly popular, because they are easy to perceive and see specific data that carries a semantic load. To style your presentation in this style, you need to use the image insertion features in your document. To add a photo, do the following:
- In the top menu of powerpoint, select the "Insert" section.
- In the submenu there will be a button called "Picture".
- An additional window will appear, through which find the location where the file is stored and select the picture by clicking the "Insert" button.
- You can move the drawing with the mouse.
- The frame surrounding the file helps to resize, just drag the corner.
How to make a presentation with music
You can make a presentation with a musical component, but you should be very careful in this matter. The slide show should play a secondary role and not distract the audience from the speaker. It is appropriate to use musical accompaniment only if it complements the performance, does not distract from the main idea and awareness of what the person is saying. On the other hand, this is another interactive tool that creates an atmosphere, so you can use it. How to add music to a presentation in Power Point:
- Find sample music online.
- At the top of the powerpoint menu, go to the "Insert" tab.
- In the submenu, find the Media Clips button.
- In the drop-down submenu, select the sound.
- In the window that appears, find the desired file and click "Insert".
- Next, you can make the audio in powerpoint play automatically when you go to the slide or by clicking on it.

Slideshow presentation
In some cases, the presentation consists of only a visual component, with short comments by the speaker. As a rule, this is a report on the work done or simply a presentation of the appearance of the product. The person in the hall will look at the image, which is what the emphasis is on. For such cases, the slideshow function is well suited. The frames themselves will change with a certain interval of time delay. To do this you need:
- Create a new presentation.
- Go to the "Insert" tab, select the "Photo Album" section.
- In the window that appears, click on the "File or disk" button.
- In the explorer window, select all the necessary images.
- Optimally, in the lower part of the window, select the “Fit to Slide” item from the “Picture Size” drop-down menu.
- Click Create.
After that, all the pictures will appear, each separately, and one will be the title page. The word "Photo Album" and your name will also be written there. If desired, this text can be deleted or replaced with any other. You can then modify these slides as you like according to your needs, add and remove them, add music. Then just save the presentation.
Video: Animate in a PowerPoint Presentation
Did you find an error in the text? Select it, press Ctrl + Enter and we'll fix it!Discuss
How to make a presentation in powerpoint
Greetings, dear readers of the site. Today I will tell and show how to make a presentation in PowerPoint using the 2016 version of the program as an example (the interface of 2010 and 2007 differs little, so you can work with them according to the instructions). At first glance, it may seem that there is nothing difficult in creating a presentation, but in fact, a poorly thought-out presentation can spoil the whole impression of a speech. Consider the issue of presentation design and content, slide show functions and formats for saving presentation files.
Let's get started.
Getting Started in PowerPoint
We launch the PowerPoint program through the "Start" or a shortcut (it must first be installed - it is included in the standard Microsoft Office package).
After launch, a window will open as in the screenshot above, in this window you can select a ready-made presentation template that suits your topic.
The template is an example finished presentation. You can open any of the proposed options and get acquainted with appearance template and read information about it in parallel.
But since we are learning how to create presentations on our own, we are interested in an empty presentation.
Before starting to create a presentation in PowerPoint, let's get acquainted with the workspace of the program. At the top is a ribbon-type menu. On the left is the slide navigation, icons of your slides will be displayed here, through the navigation you can delete extra slides or change their order. The slide that you are currently editing is displayed in the center.
Presentation design in PowerPoint
Create a slide and choose a layout
First, let's add some slides by clicking on the "create slide" button. If you click on the white icon above the inscription "create a slide", then it will automatically be added with the layout title and object, but if you click on the inscription itself with a down arrow, a drop-down menu will appear with all available layouts.
As you create your presentation, you can change the slide layout by clicking on the "layout" button next to the create slide button.
At this stage, I usually fill in the slide titles for my presentation to understand how many slides I need and what layouts will suit them. After that, you can already proceed to the design of the presentation.
Choosing a Presentation Topic
One of important points in creating a presentation in PowerPoint, this is its design. To begin with, we will select a theme, for this we go to the menu in the “design” tab.
Slide background and text style selected in the theme
In order to open the full list of topics, click on the arrow with a horizontal line above it. There are not so few topics, there are plenty to choose from.
In each theme, you can change the color scheme, which expands your options. To change the color palette in the "options" section, you need to open the drop-down menu by clicking on the arrow with a horizontal line and select "color".
In some themes, slides with different layouts look different.
Don't limit yourself to pre-installed PowerPoint themes, look for new topics on the net, today the choice is huge. If you are working in big company, where there are corporate colors and a logo, then this company probably also has a specially designed corporate theme.
Make sure that the design does not detract from the main information in the PowerPoint presentation.
The last thing to look at in the design tab is the size of the slides. PowerPoint offers two standard sizes, but it also provides the option to manually adjust the sizes. This characteristic depends on the equipment on which the presentation will be shown.
Transitions between slides
Let's go to the Transitions tab. Transitions are animations with which one slide will replace another. There are three types of transition animation in PowerPoint: simple, complex, and dynamic content. You can choose your own transition for each slide, but it's best to stick to a single style.
You can adjust the sound and duration of the transition animation, sound is rarely used these days, and the duration should be as short as possible.
Here you can also set up a slide change, whether one slide will change another on your command “on click” or the change will be made automatically after the time you specified has elapsed. If the presentation accompanies your presentation, then it is better to change slides “on click”, you will never be sure that it will take you as much time as planned for this or that slide. There may be problems or you may be asked a question, with automatic change, the presentation will run forward. If you create a mini video with PowerPoint then automatic slide change is for you.
How best to present information
The basic principles of filling when creating a presentation in PowerPoint:
- less text;
- more visual materials (drawings, graphs, tables).
Text
The text must be well readable. Use a contrasting background (dark text and light background). On a large screen, image clarity may suffer, so do not use rounded and serif fonts, they will be difficult to read at a long distance.
Do not use small print, to check readability, reduce the scale of the slide to 50-60%, make changes if necessary. Ideally, use a font size of 28 or higher.
Here are a few fonts that are great for presentation design: Calibri, Arial, Tahoma, Verdana.
Text italicization, underlining and bolding is allowed only to highlight key points (1-2 pieces per slide).
Visual information
Images, graphs and tables are always perceived better than long postulates.
In most layouts, the insertion of various media, tables and graphs is already provided, just click on the desired icon.
Or you can insert a specific element through the "insert" tab in the menu.
Even when using visual information, it is necessary to monitor readability, do not cram tables with hundreds of positions into one slide, it is better to break it into 2-3 slides or leave only a few positions for an example.
I want to draw attention to the SmartArt function, with its help you can systematize and arrange any information without any extra effort.
As you can see from the screenshot below, here you can arrange lists, processes, cycles, and so on. I remember how in the first versions of PowerPoint I had to suffer when creating a hierarchy, drawing everything with simple shapes, and how much time it all took ...
Now we find a suitable list and simply enter information into the template. You can adjust the stylistic design of the blocks to the design of your entire presentation at any time.
If everything is more or less clear with pictures, graphs, tables and diagrams, then with the use of audio and video it is very easy to get into trouble. If you use audio or video files when creating a presentation in PowerPoint, then when transferring the presentation file to another drive, be sure to transfer media files as well, otherwise they will not be available for playback.
Animation in PowerPoint
We have already covered the slide transition animation, but the animation can be customized for absolutely all elements of the presentation. To do this, go to the "animation" tab, select, for example, the title and select any animation.
When setting up animation, each action will occur in a certain order, the serial numbers are indicated on the top left of the object.
You can change the order in the process of creating a presentation also on the "animation" tab.
The most unusual presentation I have seen was a presentation consisting of 2 slides: a title slide and an information slide, where the elements changed each other with the help of competent animation settings.
After the complete design of the PowerPoint presentation, we proceed to the show.
PowerPoint presentation slide show
To show slides, go to the menu on the "slide show" tab.
You can start your presentation from the very beginning or from the current slide (the slide that is currently open).
PowerPoint also offers a time setting for automatic slide transitions, this is a kind of rehearsal before the performance. The program will record how much time you spend on each slide and based on this data you can adjust the slide change timer.
Sound accompaniment
Recording a slideshow allows you to record the text accompaniment of the presentation, which will be played during the show. You can voice selectively slides or the entire presentation. Voiced slides will have an icon and a player as in the screenshot below.
A custom slide show allows you to set up the display of not the entire presentation, but only part of it. This feature is useful for adapting the presentation to different groups of viewers.
Saving a presentation (quality and file types)
The presentation is framed, completed, set up and rehearsed, you can proceed to save it. To do this, click "file" in the menu.
If you have recorded audio, then first set up the settings for saving the recording.
PowerPoint offers three options for saving media and the ability to undo previous compression.
If you plan to edit the presentation in PowerPoint in the future, then select “PowerPoint presentation.pptx”.
To save without the possibility of further editing, select “demonstration PowerPoint.ppsx”. If you select this option, the presentation will start immediately when you open the file.
It is better to always save both .pptx and .ppsx files, it is easier to edit an already created presentation than to create it again.
Now you know how to make a presentation in PowerPoint, use your imagination and remember the basic principles of creation, then all your presentations will be unforgettable.


How to disable ads on Android: remove pop-up ads
The Russian received a term and a million fine for "piracy Negative consequences of the law
Identification of key factors
The criteria for classifying organizations and individual entrepreneurs as small and medium-sized businesses have changed
See what "Royalty" is in other dictionaries Pitfalls of legislation